Best Ways to Fix iTunes Won't Sync Music to iPhone [Proven Methods]
 Updated by Boey Wong / July 05, 2022 15:40
As one of the most popular mobile phones worldwide, iPhone is more than a simple mobile phone for users now. They can listen to music, watch movies, play games, works, and more with their phones anywhere rather than using a computer at home.
Recently, some users keep asking similar questions like music won’t transfer to iPhone, iTunes not syncing new music to iPhone and more. Listening to music is one of the most significant features of the iPhone because of the convenience and audio quality, it can be frustrating if you face this problem.
Actually, they have the same causes and fixes. Here in this post, we will show you all details about it.
![Best Ways to Fix iTunes Won't Sync Music to iPhone [Proven Methods]](/images/ios-transfer/fix-itunes-wont-sync-music-to-iphone.jpg)

Guide List
Part 1. Why iTunes Won't Sync Music to iPhone
You should meet some requirements if you want to sync music from iTunes to iPhone. So, you can also find the possible reasons to cause this error.
1. System Status error.
2. Internet connection failed.
3. Outdated iOS, macOS.
4. Incorrect date and time.
5. You don’t have enough storage on iPhone.
Some of these are some, and situations might differ from various devices. However, you can find the solutions below to fix errors like iTunes won’t sync music to iPhone or others.
Part 2. How to Fix iTunes Won't Sync Music to iPhone
There is always a way if there is a problem. If you want to fix iTunes won’t music to iPhone, you can check the 5 proven and effective methods below.
Option 1. Restart iPhone
Restarting devices can fix most errors with ease. In this case, you can also try restarting iPhone to fix this issue. You have 2 options.
Option 1. Go to Settings > General, scroll down to tap Shut Down button.
Option 2. Use combine buttons to turn off iPhone, then hold the power button to turn it on again.
For iPhone with Face ID: Press and release volume up button and then the volume down button. Hold the power button until you see the slider appears.
For iPhone with home button: Press and hold both home button and power button together until you see the slider.
Option 2. Check System Status
You should check the service in your country or region is still workable or not. If not, you are unable to use the feature anymore.
Open a browser and search Apple system status. Click the check Apple Music carefully.
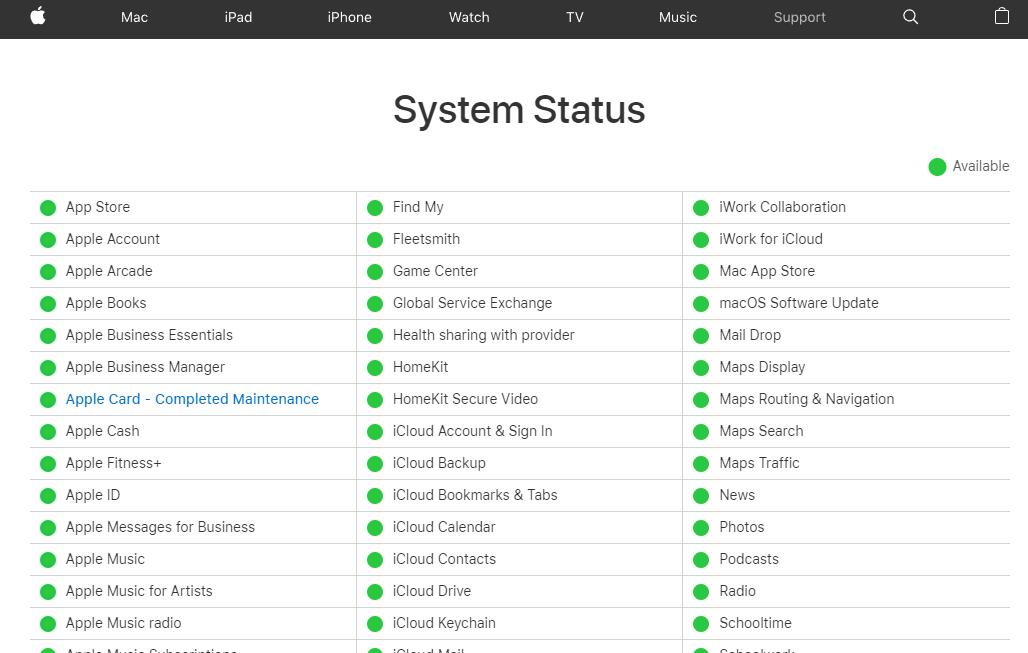
If Apple Music is available here, move to the next solution.
Option 3. Adjust Date and Time
The wrong date and time might cause errors on iPhone. Thus, you should check if your date and time are correct and set them correctly. Here is how to adjust it.
Step 1Go to Settings > General > Date & Time.
Step 2Tap and turn on Set Automatically.
Finally, the iPhone can get the correct time over the network and update for your time zone.
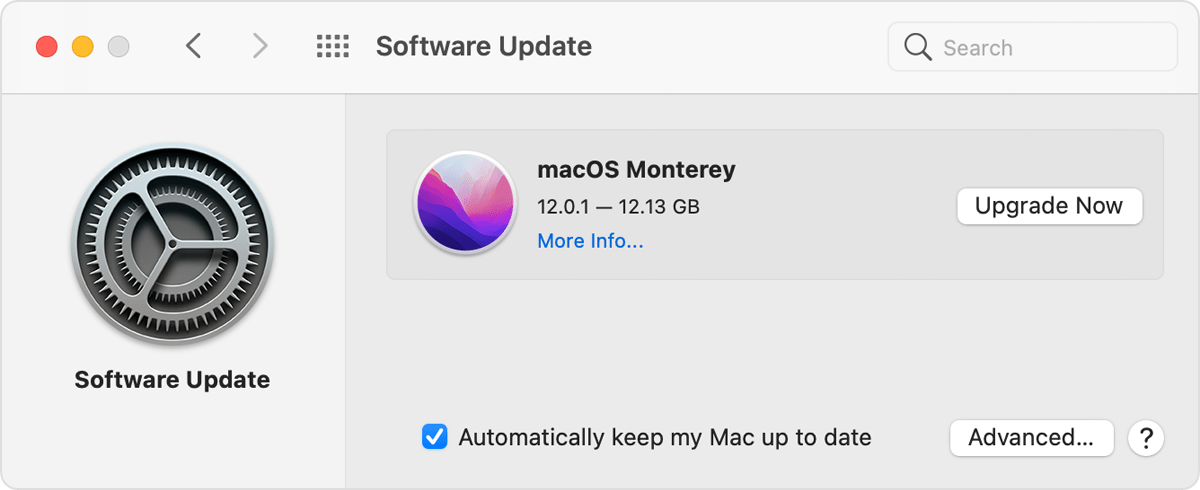
Option 4. Update iOS/macOS/Windows
Apple keeps updating iOS, iPadOS, macOS and others to fix bugs and prevent the most common mistakes on their devices. It is recommended to update your device to the latest version in time. It is helpful to fix some errors like iTunes won't sync music to iPhone and others.
Update iOS: Go to Settings > General > Software Update. And you can also toggle on Automatic Updates to automatically keep your iOS up to date.
Update macOS: Click Apple menu > System Preferences. > Update Now or Upgrade Now.
Update Windows OS: Go to Start > Settings > Update & Security > Windows Update > Check for updates.
Option 5. Clear iPhone Storage
If there is not enough space on iPhone, you won’t able to sync music to iPhone from anywhere. It is time to clear unwanted data from iPhone.
You can go to Settings > General > iPhone Storage to see the data type that takes your storage. Then you can turn on the features of Auto Delete Old Conversations and Offload Unused Apps to free up place on iPhone.
Aside from this, you can also run a third-party tool called FoneEraser for iOS on computer to help you free up iPhone storage.
FoneEraser for iOS is the best iOS data cleaner which can easily erase all contents and settings on iPhone, iPad or iPod completely and permanently.
- Clean unwanted data from iPhone, iPad or iPod touch.
- Erase data quickly with one-time overwriting, which can save you time for plenty of data files.
Here is a demonstration of how to use it.
Step 1Download and install FoneEraser for iOS on computer, connect iPhone.
Step 2Click Free up Space on the left. Click Erase Junk Files. You can also choose other options if you want.
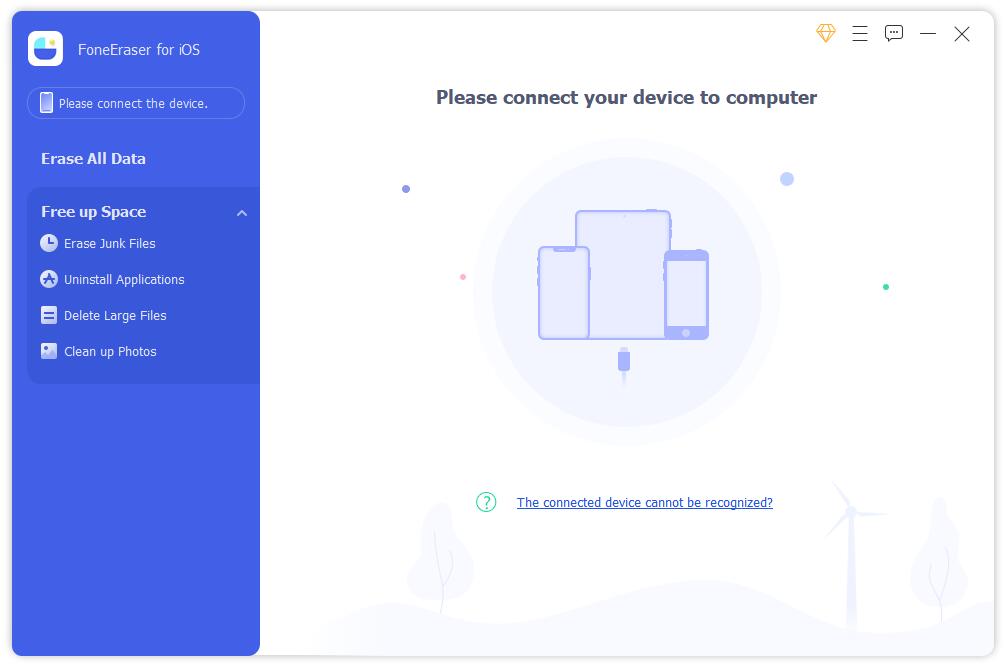
Step 3Check all available data after scanning. Click Erase button.
What’s more, FoneEraser for iOS has 2 modes to help you clear iPhone storage with or without erasing data. You can choose according to your needs.
Option 6. Reset iPhone
Reset iPhone is the final way to fix iPhone issues. You can reset iPhone settings or all content, Reset iPhone settings will never remove data, while resetting all content will erase iPhone data. You should backup iPhone and consider it carefully before doing that. Below are the detailed steps.
Step 1Go to Settings app on iPhone, and tap General.
Step 2Scroll down to tap Transfer or Reset iPhone.
Step 3Tap Reset > Reset All Settings if you don’t want to lose your data. Tap Reset All Content and Settings if you can remove all data from iPhone.
After fixing errors, you should learn the correct steps to transfer music from iTunes to iPhone.
Part 3. How to Transfer iTunes Music to iPhone Effortlessly
Transfer iTunes music is not a difficult task and you can do it through iTunes or FoneTrans for iOS. You can manage all iOS data with iTunes professionally, which is one of the traditional ways to move iTunes data to iPhone.
Option 1. Transfer iTunes Music to iPhone by iTunes
You need to sync all music to iPhone without a specific selection. Below is the tutorial:
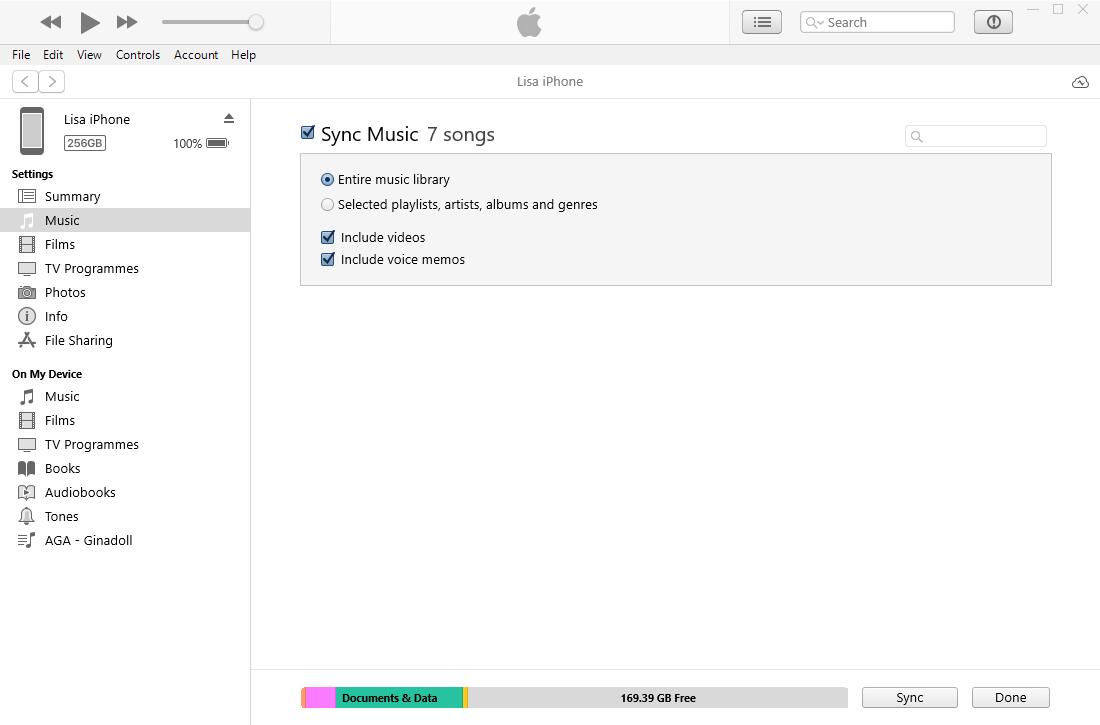
Step 1Run iPhone on computer, and connect iPhone.
Step 2Click device icon and select Music from the left side.
Step 3Check the box near Sync Songs and click the Sync button.
You can also drag and drop music directly if you have enabled the feature to manage music and video manually. Sometimes, you might can’t find what you want. At this moment, you would need FoneTrans for iOS.
With FoneTrans for iOS, you will enjoy freedom to transfer your data from iPhone to computer. You can not only transfer iPhone text messages to computer, but also photos, videos and contacts can be moved to PC easily.
- Transfer photos, videos, contacts, WhatsApp, and more data with ease.
- Preview data before transferring.
- iPhone, iPad and iPod touch are available.
Option 2. Transfer iTunes Music to iPhone by FoneTrans for iOS
FoneTrans for iOS is a powerful program on computer to transfer iPhone photos, videos, contacts, music, message, etc., between computer and device. And you can even manage iTunes data with simple clicks. It is a user-friendly tool for even beginners because it has an interface with clear instructions to show you how to use it.
Step 1Click the Download button and follow the on-screen instructions to install it on computer.
Step 2Run FoneTrans for iOS on computer, click Music from the left of the interface.
Step 3Check the items you want to transfer, click the export to device icon.
Step 4Select your iPhone from the list.
That’s all about how to fix music won’t transfer from iPhone and how to transfer music files correctly through iTunes and FoneTrans for iOS. Each method above is proven and you can quickly try them to do what you want accordingly. Why not try now and enjoy the benefits now!
With FoneTrans for iOS, you will enjoy freedom to transfer your data from iPhone to computer. You can not only transfer iPhone text messages to computer, but also photos, videos and contacts can be moved to PC easily.
- Transfer photos, videos, contacts, WhatsApp, and more data with ease.
- Preview data before transferring.
- iPhone, iPad and iPod touch are available.