Effective Ways to Transfer Photos from iPhone to Computer
 Updated by
 Good day! Could anybody please fill me in on how to transfer a photo from an iPhone to a computer? We recently had a family reunion, and now my iPhone is packed with precious memories I'd love to save on my laptop. The problem is that I'm not very tech-savvy, and I don't want to lose the photos if something happens to my device. I hope you can lend me a hand.
If you're an iPhone user, you may have likely faced the challenge of moving photos to your computer. Whether it's to free up storage, create backups, or simply organize your memories, transferring photos is a common need. Fortunately, Apple provides several built-in methods to make this process effortless, but if you're unfamiliar with them, it can feel a bit overwhelming.
The good news is that you don't need to be an expert to complete the transfer process. From official methods to professional alternatives, you will find a suitable transfer strategy that works best for your iPhone and computer. Each method has its advantages, such as being wireless and convenient. Thus, use your chosen method wisely to view iPhone photos on your computer.


Guide List
Part 1. How to Transfer Photos from iPhone to Computer without USB Cable
When transferring photos or other files from a device to a computer, a USB cable is typically required. But if you use Apple's official transfer method, AirDrop, it will no longer be needed, and you can transfer your desired iPhone photos smoothly. This method is best suited for users of macOS, as both your device and computer are Apple products, offering this exclusive feature. The only requirements are Bluetooth and WiFi, which enable seamless wireless transfer. Apart from that, the best part is that it doesn't require you to learn technical skills. With the help of the guides, you can smoothly store your chosen iPhone pictures on your Mac computer.
Echo the straightforward instructions below to grasp how to transfer photos from iPhone to computer without a USB cable using AirDrop:
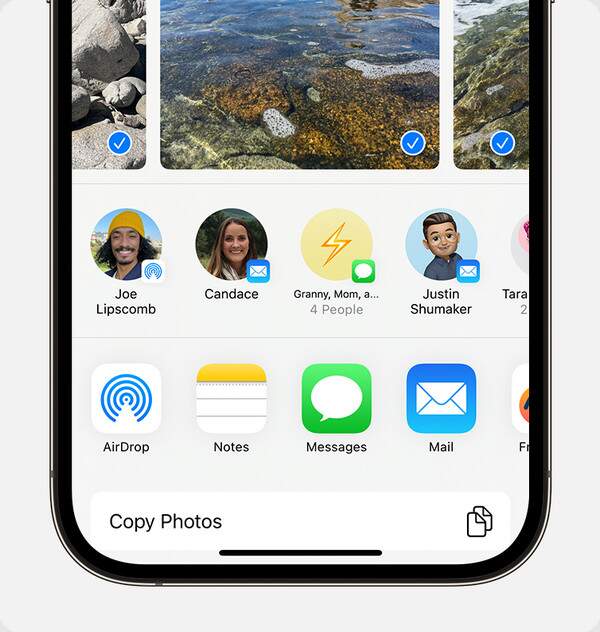
Step 1Initially, turn on the Bluetooth and WiFi features on your iPhone and Mac, then ensure they are nearby. Next, choose the Mac's Control Center to enable the AirDrop symbol.
Step 2Enter your iPhone's Photos app to view and select the images you intend to transfer. After that, hit the Share option and choose AirDrop when the options appear. The active devices, including your Mac, will then appear. Therefore, tap it to transfer your selected photos.
As mentioned, this process is suitable for macOS users, as both iPhone and Mac have a built-in AirDrop feature. However, it won't work if your computer runs Windows, as it doesn't offer the same function. But don't worry. You can also use iCloud to transfer photos, even without a USB cable. You must only enable your Photos app's sync feature with your iCloud account, then log in to it on your computer. The photos will then be there automatically.
Part 2. How to Transfer Photos from iPhone to Computer with USB Cable
Unlike the previous part, the following strategies require a USB cable instead of WiFi and Bluetooth. You don't have to worry about complex processes, though, because they also offer straightforward steps that will allow you to transfer seamlessly. You must only manage your preferred transfer strategy correctly, and your photos will be on your computer in no time.
Method 1. Try FoneTrans for iOS
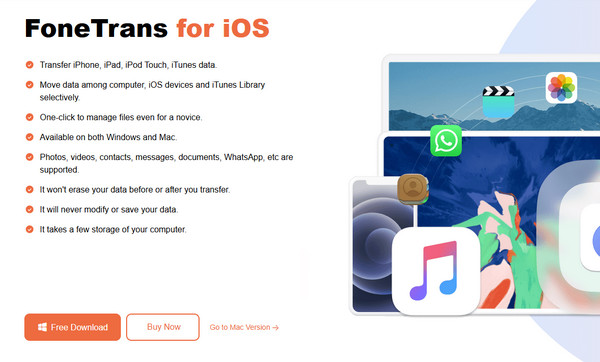
You can find multiple transfer methods or programs on different platforms, but when it comes to overall performance, FoneTrans for iOS is the way to go. We understand how convenient Apple's official solutions are, but sometimes, it is better to rely on a professional and versatile program like this to enjoy more advantages. For instance, it is accessible on multiple computers, whether running macOS or Windows, unlike AirDrop, which is only compatible with Mac.
Meanwhile, the FoneTrans for iOS program's professionalism can be intimidating at first, but we guarantee you don't need to face complex procedures. Even if its performance is advanced, the tool's transfer process remains straightforward, especially since it offers a simple interface. Apart from that, you won't only get to transfer photos with this program. It can also transfer other data types, including contacts, audio, and messages, between iOS devices and computers.
With FoneTrans for iOS, you will enjoy freedom to transfer your data from iPhone to computer. You can not only transfer iPhone text messages to computer, but also photos, videos and contacts can be moved to PC easily.
- Transfer photos, videos, contacts, WhatsApp, and more data with ease.
- Preview data before transferring.
- iPhone, iPad and iPod touch are available.
Perceive the convenient directions below as a model of how to transfer photos from iPhone to computer with a USB using FoneTrans for iOS:
Step 1Spot the FoneTrans for iOS program's Free Download button on its official site, then click it to acquire the installer. The file will be directly in your Downloads folder. When it's ready, launch it and follow the installation instructions. The process will be fast, so click Start when the button appears to start using the transfer tool.
Step 2After that, link the iPhone to your computer using the USB cable, and the device's information will appear on your interface. Additional features will also be in the lower section, but we will focus on the transfer process first. Simply click the Devices tab at the top and choose your connected iPhone. Then, opt for the Photos tab on the left side.
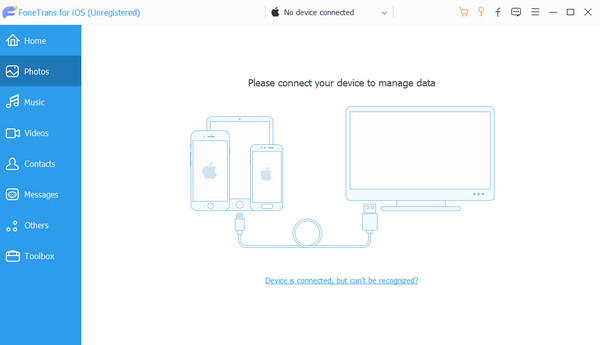
Step 3The interface will immediately exhibit your iPhone's photos, which you can choose from. Select the images you intend to transfer. Once ready, click the computer symbol at the top of the screen to transfer the selected pictures to your computer.
Method 2. Use Microsoft Photos
On the other hand, use Microsoft Photos if you prefer a more traditional way of transferring iPhone photos to a computer. Like before, you will only need a USB cable for connection, and the Photos program will allow your pictures to transfer effortlessly. If you haven't discovered it yet, this program offers an Import option, and it is the necessary function you will need to achieve your transfer goal. This tool works on Windows 10 and 11, and your iPhone doesn't require any special settings, except for the USB cable. Additionally, you can expect a convenient process, as the transfer process is direct, eliminating the need for copying and pasting files.
Bear in mind the stress-free navigation below to determine how to transfer a picture from iPhone to computer using Microsoft Photos:
Step 1Plug your iPhone into your Windows via USB first, then tap Trust when prompted. Next, open the Microsoft Photos tool and select the Import tab on the upper right side of the screen.
Step 2When the program displays your iPhone photos, select the ones you'd like to transfer. Then, choose where you'd like to save them to transfer the pictures to your computer.

Unfortunately, you will only find Microsoft Photos on Windows, so this process isn't as flexible as the previous one. If you use a Mac, choose one of the transfer methods above instead.
Part 3. FAQs about How to Transfer Photos from iPhone to Computer
How do you transfer photos from iPhone to computer in different formats?
Although your photos are in different formats, it's not a problem because the transfer methods above will still work. Hence, rely on them to manage your iPhone images.
Which is the best way to transfer my iPhone photos to the computer?
We recommend FoneTrans for iOS, as it has all the advantages you can enjoy. It offers convenience, broad compatibility, support for various file types, and more.
Allow your iPhone pictures to transfer seamlessly and without issue to your computer using the methods and guidelines provided in this post. This way, you can enjoy viewing, editing, and more on a larger screen.