- Way 1. How to Transfer Voice Memo from iPhone to Computer Using iTunes/Finder/Apple Devices
- Way 2. How to Transfer Voice Memos from iPhone to Computer Using AirDrop
- Way 3. How to Transfer Voice Memos from iPhone to Computer Using iCloud
- Way 4. How to Transfer Voice Memos from iPhone to Computer Using iCloud Drive
- Way 5. How to Transfer Voice Memos from iPhone to Computer Using Email or Messaging
- Way 6. How to Transfer Voice Memos from iPhone to Computer Using FoneTrans for iOS
- Way 7. Comparison of How to Transfer Voice Memos from iPhone to Computer
- Way 8. FAQs about How to Transfer Voice Memo from iPhone to Computer
Best Ways on How to Transfer Voice Memo from iPhone to Computer
 Posted by
 Keeping voice memos is beneficial in more ways than you might think. You may use the Voice Memo app on your iPhone to record class lectures, meetings, phone calls, and more. Furthermore, it would be best to preserve your voice memos in a much more secure location. Moreover, voice memos consume a significant amount of memory and may be the cause of your iPhone's memory shortage. You may use it to transfer voice memos from iPhone to your computer, both with and without iTunes. This procedure is required and is quite beneficial in preventing the loss of voice memos or the overuse of your iPhone's memory space due to voice memos.


Guide List
- Way 1. How to Transfer Voice Memo from iPhone to Computer Using iTunes/Finder/Apple Devices
- Way 2. How to Transfer Voice Memos from iPhone to Computer Using AirDrop
- Way 3. How to Transfer Voice Memos from iPhone to Computer Using iCloud
- Way 4. How to Transfer Voice Memos from iPhone to Computer Using iCloud Drive
- Way 5. How to Transfer Voice Memos from iPhone to Computer Using Email or Messaging
- Way 6. How to Transfer Voice Memos from iPhone to Computer Using FoneTrans for iOS
- Way 7. Comparison of How to Transfer Voice Memos from iPhone to Computer
- Way 8. FAQs about How to Transfer Voice Memo from iPhone to Computer
Way 1. How to Transfer Voice Memo from iPhone to Computer Using iTunes/Finder/Apple Devices
You probably know that iTunes, Apple Devices and Finder are Apple's default data managers if you are an iPhone user. You can manage and sync your data, your voice memos, for instance, as much as you want. On that note, you can use iTunes, Apple Devices or Finder to get voice memos off your iPhone and save them on your computer. Furthermore, both data managers are available and accessible on Mac and Windows.
Steps on How to Transfer Voice Memo from iPhone to Computer via iTunes/Finder/Apple Devices:
Step 1To begin, use a USB cord to connect iPhone to your computer and run iTunes or Finder. If you synced your iPhone with that PC, iTunes, Apple Devices or Finder would recognize it immediately. If not, wait for a notification to appear on your iPhone and hit Trust.
Step 2Click your iPhone's name when it appears in iTunes, Apple Devices or Finder. After that, go to the Sync option. Your voice memos will be visible from there.
Step 3Then, select Copy Voice Memos. This step will start the synchronization and saving process for your voice memos on your PC.
In addition to that, please note that Finder is available on a Mac running macOS Catalina or later. While Apple Devices is on the lateast Windows. On the other hand, iTunes is for Mac running macOS Mojave, an earlier version, or a Windows PC. However, read the methods below to know how to transfer voice memos from iPhone to Mac without iTunes.
Way 2. How to Transfer Voice Memos from iPhone to Computer Using AirDrop
AirDrop is a method to transfer voice memos from iPhone to PC without syncing because you share your voice memos directly to your computer without syncing any backups. Please enable Wi-Fi and Bluetooth on your iPhone and Mac before you begin.
Steps on How to Transfer Voice Memos from iPhone to Mac Without iTunes via AirDrop:
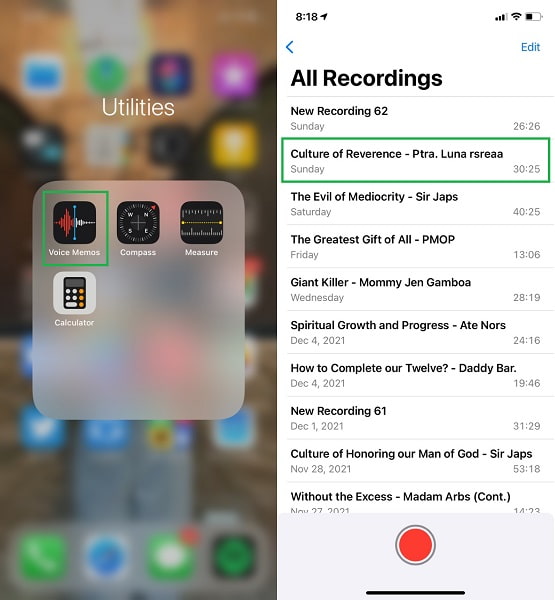
Step 1To begin, open the Voice Memos app on your iPhone and choose the voice memo you want to transfer to your computer.
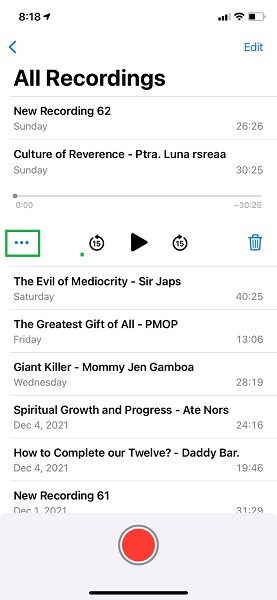
Step 2Second, while the memo you wish to transfer is open, tap the ellipsis menu in the left part of the expanded voice memo.
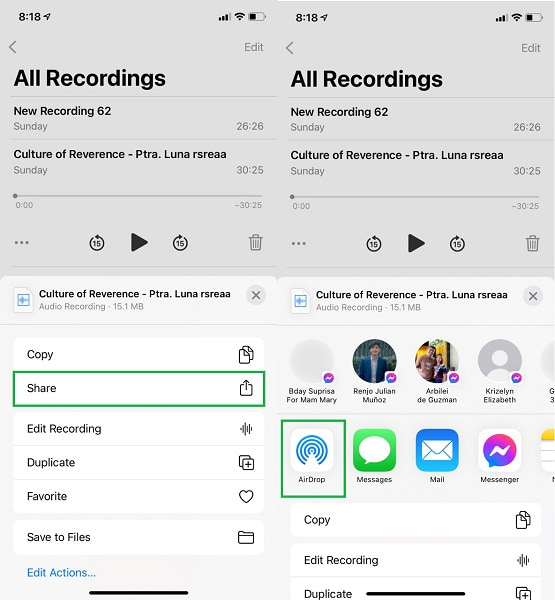
Step 3From the pop-up menu, tap Share, then select AirDrop as your transferring method.
Step 4On the other hand, click Accept on your PC once the notification appears.
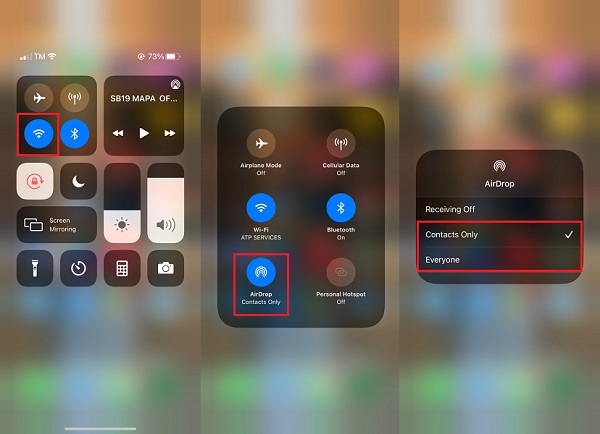
Note: You must first turn on Wi-Fi, Bluetooth, and AirDrop on your iPhone and computer before using this method. Additionally, you must set either Contacts Only or Everyone for both devices.
AirDrop is indeed an easy and quick method of transferring voice memos off your iPhone into a computer. As mentioned above, this method limits how to transfer voice memos from iPhone to Mac without iTunes. That means you cannot use this method if your PC runs a Windows operating system. With that, you must find a way that offers the same efficiency and effectiveness for both Mac and Windows.
Way 3. How to Transfer Voice Memos from iPhone to Computer Using iCloud
If you have enabled iCloud sync feature, you should know that it can also help you sync voice memos on iPhone to Mac. It is pretty easy to do.
On iPhone, go to Settings > [Your Name] > iCloud > Show All and toggle on Voice Memos.
For Mac, open System Settings > [Your Name] > iCloud > See All under Saved to iCloud and turn on Voice Memos. Then go to Voice Memos app on Mac, they will be synced automatically.
Way 4. How to Transfer Voice Memos from iPhone to Computer Using iCloud Drive
What if you have Windows? You can still use iCloud Drive to access voice memos from iPhone.
To transfer a specific voice memo to your computer, first open the Voice Memos app on your iPhone and select the recording you wish to move. Then, tap the three-dot icon, choose Share, and select Save to Files. In the location menu, pick iCloud Drive (or a specific folder within it) and confirm by tapping Save.
Finally, on your computer, go to icloud.com, log in with the same Apple ID, open iCloud Drive, and locate the saved file to download it directly to your computer.
Way 5. How to Transfer Voice Memos from iPhone to Computer Using Email or Messaging
As you can see, you will other other sharing methods in voice memos app on iPhone. Email or Messaging can be one of the best choices you can transfer iPhone voice memos to computer.
Open the Voice Memos app and select the memo you want to transfer, then tap the three dots (…) and choose Share. Next, select Mail, Messages, or another messaging app to send the file to yourself. Finally, open the message or email on your computer to download the file directly.
Way 6. How to Transfer Voice Memos from iPhone to Computer Using FoneTrans for iOS
FoneTrans for iOS is a Mac and Windows-based transferring program from FoneLab. This program is a fantastic data transferring tool that is guaranteed to be effective, safe, and fast when transferring data without reducing the quality. Furthermore, unlike other solutions, this approach does not involve syncing or resetting. It is available on any operating system for your computer.
With FoneTrans for iOS, you will enjoy freedom to transfer your data from iPhone to computer. You can not only transfer iPhone text messages to computer, but also photos, videos and contacts can be moved to PC easily.
- Transfer photos, videos, contacts, WhatsApp, and more data with ease.
- Preview data before transferring.
- iPhone, iPad and iPod touch are available.
Steps on How to Transfer Voice Memos from iPhone to Computer Without iTunes via FoneTrans for iOS:
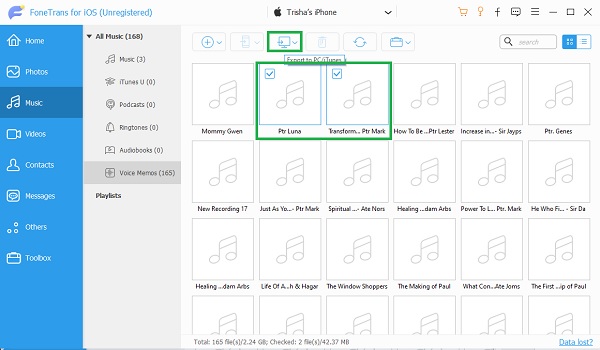
Step 1On your PC, first, download and install FoneTrans for iOS. When the program is successfully installed, it will start immediately. If not, run it manually. Connect your iPhone to the computer with a USB cord after that.
Step 2From the left part of the screen, go to the Music selection. After that, select Voice Memos.
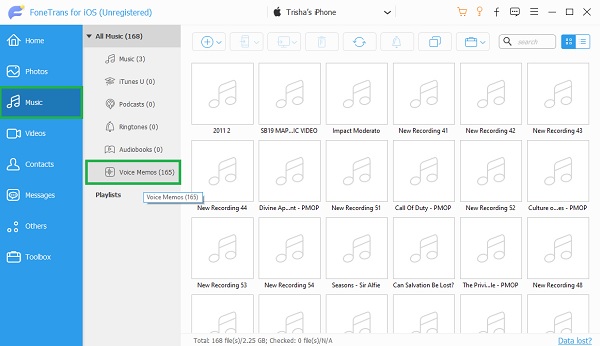
Step 3FoneTrans for iOS now will display all of your iPhone's voice memos in a list. You can add, export, and erase whatever you desire with FoneTrans for iOS. Select the ones you wish to save to your computer and click the Export button.
Way 7. Comparison of How to Transfer Voice Memos from iPhone to Computer
| Comparison Aspect | iTunes/Finder/Apple Devices | AirDrop | iCloud | iCloud Drive | Email or Messaging | FoneTrans for iOS |
|---|---|---|---|---|---|---|
| Speed | Fast (wired connection). | Very fast (Wi-Fi/Bluetooth). | Depends on upload/download internet speed. | Depends on internet speed. | Slow for multiple files; depends on mail service. | Fast (wired USB connection). |
| Internet Required? | No. | No | Yes. | Yes. | Yes. | No. |
| Computer Compatibility | Windows and Mac | Mac only | Mac only | Any computer with a web browser | Any computer with internet and email/messaging access | Windows and Mac |
| Ease of Use | Moderate | Very easy | Very easy | Easy | Easy | Easy |
| Limitations | Wired only; can be less intuitive; may sync/overwrite other media. | Apple ecosystem advantage; not ideal for bulk transfers. | Requires iCloud storage space; deletion on one device deletes everywhere. | Manual step to save each memo to iCloud Drive; uses iCloud storage. | File size limits (usually 25 MB for email); impractical for many files. | Requires installing third-party software; not free for full features. |
Way 8. FAQs about How to Transfer Voice Memo from iPhone to Computer
What format does iPhone Voice Memo use?
On the iPhone, voice memos are saved in the M4A file format. Further, the MPEG-4 codec is utilized when recording a voice memo. While playing back audio files in the iPhone's Voice Memo app, the Advanced Audio Coding (AAC) codec or the Apple Lossless Audio Codec (ALAC) is used. Because the Voice Memo app only records audio, M4A is used instead of MP4.
Can I merge voice memos?
Currently, there is no official way to merge voice memo recordings. But don't feel discouraged. Third-party applications and other options can help you integrate voice memos. You can utilize audio converters or editors like FoneLab Video Converter Ultimate. Also, you can use FoneLab Screen Recorder to record and play your voice memos in order.
Can you upload voice memos to Google Drive?
Yes, you can upload your voice memos to Google Drive. Both iOS and Android devices may upload audio recordings, including voice memos, to Google Drive. To do so, download and install Google Drive on your iPhone, then hit the plus button in the bottom right corner of your screen. Second, press Upload, then navigate to and choose the voice memos you'd like to save to your computer. Third, open Google Drive in your web browser on your computer and log in using the same Google Drive account that you used to upload your voice memos. Finally, choose the voice memos you want to transfer, right-click your mouse, and select Download from the menu.
FoneTrans for iOS is customized for iPhone users to transfer voice memos to computer, export contacts from Outlook to iPhone or transfer other files like photos, videos, ringtones, movies, books, music, SMS, etc.
With all the points given above, it is reasonable to conclude that transferring voice memos from iPhone to computer is both possible and straightforward. You can relax about your voice memos now that you know how to transfer voice memos from iPhone to a computer. Furthermore, knowing that the approach you used is successful and efficient willfully put your mind at ease. With that in mind, we highly recommend FoneTrans for iOS because it includes everything you'll need for transferring. Now is the time to move your voice memos and save them in a safer location while reducing the amount of memory used by your iPhone.
With FoneTrans for iOS, you will enjoy freedom to transfer your data from iPhone to computer. You can not only transfer iPhone text messages to computer, but also photos, videos and contacts can be moved to PC easily.
- Transfer photos, videos, contacts, WhatsApp, and more data with ease.
- Preview data before transferring.
- iPhone, iPad and iPod touch are available.