- Part 1. Find Recently Deleted Photos from iPhone via Recently Deleted Album
- Part 2. Recover Permanently Deleted Photos on iPhone with FoneLab
- Part 3. How to Recover Deleted Photos on iPhone through iCloud
- Part 4. Retrieve Deleted Photos from iPhone Using iTunes/Apple Devices/Finder
- Part 5. Comparison of How to Recover Deleted Photos on iPhone
- Part 6. FAQs about How to Recover Deleted Photos from iPhone
Excellent Ways to Recover Deleted Photos on iPhone Properly
 Updated by
 Can you recover deleted photos on iPhone? I let my niece borrow my device, thinking she would only take pictures. However, after choosing her best shots, she decided to delete the ones she would no longer use, accidentally including some of my essential images as well. Would it be possible to retrieve them? If so, I would greatly appreciate anyone's assistance, so please help. Thanks in advance!
Do you wish to return essential photos on your iPhone? Whether you experienced accidental deletion or you simply want to retrieve the image files, it's not a problem because this article will walk you through the best solutions. It doesn't matter if you're a beginner at navigating iPhone devices or recovering erased files. The parts below will be enough to assist you in retrieving your treasured photos, regardless of how you unintentionally deleted or lost them. So, don't be reluctant to depend on the guides in the following parts.


Guide List
- Part 1. Find Recently Deleted Photos from iPhone via Recently Deleted Album
- Part 2. Recover Permanently Deleted Photos on iPhone with FoneLab
- Part 3. How to Recover Deleted Photos on iPhone through iCloud
- Part 4. Retrieve Deleted Photos from iPhone Using iTunes/Apple Devices/Finder
- Part 5. Comparison of How to Recover Deleted Photos on iPhone
- Part 6. FAQs about How to Recover Deleted Photos from iPhone
Part 1. Find Recently Deleted Photos from iPhone via Recently Deleted Album
Where to find deleted photos on iPhone? The official yet most basic photo recovery method on iPhone is the Recently Deleted Album. Are you aware of the recently deleted feature that Apple devices offer? If not, this is the best time to discover it, as it could save you in many situations. After all, this feature is automatically activated on the iPhone, allowing you to enjoy its advantages, even if you haven't turned it on beforehand. You must only access the designated album, and the iPhone will allow you to recover the deleted pictures it contains without any issues. Meanwhile, the retrieval procedure is also hassle-free; you can return your images smoothly.
Bear in mind the easy navigation below to determine where to find recently deleted photos on iPhone and recover them via the Recently Deleted Album:
Step 1Access your iPhone's Photos app, and when its initial screen appears, hit the Collections button in the lowest section. Then, select Recently Deleted from the Utilities section.
Step 2If asked, use your Face or Touch ID to open the album. The images you recently deleted will then be presented. Thus, select the pictures you intend to recover before tapping the More button. Finally, hit Recover to restore them to your device.
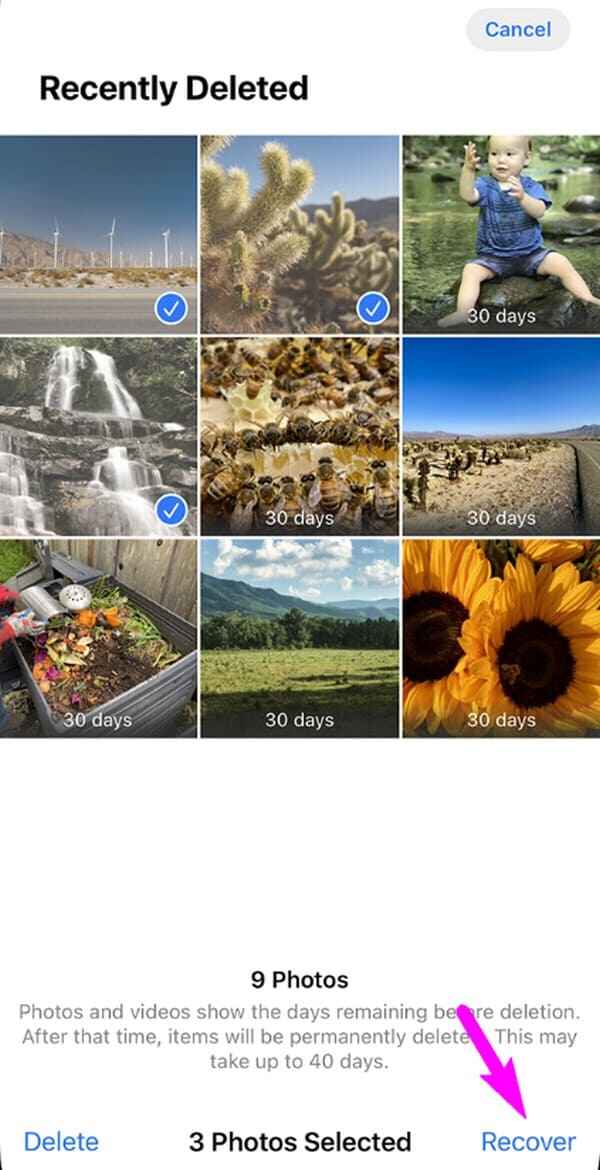
The Recently Deleted album is Apple users' go-to solution for recovering erased photos on their devices, thanks to its convenience and unlimited chances to recover. However, it has a catch. The album contains only the files you have deleted within the last 30 days. Hence, it will no longer be possible to recover those that exceeded the timeframe using this method.
Part 2. Recover Permanently Deleted Photos on iPhone
No worries if the deleted images you wish to recover are already more than 30 days old. Advanced solutions, such as FoneLab iPhone Data Recovery, are still available. Even if you have already erased the files for a while, this professional tool will still be able to help you recover them. Thus, don't hesitate to trust and acquire it on your computer. It won't have a problem returning your photos without limitations. The tool's interface will present you with the deleted images, even those from months ago, effortlessly.
Meanwhile, both Mac and Windows versions of FoneLab iPhone Data Recovery are accessible, and images aren't the only files it allows you to recover. This program can also retrieve videos, music files, WhatsApp, reminders, notes, contacts, and other data types. Thus, keeping it on your computer will be beneficial, especially since it occupies only a small amount of storage space.
With FoneLab for iOS, you will recover the lost/deleted iPhone data including photos, contacts, videos, files, WhatsApp, Kik, Snapchat, WeChat and more data from your iCloud or iTunes backup or device.
- Recover photos, videos, contacts, WhatsApp, and more data with ease.
- Preview data before recovery.
- iPhone, iPad and iPod touch are available.
Determine the worry-free directions below as a pattern of how to retrieve deleted photos on iPhone with FoneLab iPhone Data Recovery:
Step 1Navigate toward FoneLab iPhone Data Recovery's site. A Free Download tab will be available, prompting you to click it and download the installer. Then, when the file is ready in your Downloads, launch it to set up the prompts and install the recovery program. Once Start appears, select it.

Step 2Select the iPhone Data Recovery option when the interface appears. It will then instruct you to attach your iPhone, which you can do using a Lightning cable. Once the tool detects the device, a "Start Scan" tab will be displayed, so select it to allow the program to read and display your data.

Step 3Meanwhile, your iPhone content will be categorized. You must only view the categories under Media in the left column to find the pictures you may recover. Once found, mark them and proceed to the Recover selection at the bottom right to retrieve your chosen image files.

Part 3. How to Recover Deleted Photos on iPhone through iCloud
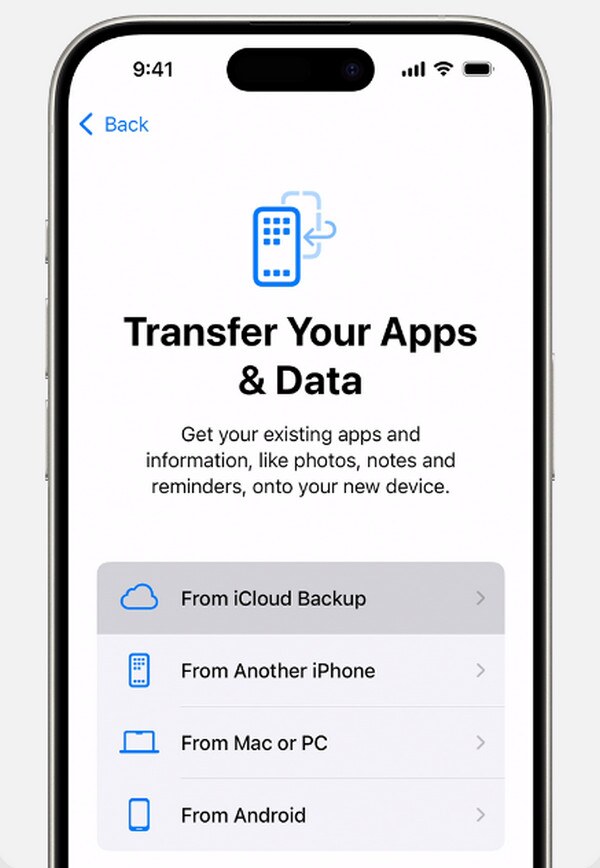
The iCloud backup feature is also helpful for restoring deleted photos from your iPhone. After all, a backup's primary purpose is to keep a copy of important files to ensure you won't lose them, even after unintentional deletion, unwanted format, etc. So, if you have enabled this iCloud feature on your iPhone, returning the deleted photo from your device won't be a problem. However, please be aware that, unlike the previous solutions, this recovery method has a significant condition that you must consider. Before you can restore your iCloud backup, it is essential to perform a reset, which will erase all data on your device first. It is strongly recommended to backup your iPhone data.
Mirror the uncomplicated steps below to retrieve deleted photos on iPhone through iCloud backup:
Step 1First, perform a reset through the iPhone Settings app's General section. Simply tap Transfer or Reset iPhone, then pick Erase All Content & Settings on the subsequent screen.
Step 2After a successful reset, let your iPhone restart and manage the initial setups. After reaching the Transfer Your Apps & Data screen, choose From iCloud Backup, then navigate through the succeeding prompts to recover the image you intend to return.
Whats' more, you can also try the iCloud sync feature to restore iPhone photos from iCloud rather than the complete backup file. Similarly, you should have enabled this feature through Settingss > your profile > iCloud > Photos. And now, you can also go to the same path to turn on the syncing feature for photos to retrieve deleted photos on iPhone.
As you can see, you can only restore your erased photos through iCloud if you have enabled the feature beforehand. Therefore, we highly recommend the prior solution if you don't have a backup available on your iCloud for your iPhone due to the deactivated backup feature, as it can help you better. Meanwhile, iTunes and Finder also offer a backup function you can try.
Part 4. Retrieve Deleted Photos from iPhone Using iTunes/Apple Devices/Finder
If you are one of the users don't like an online option to backup your data, Apple backups on computer can help you. You can try iTunes on earlier Windows and macOS. And now you can find Apple Devices app on Windows and Finder on Mac to restore your iPhone photos.
3 of them have similar steps to restore deleted photos from iPhone. Please move to the below instructions.
Connect iPhone to computer and run iTunes/Apple Devices/Finder. Choose your device from the left panel and click Restore Backup button after detection. Click Restore when it pops up for confirmation.
Part 5. Comparison of How to Recover Deleted Photos on iPhone
| Method | Recovery Source | Time | Requirements | Limitations |
|---|---|---|---|---|
| Recently Deleted Album | iPhone's temporary storage | 30 days after deletion | • iPhone itself • Photos deleted within 30 days |
• Automatic permanent deletion after 30 days • Album can be manually emptied |
| FoneLab | iPhone's raw storage | Until overwritten by new data | • Computer (Windows/Mac) • USB cable • iPhone connection |
• Can't recover if storage was overwritten |
| iCloud | iCloud/Sync feature | Depends on backup timing | • iCloud backup/synced photos exists • May need to erase iPhone |
• Need sufficient iCloud storage |
| iTunes/Apple Devices/Finder | Local computer backup | Depends on backup timing | • Previous local backup exists • Computer with backup • May need to erase iPhone |
• Restores entire backup • Backup must not be encrypted if password forgotten • Not selective recovery |
Part 6. FAQs about How to Recover Deleted Photos from iPhone
Can I recover permanently deleted photos iPhone?
Yes, you can. FoneLab iPhone Data Recovery can still retrieve your deleted image files, even if they have already been permanently erased from your iPhone.
Do deleted pictures stay on iCloud if synced?
No, they don't. If you have synced the photos, those you erase from your iPhone will also disappear from iCloud unless they are still available in the Recently Deleted folder. However, if you're referring to the iCloud backup, then yes, they will stay.
Image deletion, whether or not intentional, happens once or more times in a person's life. That's why devices offer built-in solutions, such as Recently Deleted. However, it has significant limitations that could prevent users from recovering their photos. Fortunately, you have alternatives like FoneLab iPhone Data Recovery to rely on, ensuring your images will be recovered. Install it to enjoy the advantages.