- Part 1: Sync Notes from iPhone to Mac with iTunes
- Part 2: Sync Notes from iPhone to Mac with Finder
- Part 3: Sync Notes Between from iPhone to Mac with iCloud
- Part 4: Sync Notes from iPhone to Mac with Airdrop
- Part 5: How to Sync Notes from iPhone to Mac without iCloud via Email
- Part 6: How to Transfer Notes from iPhone to Mac without iCloud through Mac FoneTrans for iOS
- Part 7: FAQs About Sync Notes from iPhone to Mac
How to Sync Notes from iPhone to Mac: 6 Most Convenient Techniques
 Posted by Lisa Ou / Mar 04, 2022 13:30
Most of the time, we keep a record of different information in our notes. So, we will easily find them in the future, especially when we need them. There are maybe times that you want to view them on a Mac for a bigger screen. Or you might need to backup them up on your Mac. Another thing could be your notes had piled up so much, therefore, it is necessary to sync or backup them in a place like a Mac. But the question is, how can you sync or transfer your notes from iPhone to Mac? Well, there are many ways to do this. And so, today, we will teach you and share 6 helpful techniques to sync your notes from iPhone to Mac.
With FoneTrans for iOS, you will enjoy freedom to transfer your data from iPhone to computer. You can not only transfer iPhone text messages to computer, but also photos, videos and contacts can be moved to PC easily.
- Transfer photos, videos, contacts, WhatsApp, and more data with ease.
- Preview data before transferring.
- iPhone, iPad and iPod touch are available.


Guide List
- Part 1: Sync Notes from iPhone to Mac with iTunes
- Part 2: Sync Notes from iPhone to Mac with Finder
- Part 3: Sync Notes Between from iPhone to Mac with iCloud
- Part 4: Sync Notes from iPhone to Mac with Airdrop
- Part 5: How to Sync Notes from iPhone to Mac without iCloud via Email
- Part 6: How to Transfer Notes from iPhone to Mac without iCloud through Mac FoneTrans for iOS
- Part 7: FAQs About Sync Notes from iPhone to Mac
Part 1. Sync Notes from iPhone to Mac with iTunes
One of the well-known applications that can sync files between iOS devices and computers is iTunes. Users can play and organize their data and even backup their important files with it. If you want to sync your notes from iPhone to Mac using iTunes, it is also possible. Also, iTunes is pre-installed on every Mac, so there is no need for you to download and install it. Now, here are the following steps that you can follow.
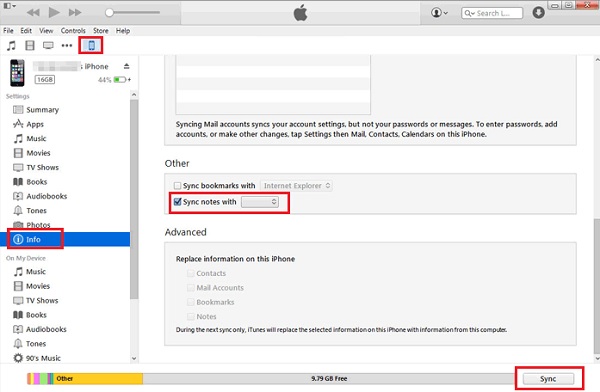
Steps on How to Sync Notes from iPhone to Mac with iTunes:
Step 1First and foremost, launch the iTunes app on your Mac.
Step 2Then, connect your iPhone to your Mac using USB cables.
Step 3Next, click your device icon on the top-left menu bar on the main interface.
Step 4After that, you’ll see all the contents on your iPhone on the left sidebar. Simply click the Info option.
Step 5Finally, put a checkmark on the box beside the Sync Notes with under the Other section. And click the Sync button at the left-bottom corner, and your notes will be synced on the Mac.
That’s it! If you have an earlier version of operating systems for Mac, such as macOS Mojave, this method is applicable for you. However, this method is no longer available for the later versions of macOS. With that, you can see the following method that will work on your updated Mac in the next part of this post.
With FoneTrans for iOS, you will enjoy freedom to transfer your data from iPhone to computer. You can not only transfer iPhone text messages to computer, but also photos, videos and contacts can be moved to PC easily.
- Transfer photos, videos, contacts, WhatsApp, and more data with ease.
- Preview data before transferring.
- iPhone, iPad and iPod touch are available.
Part 2. Sync Notes from iPhone to Mac with Finder
If you are using updated operating system versions of Mac, you can use the Finder app instead. It is a tool that allows you to find whatever you are looking for instantly on your device. It also enables you to access all your content on your device and iPhone as iTunes does. Finally, you can sync your notes here as well. Do you want to know how? See and follow the given steps below.
Steps on How to Sync Notes from iPhone with Finder:
Step 1To begin, launch the Finder app on your Mac.
Step 2After that, connect your iPhone device to the Mac using a USB cord.
Step 3Then, select your iPhone’s name on the left pane of the main interface.
Step 4Lastly, on the menu bar, click the Info option. And tick the box beside the Sync Notes. And that’s it!
Now, you have finally synced your notes from your iPhone to Mac using Finder. The process is just the same with iTunes because both of them have the similar interface as well as functions. iPhone users are aware of iCloud and what it can do, but can you also sync or store your notes there? Find it out as you move on to the next part.
Part 3. Sync Notes Between from iPhone to Mac with iCloud
A lot of users knew what iCloud is. It is a cloud and storage syncing service. And definitely, you can sync your notes from your iPhone and access them on other devices. Indeed a helpful way to backup your data from your Apple device. However, using this, you only have limited notes that you can store on your iCloud, for it just gives 5 GB free of iCloud storage. So, here’s how to sync your notes using this method.
Steps on How to Sync Between iPhone to Mac with iCloud:
Step 1First of all, go to the Settings of your iPhone. Then, tap [your name].
Step 2Next, tap the iCloud option.
Step 3Then, scroll down until you find the Notes and toggle it on.
Step 4After that, on your Mac, go to the System Preferences and log in to the same iCloud. At last, all your notes will be synced from your iPhone to Mac.
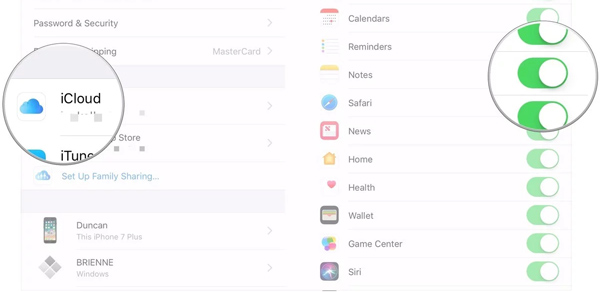
There you go! Note that you can also turn the iCloud Notes to your Mac. To do that, go to System Preferences > Apple ID > iCloud, lastly, tick the box next to Notes. Now, you have synced your notes. But, always remember that you only have a limited iCloud storage space, and you are uable to choose which notes can be synced accordingly.
Part 4. Sync Notes from iPhone to Mac with Airdrop
Instead of using your iCloud to sync your notes, you can just transfer them from your iPhone to Mac. In that sense, you also have your notes on both iPhone and Mac. You can select the notes you want to keep and backup by sending them to your Mac using the Airdrop. And this is how you do it.
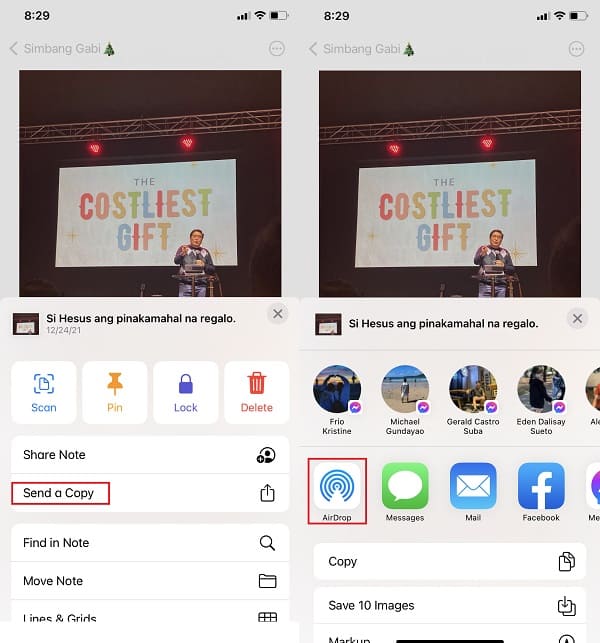
Steps on How to Sync Notes from iPhone to Mac with Airdrop:
Step 1Firstly, on both iPhone and Mac, turn on the Airdrop. But, you can also open your Notes, select notes, tap the three-dot icon Send a Copy > Airdrop. And it will automatically turn on your Airdrop on your iPhone.
Step 2Next, select the Mac or its name as a recipient of the notes you are sharing.
Step 3Then, a message will pop up on your Mac, and simply tap the Accept option to add and save the item on your Mac.
Step 4Finally, check it by going to the Notes app on your Mac. And that’s it!
You have your Notes stored on your Mac through the Airdrop feature now. If you want another way to transfer your essential notes from your iPhone to Mac, check it out in the next part.
With FoneTrans for iOS, you will enjoy freedom to transfer your data from iPhone to computer. You can not only transfer iPhone text messages to computer, but also photos, videos and contacts can be moved to PC easily.
- Transfer photos, videos, contacts, WhatsApp, and more data with ease.
- Preview data before transferring.
- iPhone, iPad and iPod touch are available.
Part 5. How to Sync Notes from iPhone to Mac without iCloud via Email
Another way to sync notes from your iPhone to Mac is through Email or using your Google Gmail Account. Do not worry. It is allowed and still working these days. You’ll simply enable this option on the Settings, on Mac or iPhone. See and follow the instruction below to know how it is done.
Steps on Enabling Notes Sync for Gmail on iPhone:
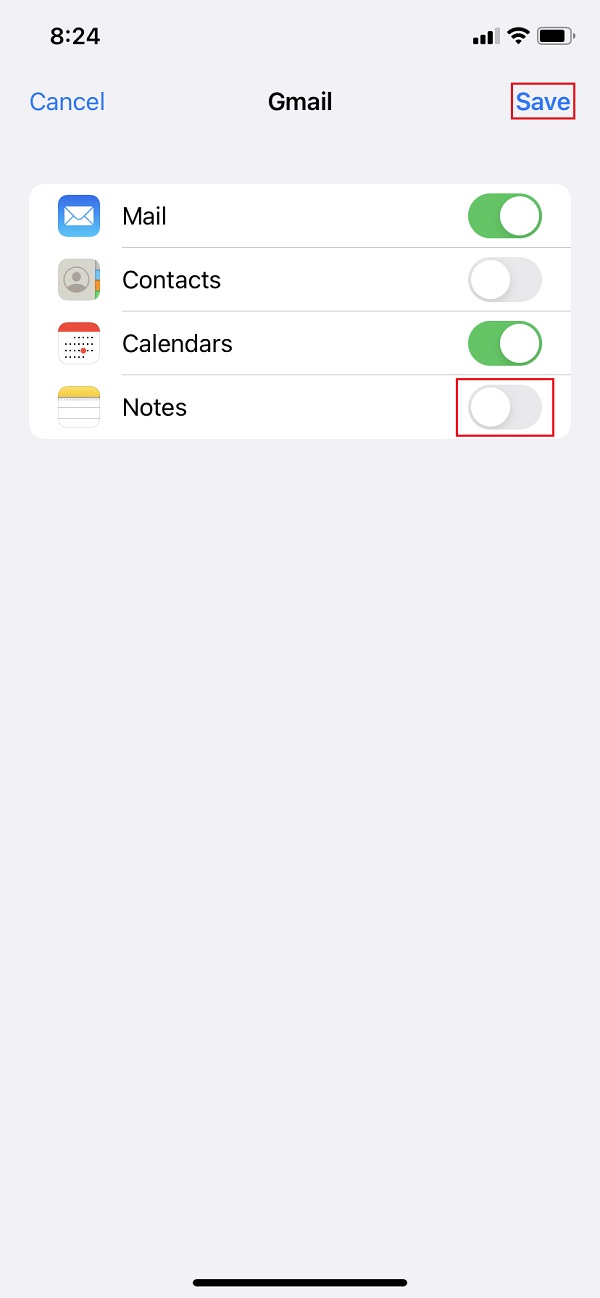
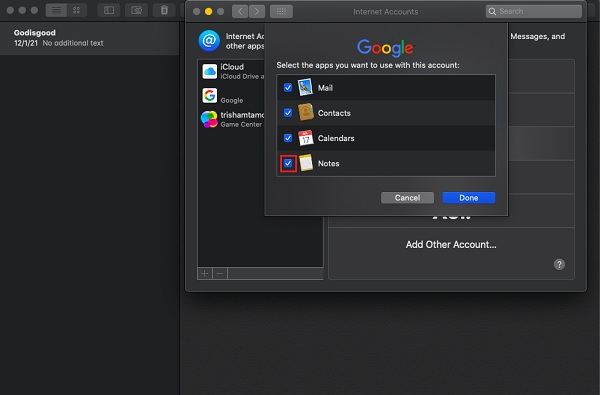
Step 1To start with, go to the Settings app on your iPhone.
Step 2Then, scroll down and search for the Mail options and tap it.
Step 3Next, tap the Accounts then Gmail option. If you haven’t yet added a Gmail account, attach one by tapping the Add Accounts > Sign in to your Google account buttons.
Step 4Finally, toggle on the Notes option and click the Save button.
Steps on Enabling Notes Sync for Gmail on Mac:
Step 1First, launch the Notes app on your Mac.
Step 2Next, click the Notes in the menu bar.
Step 3Then, click the Finder > Accounts > Google and log in to your account.
Step 4Lastly, tick the box next to Notes. And that’s it!
Now, whatever you keep on your Notes, all will be synced on your email or Gmail Account. If you are still not satisfied with this method, you can try using the best transferring tool that you will ever have. Move to the next part of this post to see the highly-recommended tool.
Part 6. How to Transfer Notes from iPhone to Mac without iCloud through Mac FoneTrans for iOS
In transferring notes from your iPhone to Mac, you can use Mac FoneTrans for iOS. A professional iOS notes transfer tool for Mac and Windows users. In fact, you can move all types of data from your iPhone to Mac using this program. Moreover, you can also utilize this to backup your device data files. What’s more interesting, you can move your files, including the notes, selectively from your iPhone device to Mac. It is a perfect tool that can assist you with your transferring necessities. Now, start transferring your notes by following the given detailed steps below.
With FoneTrans for iOS, you will enjoy freedom to transfer your data from iPhone to computer. You can not only transfer iPhone text messages to computer, but also photos, videos and contacts can be moved to PC easily.
- Transfer photos, videos, contacts, WhatsApp, and more data with ease.
- Preview data before transferring.
- iPhone, iPad and iPod touch are available.
Steps on How to Transfer Notes from iPhone to Mac with iCloud:
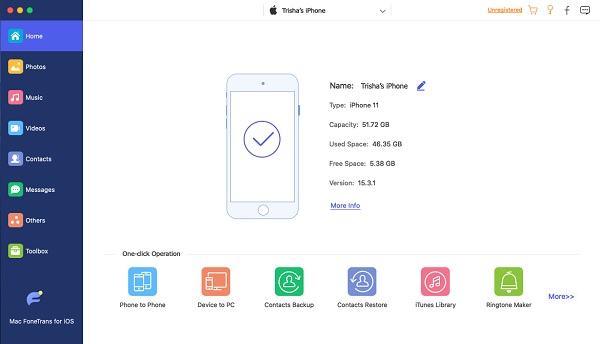
Step 1Before all else, download and install the tool Mac FoneTrans for iOS on your Mac by visiting its official website. By dragging the tool’s icon to the Applications folder icon, install it. And open it.
Step 2Afterward, connect your iPhone to your Mac using a USB cable. Then, the tool will automatically detect your device and show you your iPhone's basic information.
Step 3Next, on the left pane of the main interface, click the Others option. From then, you’ll see the Notes option on the second-left column.
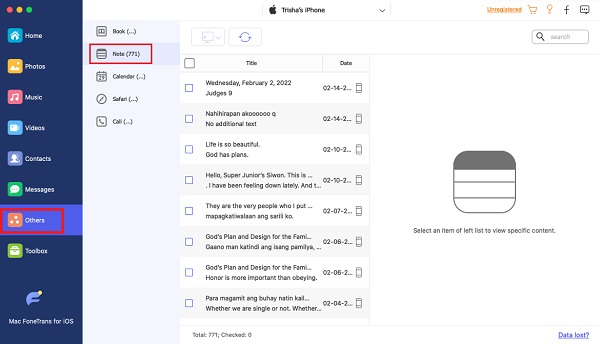
Step 4Then, start selecting the notes that you wish to transfer or sync on your Mac. Put a checkmark on the box of the notes.
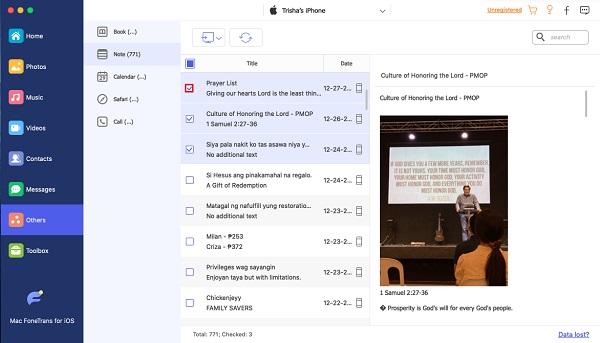
Step 5Finally, click the Export to icon and choose what type of file you want to save the notes Export to Mac option on the drop-down. And the notes will be automatically saved on your Mac. That’s it!
And this way can also be used to sync notes from Mac to iPhone. There are more things that you can do using the FoneTrans for iOS. With that, we earnestly suggest you use the tool for your needs.
Part 7. FAQs About Sync Notes from iPhone to Mac
1. How to sync notes from Mac to iPhone?
To sync your important notes from Mac to iPhone, open the System Preferences from your Mac dock. Then, tick the Apple ID and log in to your account. Finally, click the box next to Notes from the listed applications to sync. And FoneTrans for iOS is recommended for its simple steps.
2. Why can't I sync my notes from iPhone to Mac?
There are various reasons why you can't sync notes from your iPhone to Mac according to which method you are used to do it: 1. The Apple ID account is not the same. 2. The notes are stored locally on your iPhone. 3. Disable iCloud for Notes. That is why make sure that you check this, so you will not have an issue in syncing your notes.
With FoneTrans for iOS, you will enjoy freedom to transfer your data from iPhone to computer. You can not only transfer iPhone text messages to computer, but also photos, videos and contacts can be moved to PC easily.
- Transfer photos, videos, contacts, WhatsApp, and more data with ease.
- Preview data before transferring.
- iPhone, iPad and iPod touch are available.
To sum it up, you can sync and transfer your notes from iPhone to Mac effectively using the 6 methods mentioned. Do not worry. All of these techniques are still working, and you can try one of them or some or all of them. Yet, we highly recommend Mac FoneTrans for iOS, try and we guarantee you that it can surely help you in so many ways. Hence, it is still your choice.