iPhone Data Recovery
 iOS System Recovery
 iOS Data Backup & Restore
 iOS Unlocker
 iPhone Password Manager
 Location Changer
 Android Data Recovery
 Broken Android Data Extraction
 Android Data Backup & Restore
 Android Unlocker
 FoneTrans for iOS
 iPhone Data Eraser
 iPhone Cleaner
 HEIC Converter
 HyperTrans
 WhatsApp Transfer for iOS
 Mac Sweep
 Data Retriever
 Mac Data Retriever
 Video Converter Ultimate
 Screen Recorder
 Phone Mirror
 Recover PC Data Now
Recover the lost/deleted data from computer, hard drive, flash drive, memory card, digital camera and more.
Windows Search Bar Not Working: Eminent Fixes with Guide
 Updated by
 Is your search bar on Windows not working? Among the features on a computer, it may not be the most prominent, but once it malfunctions, the impact is significant. It can leave you unable to find files, apps, or system settings, especially when they are buried deep within the computer. Hence, whether you're a professional chasing a deadline or just a casual user trying to open a program, a dysfunctional search bar could cause unnecessary, disruptive delays.
Fortunately, most search bar failures stem from minor software conflicts, corrupted system files, and similar issues, which can be resolved with a few reliable fixes. From restarting essential Windows services to running built-in troubleshooters, the solutions can be performed by users of all skill levels. All you need to do is understand them and choose the method that best suits your search bar’s situation. Hence, browse the fixes we’ve provided to get the feature working again.


Guide List
Part 1. Immediate Triage
Below are the quickest, least invasive fixes you can try first. They require no advanced knowledge and take less than a minute each, so you may treat them as quick fixes to resolve the problem instantly.
Option 1. Restart the SearchHost.exe Process via Task Manager
The first option to try is restarting the SearchHost.exe process in Task Manager. Sometimes this process freezes or crashes without your knowledge, making the search interface unresponsive. So, by manually ending and restarting it in Task Manager, you give the search function a fresh start, just like rebooting a device. It is the quickest solution available, as it targets the specific background process that powers the search bar itself.
Follow the steps below to handle your Windows Explorer Search not working by restarting the SearchHost.exe process via Task Manager:
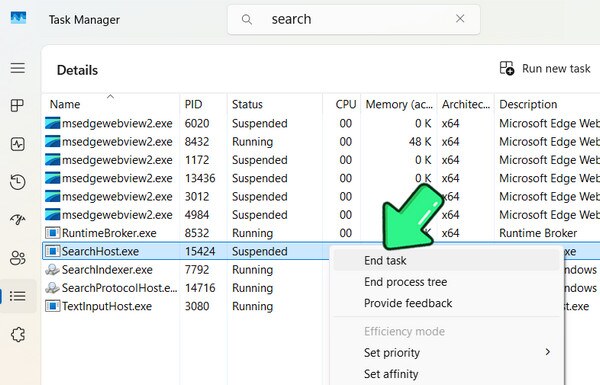
Step 1Press Ctrl + Shift + Esc to initialize Task Manager instantly, then go to the Details tab. From there, scroll down to find SearchHost.exe.
Step 2Once found, right-click on it and select End Task. Then, click End Process in the pop-up, and the search bar will automatically restart itself within a few seconds.
Option 2. Check the Windows Search Service in Services.msc
Additionally, checking the Windows Search Service in Services.msc ensures that the main background service that handles all searching is actually running. This service is sometimes turned off without you realizing it due to Windows updates, power-saving settings, or third-party tools that mistakenly mark it as unnecessary. As a result, it stops the search bar from working entirely. Hence, a quick check helps you confirm whether it's running or turned off.
Follow the instructions below to resolve a Windows search bar not working by checking the Windows Search Service in Services.msc:
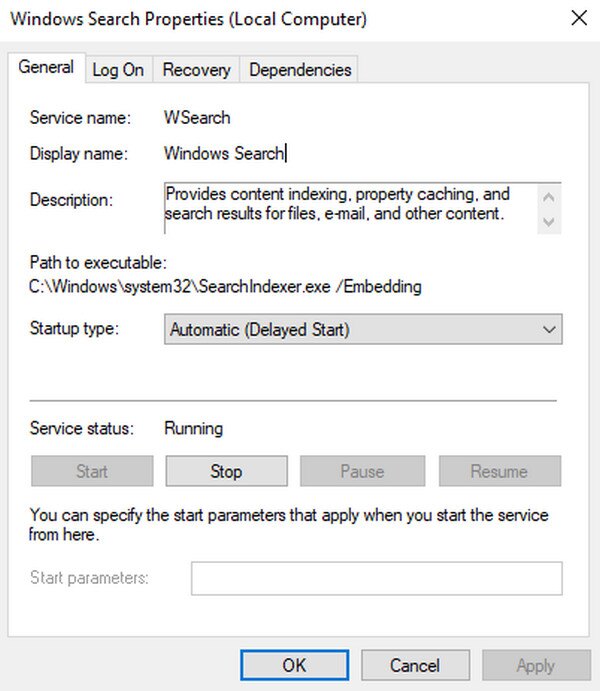
Step 1Press Windows + R to initialize the Run dialog, then enter services.msc. After that, scroll down and find Windows Search in the list, then double-click it to select it.
Step 2When the designated dialog box appears, ensure the Startup type is set to Automatic and the Service status is “Running.” Once ready, select Start > OK.
Part 2. Deep Diagnostics
If the quick fixes didn't work, it's time to dig a little deeper. The following methods target underlying system issues that aren't as obvious and take more time to run. However, they are also more effective at resolving search bar issues that persist after simple restarts.
Method 1. Rebuild the Search Index
The search index is a master catalog that Windows uses to find your files instantly. Over time, this catalog can get outdated or corrupted, especially after large file moves, system updates, or improper shutdowns. When that happens, your searches will show no results or miss files you know exist. Rebuilding the search index will help force Windows to wipe the old catalog, creating a fresh, accurate index that restores the search bar’s proper function.
Follow the procedure below to repair a Windows Search not working by rebuilding the Search Index:
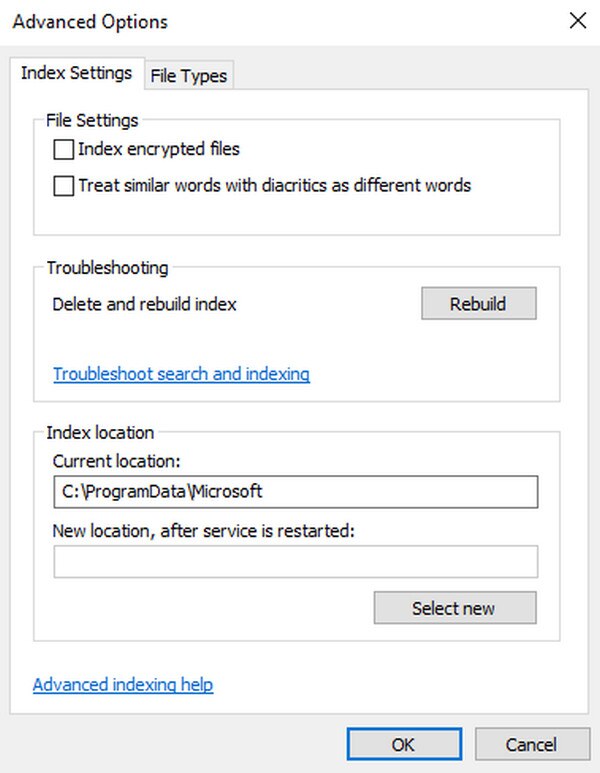
Step 1Open the Control Panel and browse the list for the Indexing Options. When found, click it, then choose the Advanced button at the bottom.
Step 2In the dialog box that appears, click Rebuild under Troubleshooting, then click OK.
Method 2. Use SFC and DISM
SFC and DISM are two built-in Windows tools you can run from the command line to repair damaged system files. SFC scans and replaces any corrupted or missing Windows files with fresh copies, while DISM goes deeper by repairing the underlying system image that Windows relies on to function properly. So, running them ensures your operating system's core files are okay, which can resolve search bar issues caused by deeper system corruption.
Follow the process below to fix the search bar on Windows not working using SFC and DISM:
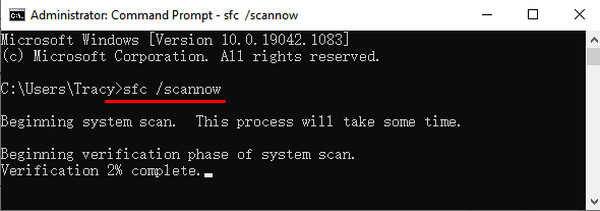
Step 1Enter DISM /Online /Cleanup-Image /RestoreHealth on the Command Prompt interface that has been launched as an administrator and wait for it to complete.
Step 2Once DISM finishes, run sfc /scannow this time, then wait for the scan to finish.
Part 3. Comparison Table: Which Fix Should I Try First?
| Method | What It Does | How Long Does It Take | Ease of Use |
| Restart SearchHost.exe | Restarts the search bar process to fix temporary freezes | A few seconds | Very Easy |
| Check Windows Search Service | Ensures the main search engine service is running | 1–2 minutes | Easy |
| Rebuild Search Index | Creates a fresh file catalog for accurate searches | 15–60+ minutes (depends on file count) | Medium |
| Use SFC and DISM | Repairs corrupted system files behind the scenes | 10–30 minutes | Medium |
Part 4. Use FoneLab Data Retriever If You Lose Data
As you can see, repairs range from simple to advanced methods, and if something goes wrong during the process, you may lose files in the blink of an eye. The good news is that recovery is still possible. Instead of getting disheartened, we suggest you focus on bringing back your data, such as photos, audio, documents, etc., with FoneLab Data Retriever.
This program offers hassle-free Windows data recovery, and you don’t even have to be an expert to navigate its functions. Whether you have lost your files due to corruption, disk damage, formatting, a virus attack, or other causes, it’s not a problem because FoneLab Data Retriever will still allow you to recover data from Windows or Mac with ease.
Follow the directions below to bring your data back with FoneLab Data Retriever:
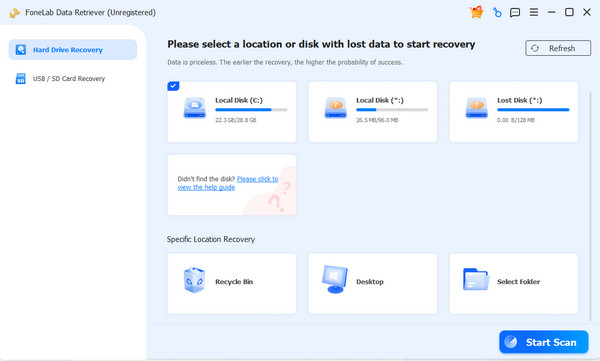
Step 1Download FoneLab Data Retriever and use that saved copy of the file to install the program. When the Start button appears, click it to open the program, then choose your disk on the initial interface. Afterward, tick Start Scan to proceed.
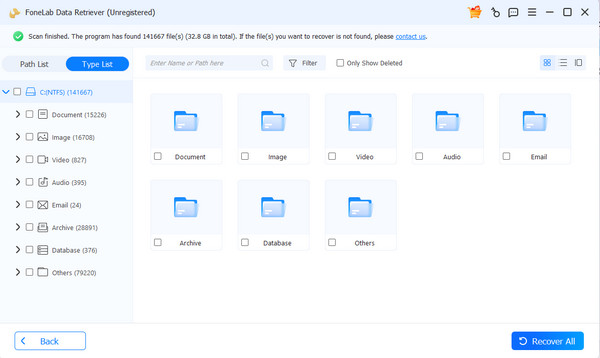
Step 2The folders for different data types will welcome you on the results interface. Open them as needed to find and select the required data, then check the checkboxes. After you’re done selecting, it’s time to select Recover All for file restoration.
Part 5. FAQs about Windows Search Bar Not Working
Does rebuilding the Search Index delete my files?
No, it doesn’t. It only recreates the catalog Windows uses to find your files, not touching your actual files.
Will restarting my computer fix the search bar?
It’s not an official solution, but yes, it sometimes can. After all, a simple reboot can clear temporary glitches and restart background services.
A broken Windows search bar is frustrating, but with these simple fixes, you can almost always get it working again without any technical expertise. Besides, FoneLab Data Retriever is there if you're worried about your files.