- Part 1. How to Recover Files Deleted from Recycle Bin with Shortcut Key Commands
- Part 2. How to Recover Deleted Files from Recycle Bin with Restore Command
- Part 3. How to Recover Deleted Files from Recycle Bin After Empty with Previous Version
- Part 4. How to Recover Deleted Files from Recycle Bin with FoneLab Data Retriever
- Part 5. FAQs about How to Recover Files Deleted from Recycle Bin
Recover the lost/deleted data from computer, hard drive, flash drive, memory card, digital camera and more.
How to Recover Deleted Files from Recycle Bin in 4 Easy Ways
 Updated by
 The Recycle Bin tool on your Windows also serves as a safety net for the files it contains. For example, if you accidentally delete a file from your Windows computer, the Recycle Bin can easily retrieve it. It does not modify the retrieved files, as it restores them to their original form. However, some individuals are not yet familiar with how this tool works.
Are you interested in how you can recover deleted files from Recycle Bin? Take this article as your reference! It will show you 4 quick ways to recover the files from your Recycle Bin. Kindly continue reading and scrolling in this post to see more information.


Guide List
- Part 1. How to Recover Files Deleted from Recycle Bin with Shortcut Key Commands
- Part 2. How to Recover Deleted Files from Recycle Bin with Restore Command
- Part 3. How to Recover Deleted Files from Recycle Bin After Empty with Previous Version
- Part 4. How to Recover Deleted Files from Recycle Bin with FoneLab Data Retriever
- Part 5. FAQs about How to Recover Files Deleted from Recycle Bin
Part 1. How to Recover Files Deleted from Recycle Bin with Shortcut Key Commands
Recycle Bin is a tool that holds recently deleted files from your Windows computer. What if you accidentally delete the files from it as well? You are lucky! This tool allows you to use a shortcut key command to retrieve those files. You can use the Ctrl+Z command. This shortcut key combination is an undo command for the mentioned computers.
It cannot only be used on your Recycle Bin. It can also be used to run different programs that your Windows contains. Additionally, it cannot be used to retrieve files after the Recycle Bin is emptied. Let’s recover Recycle Bin files using this shortcut key command, following the steps below.
Open the Recycle Bin. Ensure that the file is recently deleted without other operations on your Recycle Bin. After that, please quickly press the Ctrl+Z keys on your Windows computer. This way, it will perform the undo command and return the deleted files from the Recycle Bin.
Part 2. How to Recover Deleted Files from Recycle Bin with Restore Command
Let's say that the files are stored in the Recycle Bin after you accidentally delete them. The good news is that recovering them is easy because it is the primary goal of the mentioned tool. Additionally, retrieving files from the Recycle Bin is a quick process. The reason is that you can recover a single or multiple files using its Restore command. This command will return the restored files to their original folder before they were deleted. Please note that this procedure cannot be used when the Recycle Bin has been emptied. Please follow the steps below to discover how the Restore command restores Recycle Bin in your Windows.
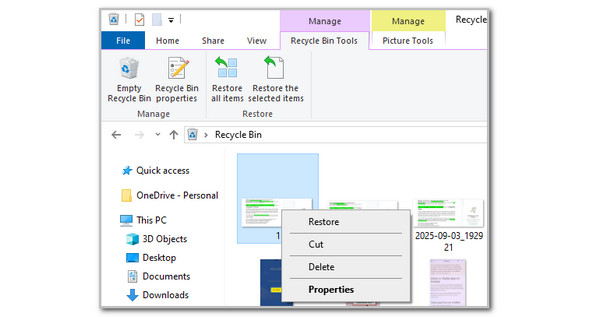
Open the Recycle Bin tool on your computer. After that, the recently deleted files will appear on the screen. Locate the files you prefer to restore to your Windows computer. Then, right-click on the files to see more options in a small window. Finally, please click the Restore button from the first option. This way, the deleted files from the Recycle Bin will be recovered instantly.
Part 3. How to Recover Deleted Files from Recycle Bin After Empty with Previous Version
The Previous Version feature, also known as Shadow Copies, is a feature on Windows computers that allows you to restore old copies of files and folders that it contains. The primary function of this feature is to recover deleted files, restore modified files to their previous versions, and undo unwanted changes to files or folders. Your Windows computer automatically creates restore points or backups when you create files or folders.
This feature cannot be used to recover deleted files from Recycle Bin after empty. It will revert the files to their earlier version, not the tool. However, the success rate of this feature is low. Please follow the steps below to discover how the tool works.
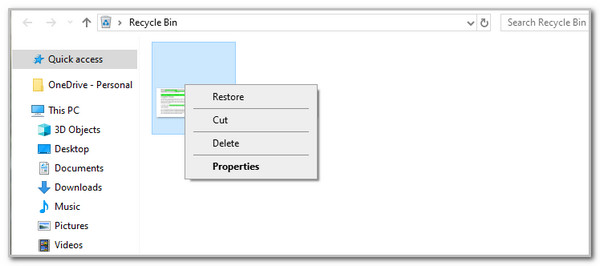
Step 1Open the Recycle Bin tool on your Windows computer. After that, right-click the file or folder you prefer to recover. Then, a small window will be prompted on the screen. Please click the Properties button at the bottom. A tiny dialog box will appear on the main interface.
Step 2You will see the file information on the screen. It includes its Type, Origin, and Size sections. Go to the Attributes section and customize the file you prefer to restore. Finally, please click the Apply button at the bottom right and click the Restore button. This way, you can restore the file from the Windows computer.

Part 4. How to Recover Deleted Files from Recycle Bin with FoneLab Data Retriever
On the other hand, how to recover deleted files from Recycle Bin after empty? FoneLab Data Retriever is the solution! This program is a tool designed to retrieve data from your Windows system, including data from the Recycle Bin. It can be used for various recoverable scenarios, including accidental deletion, unwanted formatting, computer viruses, and other similar issues. Additionally, this tool can recover multiple data types from your Windows computer. It includes emails, documents, videos, pictures, and more. The best thing about this tool is that it is also available on your Mac. Please follow the steps below to discover how this tool functions.
FoneLab Data Retriever - recover the lost/deleted data from computer, hard drive, flash drive, memory card, digital camera and more.
- Recover photos, videos, documents and more data with ease.
- Preview data before recovery.
Step 1Click the Free Download option from the main interface of the website. Then, choose the downloaded file to set it up. Later, install it to open it on your computer.

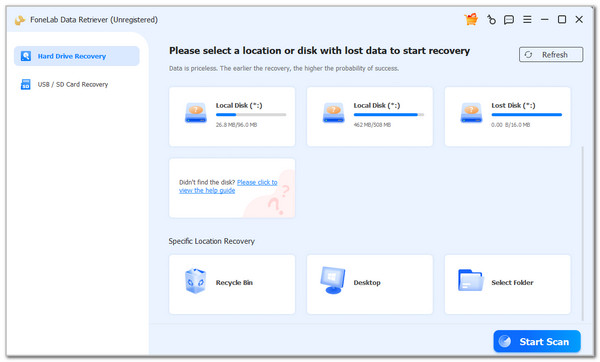
Step 2Select the Recycle Bin button at the bottom of the screen. Then, select the Start Scan button at the bottom right. This way, the tool will scan the deleted data from your Recycle Bin.
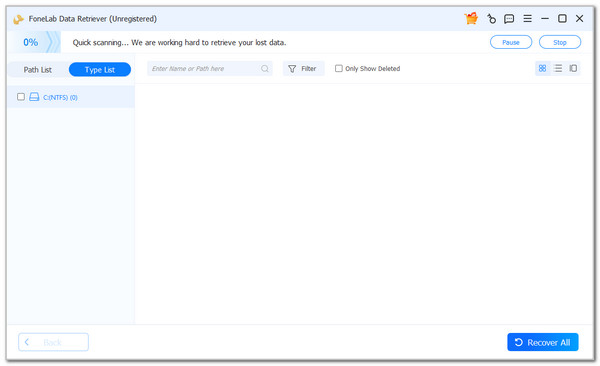
Step 3Wait for the scanning process to be completed. Then, select the files you need to recover. Finally, click the Recover All button at the bottom right to retrieve them.
Part 5. FAQs about How to Recover Files Deleted from Recycle Bin
How many days do files stay in the Recycle Bin?
The Recycle Bin in Windows stores the deleted files without a specific time interval. They will be stored until you manually delete them. However, the files will be deleted automatically if you set the time interval to 30 to 90 days.
What does the Recycle Bin store?
Recycle Bin can store recently deleted file metadata, files, folders, and items until space is needed. However, there is data that it cannot store. It includes files deleted from your USB drives, network drives, and external hard drives.
To summarize, this article listed the 4 easy guides on how to recover items deleted from Recycle Bin. It includes FoneLab Data Retriever. It is the third-party software that can recover files from your Recycle Bin after it has been emptied. Download it and experience it yourself for the best result. Recycle Bin is indeed a lifesaver when you accidentally delete files from a Windows computer. Do not let them be permanently deleted before you recover the essential files. Recover them now!