
 iPhone Data Recovery
 iOS System Recovery
 iOS Data Backup & Restore
 iOS Unlocker
 iPhone Password Manager
 Location Changer
 Android Data Recovery
 Broken Android Data Extraction
 Android Data Backup & Restore
 Android Unlocker
 FoneTrans for iOS
 iPhone Data Eraser
 iPhone Cleaner
 HEIC Converter
 HyperTrans
 WhatsApp Transfer for iOS
 Mac Sweep
 Data Retriever
 Mac Data Retriever
 Video Converter Ultimate
 Screen Recorder
 Phone Mirror
 Recover PC Data Now
Recover the lost/deleted data from computer, hard drive, flash drive, memory card, digital camera and more.
[4 Ways] How to Recover Deleted Images from a Hard Drive
 Updated by Valyn Hua / October 10, 2026 10:00
Photos deleted off a hard drive is the kind of loss that hurts: family pictures, project shots, or a finished edit you can never retake. The good news is that an image you "delete" is usually not actually gone — the drive just marks its space as free, and the pixels sit there until something new is written over them.
That detail drives the whole strategy. Stop using the drive immediately. Every new file, download, or even system update can overwrite the deleted photos before you recover them. Then work through the four methods below, from the quickest free check to the full disk scan.
This applies to internal drives, external USB drives, and camera cards. The steps are nearly the same on Windows and Mac, and I call out the differences as they come up.


Guide List
Part 1. Check the Recycle Bin / Trash
Nearly half of "deleted" photos are one click away. On Windows they sit in the Recycle Bin; on Mac they sit in Trash. This takes ten seconds.
Restore from the bin
Step 1Open the Recycle Bin on Windows or Trash on Mac.
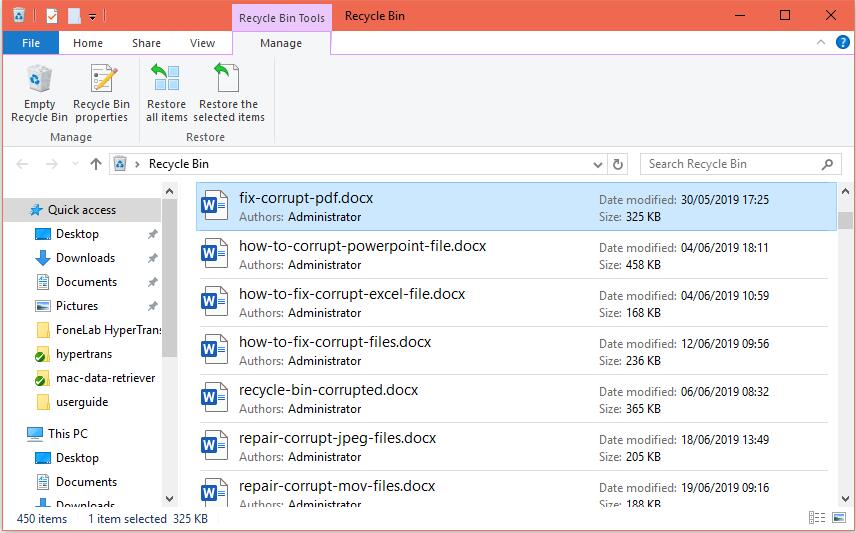
Step 2Sort by Date deleted and find your images. Right-click and choose Restore.
Step 3If you already emptied the bin, move on — the file table has forgotten the path, which is what the later scan fixes.
A tip: deleted files in the Recycle Bin lose their original folder names, so sort by the deletion time window rather than guessing filenames. On Mac, Trash usually keeps the original name, which makes a search box enough.
Part 2. Restore Previous Versions or File History
If you emptied the bin, the next safety net is version history. Windows keeps previous versions of a folder, and File History keeps copies of pictures over time. Mac uses Time Machine.
Roll back to an older copy
Step 1On Windows, right-click the folder that held the photos and choose Restore previous versions.
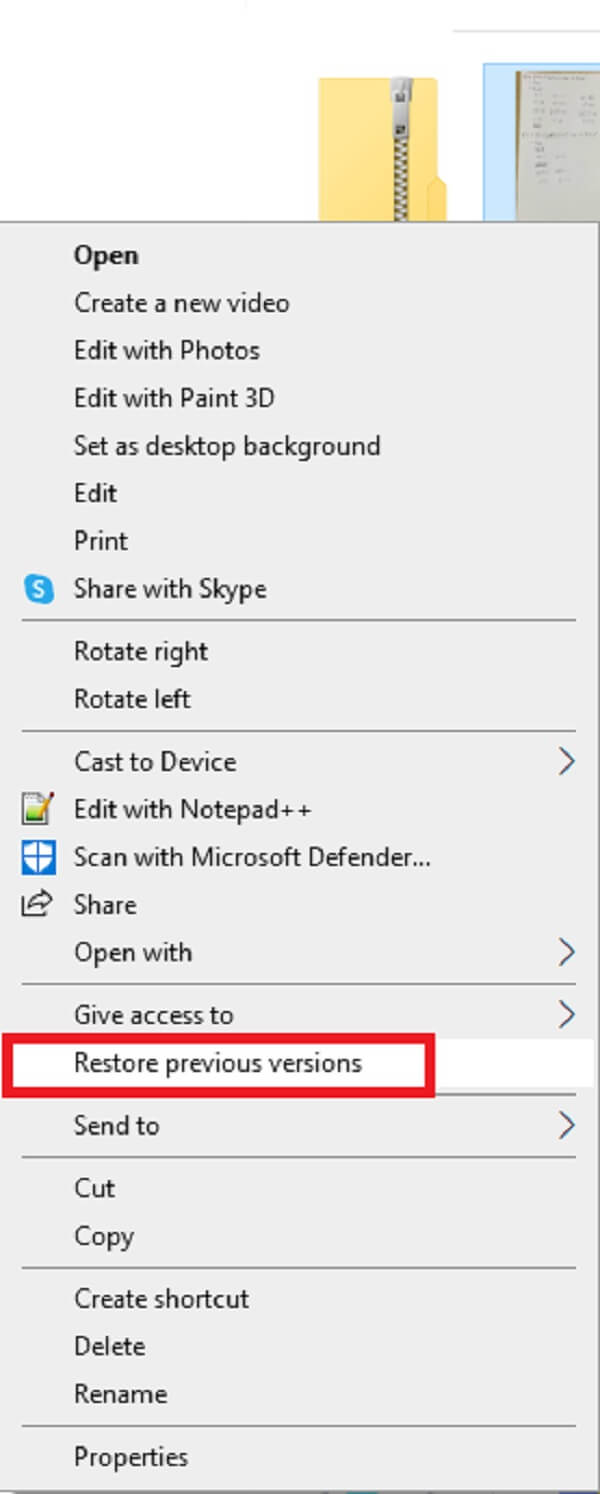
Step 2Pick a version dated before the deletion and click Restore. Or open Control Panel > File History to browse image copies.
Step 3On Mac, enter Time Machine from the menu bar and restore an older Pictures folder.
This only works if version history or File History was actually turned on. If it was not, the photos are not in a backup either, and we go to the disk scan.
Part 3. Recover Deleted Photos with FoneLab Data Retriever
When the bin is empty and no backup exists, the file table has simply lost track of where the images live. FoneLab Data Retriever scans the drive itself and carves out deleted JPG, PNG, RAW, and other image files. It runs on Windows and Mac, and after you choose the drive and start, it runs an automatic deep scan — there is no separate Deep Scan button.
FoneLab Data Retriever - recover the lost/deleted data from computer, hard drive, flash drive, memory card, digital camera and more.
- Recover photos, videos, documents and more data with ease.
- Preview data before recovery.
Scan and preview the images
Step 1Launch FoneLab Data Retriever, tick Image, and select the drive where the photos were stored.
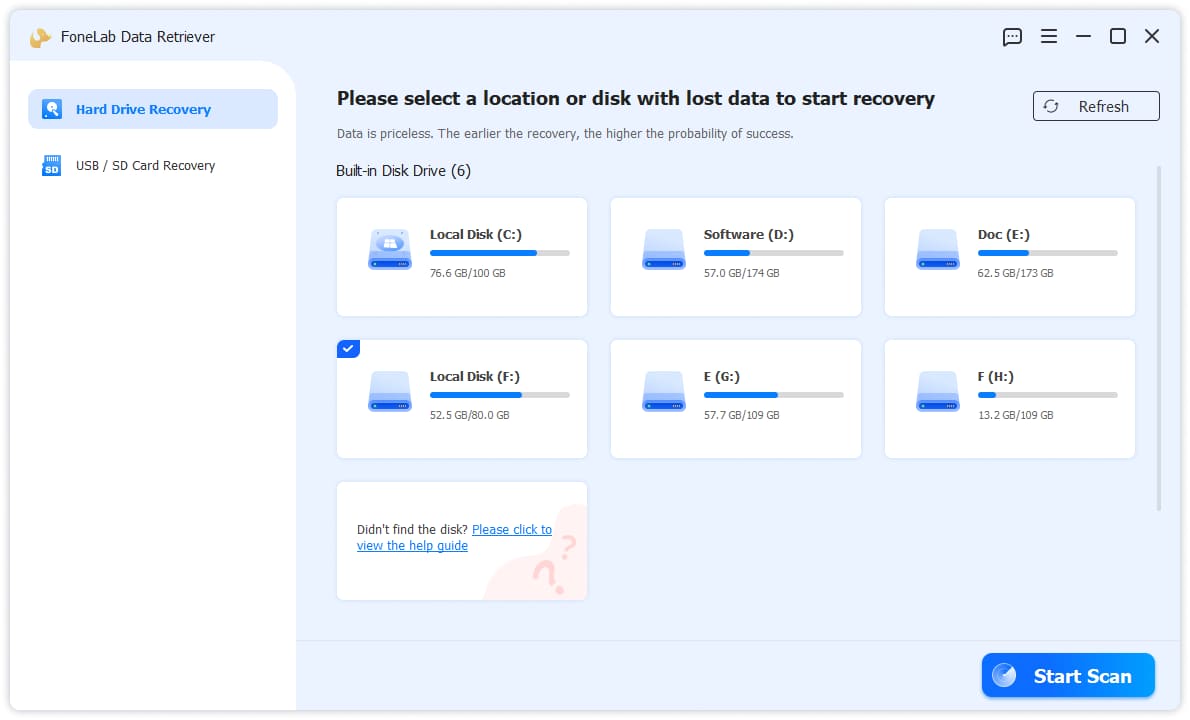
Step 2Click Start Scan. It performs an automatic deep scan and groups recoverable images by type.
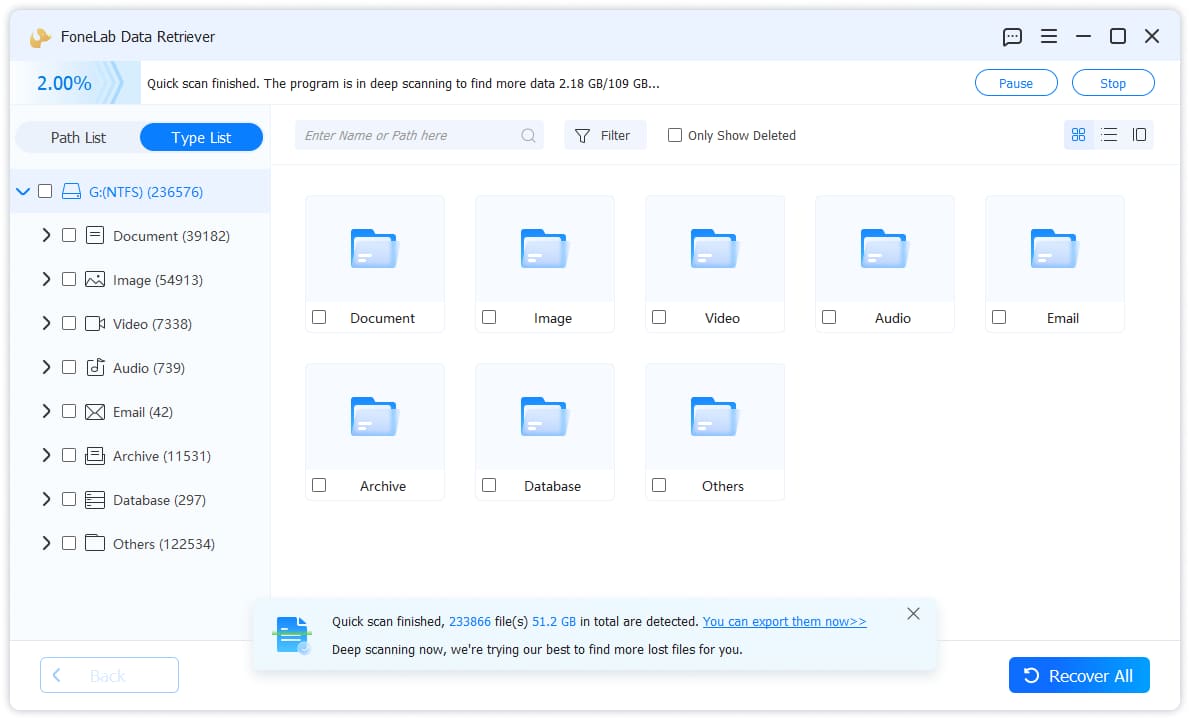
Step 3Open the Image category and preview thumbnails to pick the right photos. Use Filter by date or size to narrow thousands of results.

Step 4Tick the images you want and click Recover, saving to a different drive than the one you scanned.
Because filenames are usually gone after deletion, rely on the thumbnail preview rather than the file name. Success depends on the sectors not being overwritten yet, which is why I urged stopping writes to the drive. The same tool also handles recovering deleted WAV audio files on the same drive.
FoneLab Data Retriever - recover the lost/deleted data from computer, hard drive, flash drive, memory card, digital camera and more.
- Recover photos, videos, documents and more data with ease.
- Preview data before recovery.
Part 4. Quick Comparison of the Methods
| Method | Free? | Works after Empty Bin | Automatic Deep Scan | Best For |
|---|---|---|---|---|
| Recycle Bin / Trash | Yes | No | No | Recently deleted photos |
| Previous Versions / File History | Yes | If version history on | No | Backed-up folders |
| FoneLab Data Retriever | Free to preview | Yes | Yes (automatic deep scan) | Permanently deleted, no backup |
Part 5. Tips to Protect Your Photos
- After recovering, copy images to a second drive and a cloud folder immediately.
- Keep File History (Windows) or Time Machine (Mac) running to a separate drive.
- When photos go missing, stop writing to that drive right away to avoid overwriting.
- Import camera photos to two places at once — the computer and an external drive.
- Never recover images back onto the same disk you just scanned.
- Use a cloud-synced Pictures folder for your most irreplaceable shots.
Part 6. Frequently Asked Questions
Can I recover photos from a formatted external hard drive?
Often, yes. A format clears the file table rather than erasing the pixels, so a disk scan can still carve the images out, as long as the drive has not been reused heavily since.
Does it recover RAW camera files?
FoneLab Data Retriever reads standard image types like JPG, PNG, and common RAW formats. You can preview thumbnails to confirm which files are intact before recovering.
Do I need a separate Deep Scan button?
No. Clicking Start Scan already runs the automatic deep scan. There is no separate Deep Scan control to look for.
Why do recovered photos have wrong names?
The filename table is deleted along with the image metadata, so files often come back with generic names. Use the thumbnail preview to identify them by content instead.
To wrap up: check the Recycle Bin or Trash first, roll back a previous version if you had backups, and if the photos are truly gone, FoneLab Data Retriever scans the drive automatically and previews the images before you recover them. The key move is stopping writes to the drive immediately so the deleted pixels are not overwritten.
Going forward, the simplest insurance is a two-place copy: every important photo lands on both the internal drive and an external or cloud location. That way the next accidental delete ends in a one-click restore, not a recovery scan.
You scanned the wrong drive
The most common reason a photo scan comes up empty is that the files were on a different volume than the one scanned. Photos from a camera usually live on the SD card or an external drive; screenshots go to the internal Pictures folder; phone imports pile up on a USB stick. Double-check where the images actually were before concluding they are gone, and run the scan again on the correct volume. That one mistake sends more people to paid recovery than actual overwriting does.
Also scan the whole disk rather than a single folder. When an image is deleted, its path is forgotten, so browsing the original folder finds nothing while a full-volume scan carves the file signatures out. Let the scan run to completion; an interrupted scan can stop before it reaches the folders you need.
What recovered images look like
Expect the filenames to be gone. A recovered photo often shows up as a generic label, and the folder structure is lost. Use the thumbnail preview to recognize the shot by content — faces, scenes, dates on screen — rather than hunting for "IMG_2043.jpg". If the scan returns thousands of files, narrow it with a date range around when you remember taking the photos.
Some recovered images open but look partially corrupted, especially if the sectors were reused. That is normal after overwriting. Save everything that previews correctly and accept the partial win; a damaged half-file cannot be repaired once overwritten. Copy the good ones off immediately so you do not lose them again.
FoneLab Data Retriever - recover the lost/deleted data from computer, hard drive, flash drive, memory card, digital camera and more.
- Recover photos, videos, documents and more data with ease.
- Preview data before recovery.
Photos that vanished but were not deleted
Not every missing photo was deleted. Sometimes an update moved the Pictures folder, a sync conflict created a duplicate, or an external drive just disconnected. Before scanning, open the Photos app or the Pictures folder and check whether the library simply got reorganized. A disconnected external drive, in particular, makes a whole photo library look "gone" when it is just unplugged.
If the images came from a phone, check the phone itself. People "delete" photos on the computer and never realize the originals are still on the device, or on a cloud album. Look on the phone and in any web photo account before treating the computer as the only copy.
After you recover
Save the recovered images to a fresh folder and sort them by the preview content. Verify the important shots open fully before you trust them, and then immediately copy them to two places. Recovering once is hard enough; losing the recovered copy would be doubly frustrating.
The bigger lesson is that photos are worth a redundancy habit. Keep your camera card copied off the card the same day, keep an external drive, and let a cloud photo library sync the important albums. When three copies exist, an accidental delete becomes a restore instead of a recovery. Treat the disk scan as the safety net, not the plan, and your images will be fine. The same approach applies whether the pictures came from a camera, a phone import, or a screen capture.
Finally, treat a recovered image as evidence you want to keep. Open each important photo, confirm it is not truncated, and then rename it by what it actually shows. Generic recovered filenames make the second loss just as confusing as the first, and a few minutes of sorting pays off for years. If the scan found nothing at all, the sectors were likely overwritten — stop writing to that drive and reach out to a professional service before the chance slips away completely.
Also remember to scan the whole disk rather than a single folder: once an image is deleted, its path is forgotten, so the original folder will look empty even when the file is still recoverable elsewhere on the volume. Let the scan finish rather than interrupting it.
When you are done, keep the recovered images in two places: the folder you restored them to, plus an external drive. A second copy costs nothing and protects you from the next accident.