Recover the lost/deleted data from computer, hard drive, flash drive, memory card, digital camera and more.
How to Recover Unsaved/Deleted/Lost WordPad Documents from Hard Drive
 Updated by Valyn Hua / Dec 25, 2020 12:20
My computer is not working due to some technical issues. Now I need the data in the hard drive. However, when I install this hard drive in my new computer, not all data can be accessed including some important WordPad documents. Who can help me restore WordPad documents from a hard drive?
WordPad is a basic text processor, which is more advanced than Microsoft Notepad but simpler than Microsoft Word. Almost all versions of Microsoft Windows from Windows 95 onwards include it.
WordPad can format and print text including fonts, italic, bold, colored and centered text, etc. However, WordPad can read, save, and render much Rich Text Format features that it cannot create, such as tables, strikeout, text background colors, numbered lists, right or left indent, quasi-hypertext and URL linking, or various line spacing. etc.

Among its advantages are low system-resource usage, simplicity, and speed. As a result, WordPad is great for taking notes, writing letters and stories, or for usage in various tablets, PCs, and smartphones.
Users can run Microsoft WordPad (wordpad.exe) by the following steps:
Step 1Go to the Start menu.
Step 2Type WordPad in the Start Search and press Enter.
Step 3Click wordpad.exe to open it.
Do you have the same question as in the above case?
Actually, as long as the hard drive appears to function normally, the inside WordPad documents are recoverable.
There are 3 ways to recover WordPad documents from hard drive.

Guide List
1. Restore Previous Versions of Lost WordPad Documents in Hard Drive
As long as System Protection is enabled, Windows will automatically create a copy of file and folder called Previous Versions. Previous versions are usually used as restore points to restore windows folders or files that were accidentally modified or deleted.
The only catch is that you have to remember the location where the file or folder was saved.
To turn on System Protection, just go to Start > Control Panel > System and Security > System > System Protection.

To restore deleted WordPad files, do the following.
Step 1Open This Computer on the desktop or go to Start and click on This Computer.
Step 2Navigate to the original folder where the lost file resided. If the folder was also lost, you can create a dummy folder with the same name as the lost one. The contents of the folder are irrelevant.
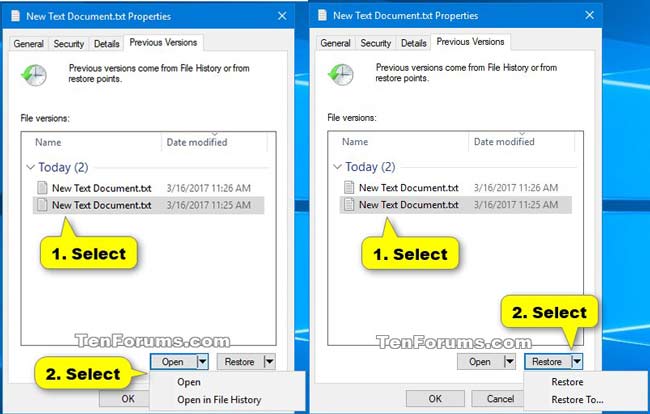
Step 3Right-click the folder and select the Restore Previous Version option. All available previous versions of files or folders will be listed in a dialog box.
Step 4Choose a previous version of the folder that contains the WordPad files you want to restore, and then click Open to view it to make sure it's the version you want.
Step 5Drag your selected folder to another location such as the desktop or another folder.
2. Recover Unsaved WordPad Documents in Hard Drive through Temp Files
Just imagine that you have been working on a WordPad document for some hours, and then the program or computer crashed or you accidentally closed the file without saving. It's frustrating, but don't get too discouraged - this document is still rescued.
A temporary file is created to hold information temporarily while a document is being edited. These temporary files are used to help recover lost data if the program or computer is quitted in an irregular way.
To find these temp files and restore WordPad files, please follow the steps.
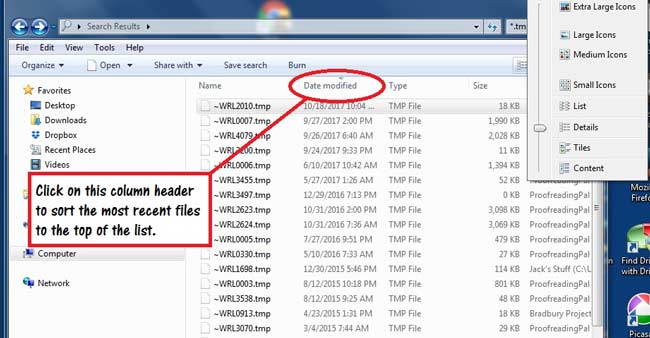
Step 1Go to Start menu on your computer and type .tmp in the Start Search box.
Step 2Click Other in the bottom of the toolbar.
Step 3Search for files that match the last date and time that you edited the document.
Step 4If you find the files that you're looking for, drag them to the desktop.
Step 5Change the extension name from .tmp to .odt.
3. Extract Lost WordPad Documents from Hard Drive
System image is a good method to backup computer data in time to prevent data loss. Some users might misunderstand that you are only allowed to restore all data from system image and this procedure will overwrite all data on PC. You still have another choice to recover individual file from backup file selectively.
Step 1Click Windows search bar and type diskmgmt.msc in the box, then click to run it. You can see Action, select Attach VHD under it. Click Browse to choose the backup disk and click Open here. You should note that the box next to Read-only cannot be checked, otherwise the individual files will be unable to be extracted.
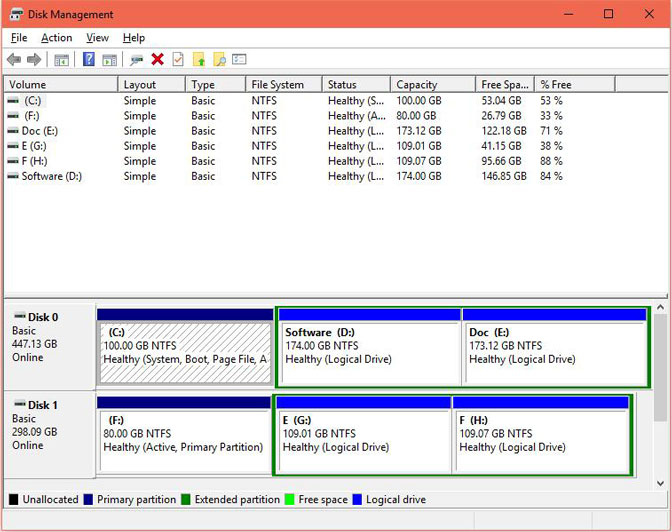
Step 2Choose the disk you want, right-click to change drive letter and paths.
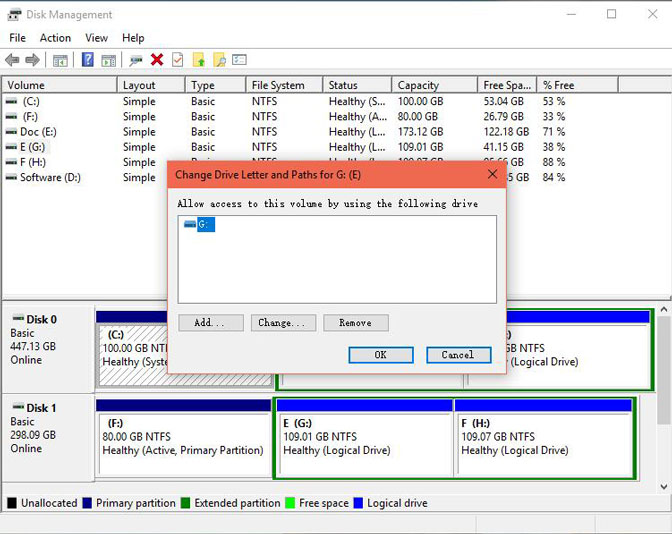
Step 3After that, you are allowed to open the disk you want and extract data from.
4. Recover Lost WordPad Documents from Hard Drive with FoneLab
It's a bit complicated to perform the whole recovery process with Microsoft Office guidelines listed above for those of us who have no technical background.
However, the best solution always comes the last.
FoneLab Data Retriever has a capability of recovering almost all deleted or unsaved WordPad files by scanning the hard drive. It is able to retrieve WordPad documents lost for various reasons such as system crash, hard drive failure, non-responding, deletion, corruption, etc.
This software allows WordPad users to recover deleted files within a few clicks. even computer novices are very good at applying the tool.
FoneLab Data Retriever - recover the lost/deleted data from computer, hard drive, flash drive, memory card, digital camera and more.
- Recover photos, videos, documents and more data with ease.
- Preview data before recovery.
- Recover data from device, iCloud and iTunes.
Step 1Free download, install and launch the hard drive data recovery on your computer.
Step 2On the main menu page, choose the data types and the location where you lost the WordPad document.
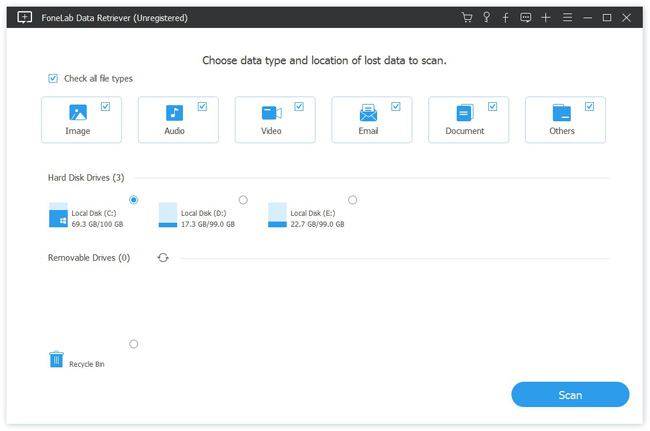
Step 3Click Scan button to start the quick scan process. All files will be displayed in the interface. You can click Deep Scan to get more scan results.

Step 4Search for your needed items. You can also use Filter feature to quickly locate the files you are looking for.
Step 5Check your required items and click Recover. The selected files will be saved back to your computer.
In addition to WordPad file, this software can also recover PDF document, recover TXT files on Windows, images, emails and more data.
Other data recovery tasks such as WordPad recovery in Windows, memory card, flash drive, digital camera camcorder, etc. can all be simply done by this software.
It offers a 30-day trial, why not give it a shot?
FoneLab Data Retriever - recover the lost/deleted data from computer, hard drive, flash drive, memory card, digital camera and more.
- Recover photos, videos, documents and more data with ease.
- Preview data before recovery.
- Recover data from device, iCloud and iTunes.