Recover the lost/deleted data from computer, hard drive, flash drive, memory card, digital camera and more.
How to Recover Deleted Email: 2 Top Picks Easy Procedures
 Updated by Valyn Hua / June 08, 2023 09:20
My daughter borrowed my computer, including my email account, to email her teacher. Her reason for the email is that she cannot attend school because she has a fever. But she accidentally deleted some of my important emails for work, thinking they were hers! Can you please help me retrieve them? Thanks in advance!
At work, people tend to use emails for communicating. It is more formal than other ways of communication, like social media accounts. But these emails are prone to viruses and human errors. And it may lead them to be lost on your computer. If that happens, you can still recover them! This post will show you the leading email recovery tool with its alternative way. Read this trusted article for more information.


Guide List
Part 1. How to Recover Deleted Emails on A Computer with FoneLab Data Retriever
We may think that deleted emails cannot be recovered. But with the help of recovery tools like FoneLab Data Retriever, you can retrieve them in a few seconds! This software can retrieve your emails in any scenario. It includes accidentally deleted, unwanted formats, unexpected computer power off, and more. In addition, this recovery tool can also retrieve deleted data from memory cards, computers, hard drives, flash drives, etc. It has a deep scan feature that can give you more results.
FoneLab Data Retriever - recover the lost/deleted data from computer, hard drive, flash drive, memory card, digital camera and more.
- Recover photos, videos, documents and more data with ease.
- Preview data before recovery.
Furthermore, knowing the creation date of your emails can help you find them quickly. You can use the filter feature of the software. Upon reading this article, you will know to use it. To discover how to recover deleted emails on Mac and Windows, imitate the steps below.
Step 1Visit the official website of FoneLab Data Retriever using your computer. You will see and notice the full description of the tool. You must click the Free Download button to get the tool on your computer. Please wait for the downloading process to end before you tick the Downloaded File at the bottom. Set up the software on the computer, depending on your preference. Later, the computer will launch the recovery tool automatically.

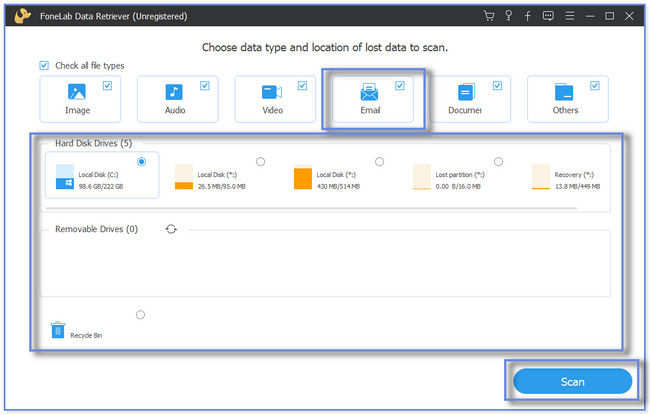
Step 2The data type this tool supports will appear at the top of the main interface. The Image, Audio, Video, Email, Documents, and Others sections will appear. Since you will only want to recover emails, please tick the Email button. But if you also have other deleted or lost files, tick the sections you prefer. After that, select the location where you lost your emails. You can also click the Recycle Bin button at the bottom left corner. Afterward, click the Scan button at the bottom right to scan the lost files from your computer.
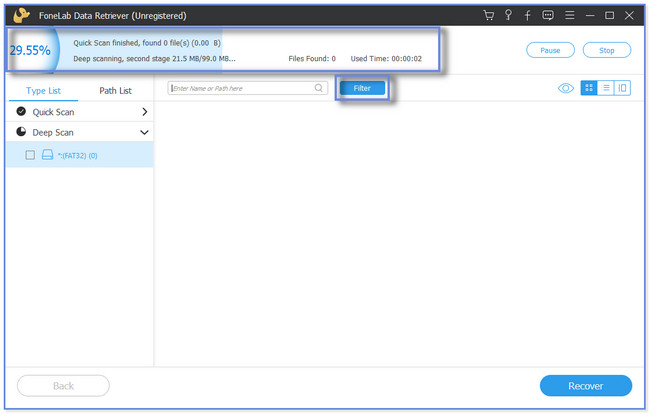
Step 3At the top, you will see and notice the progress percentage of the scanning procedure. It includes the number of files this software found and the time interval it uses. If unsatisfied with the scanning results, click the Deep Scan button. You can use the Filter feature of the software if you know the creation date of the deleted emails. You must only complete the necessary information and click the Apply button to continue.
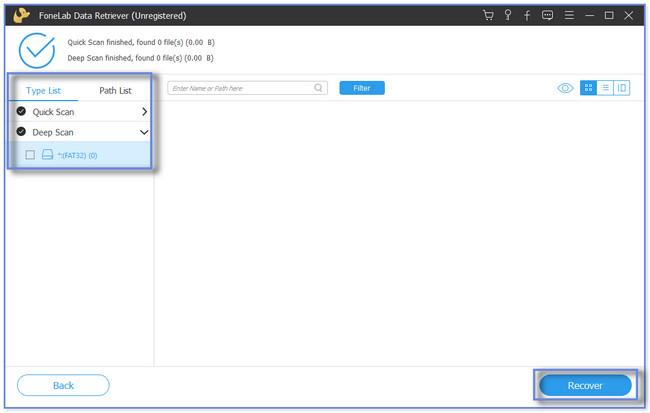
Step 4On the left side, you will notice and see the scanning process results. Please click the Type List or Path List to locate the lost files this software found. After that, click the folders on the left to see their content on the right side of the recovery tool. Later, please click the Recover button at the bottom right corner. The recovery process will last depending on the sizes of the files you will recover. Please do not interrupt the process unless the recovery process is done.
The software above can recover any deleted email. In addition, you might be able to restore deleted emails from the Trash folder on the computer no matter the email service you are using. If you use an Outlook account, see the method below. It is about how Outlook recovers deleted drafts and emails. But you cannot use the procedure below if Outlook permanently deletes your email on its folders. For further knowledge, please scroll down.
FoneLab Data Retriever - recover the lost/deleted data from computer, hard drive, flash drive, memory card, digital camera and more.
- Recover photos, videos, documents and more data with ease.
- Preview data before recovery.
Part 2. Recover Deleted Emails Messages in Outlook Website
You can access your Outlook account on your phone and computer. Since you want to recover on your computer, you will see methods for recovering emails on the computer. But Outlook will only keep your emails for 30 days. You cannot use this procedure if Outlook permanently deletes your emails from its folder.
Do you want to discover how to recover draft email Outlook? Please proceed below.
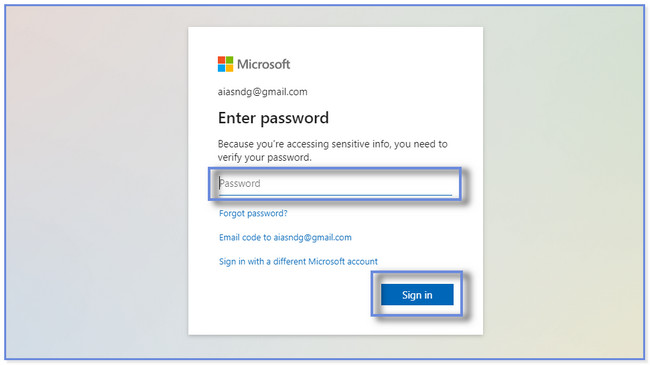
Step 1Please search for the outlook.com website using your computer. After that, the Outlook website will require you to log in to your Outlook account. Enter the account password and email where you accidentally deleted your important emails. After that, press the Enter key or Sign In button on your keyboard to sign in.
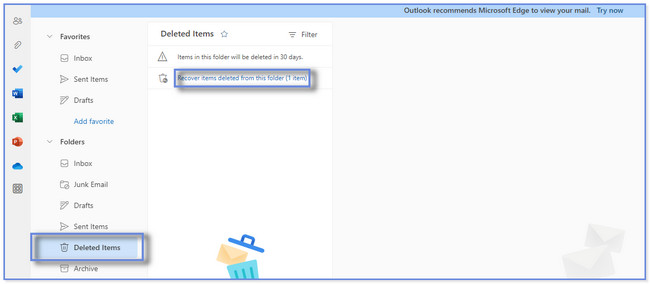
Step 2You will notice the main interface of Outlook with your existing emails. On the left side, please click the Deleted Items button. If the email is in the recently deleted section, please drag it to the Inbox section. But if it is on the Recover Items Deleted From This Folder folder, click the Restore button at the top to recover your emails.
FoneLab Data Retriever - recover the lost/deleted data from computer, hard drive, flash drive, memory card, digital camera and more.
- Recover photos, videos, documents and more data with ease.
- Preview data before recovery.
Part 3. FAQs about How to Recover Deleted Email
1. How to permanently delete emails from Mac Mail?
Permanently deleting emails from the Mac Mail app is easy. You only need to go to the Mail app on your Mac. After that, please choose the Mailbox button. Scroll down and look for the Erase Deleted Items on the app's main interface. Please select an account afterward. Control-click the Trash mailbox and click the Erase Deleted Items button.
2. How can I retrieve permanently deleted emails on Gmail from my computer?
Please search for the gmail.com website on your computer. After that, log in to your Gmail account. You only need to input your Gmail email and password or log-in credentials. After that, please click the More button or the Three Dots icon on the left side. A new set of options and sections will pop up. Since the email is deleted, move it to the Inbox section. To do that, please click the Move Folder icon at the top. Later, choose the Inbox folder.
3. Can I still email a deleted Gmail account?
Yes. You can still send an email to a deleted account. The emails will be marked as delivered, but the owner of the deleted email account will not receive the emails. Once a person deletes their email account, they will no longer have the chance to send or receive emails from someone. And the deletion of the email account is permanent.
There are too many ways to recover deleted emails from the computer. This post recommends 2 easy methods to do that. But FoneLab Data Retriever stands out because it can retrieve any email. Also, it can recover them with or without a backup from a computer. Do you want to discover and know more about the recovery tool? Please download it now on your computer!
FoneLab Data Retriever - recover the lost/deleted data from computer, hard drive, flash drive, memory card, digital camera and more.
- Recover photos, videos, documents and more data with ease.
- Preview data before recovery.