Recover the lost/deleted data from computer, hard drive, flash drive, memory card, digital camera and more.
Best Database Recovery Tool and Alternative Techniques
 Updated by Valyn Hua / June 06, 2023 09:00
The often causes of database loss or deletion are human errors, viruses, and malware. These circumstances are a total nightmare because you cannot access your files. Rescue your data before they are lost for good!
In this situation, we commonly go directly to the Recycle Bin of our computer. But what if they are also missing there? We got you!

This article will recommend proven and tested techniques for recovery databases. Please read the entire interesting post to bring back all of your databases on the computer. Scroll down now!

Guide List
Part 1. Best Database Recovery Tool - FoneLab Data Retriever
Need to restore database with recovery tool? FoneLab Data Retriever is the software that can help you! It can recover databases from computers, hard drives, and other devices. And it will not destroy your data because it will preserve them in their original form. It supports various numbers of recoverable data types, like documents, emails, videos, images, and more.
FoneLab Data Retriever - recover the lost/deleted data from computer, hard drive, flash drive, memory card, digital camera and more.
- Recover photos, videos, documents and more data with ease.
- Preview data before recovery.
Furthermore, you can locate exact files by using its filter feature. Also, it offers you its deep scan tool to search or scan for more results. Upon reading this tutorial, you will discover more about them. Please scroll down and glance at the tutorial of this leading software. Move on.
Step 1Click the Free Download button of FoneLab Data Retriever. After that, the computer will download the software. It will show and let you see the progress of the process at the bottom. Later, click the Downloaded File and set it up as soon as possible. Click the Install button afterward, and the computer will automatically launch the software.

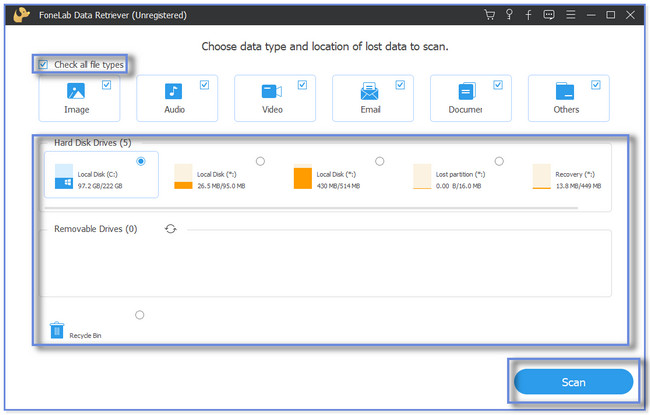
Step 2On the main interface, you will view the supported data of the software. Please choose the classification of the data you lost. If you are unsure about the lost files you want to recover, click the Check All File Types box to add all of them. After that, choose the location where you lost data and click the Scan button.
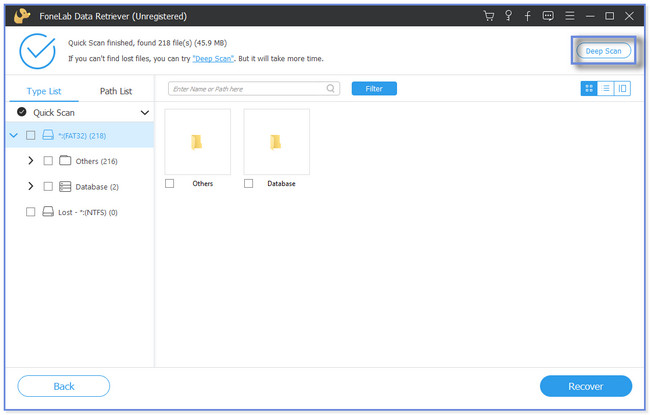
Step 3The software will show you the scan progress at the top. Please click the Deep Scan button if the result does not satisfy you yet. Another scanning process will take place, and this feature will show you more results.
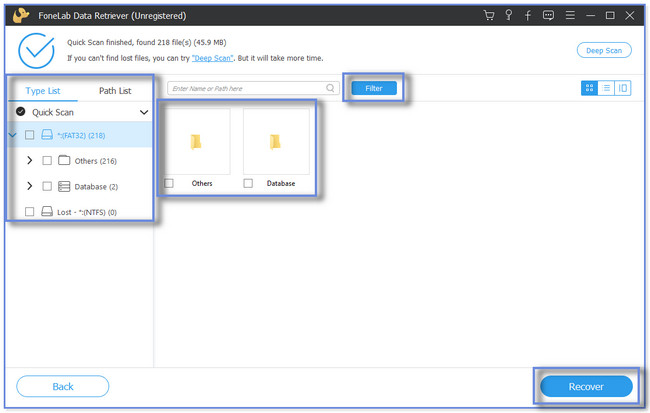
Step 4The results will appear or pop up on the left side of the software. Click the database folder you want to recover. After that, please click the Recover button to start the process. The recovery process will only last for a couple of seconds. Do not interrupt the process for the best results.
Note: You can click the Filter button if you know the exact date of your databases. Fill out the needed information and click the Apply button once done.
FoneLab Data Retriever can recover databases without modifying the original data. Also, it can recover data from USB, memory cards, digital cameras, and more. Aside from this tool, you can retrieve databases from their previous versions and backups. But you cannot utilize one of the techniques if you do not back up your databases. Do you want to see more methods? Proceed.
FoneLab Data Retriever - recover the lost/deleted data from computer, hard drive, flash drive, memory card, digital camera and more.
- Recover photos, videos, documents and more data with ease.
- Preview data before recovery.
Part 2. Database Recovery Using Previous Version
Computers like Windows have a feature that can copy or back up your files and folders automatically. These are called previous versions of the files. The mentioned feature has a lot of benefits if you accidentally delete or lose a database. Also, it is easy to access because you can use it by only right-clicking the folder. But if you forgot to activate system protection on your computer, there’s no way you can utilize this technique.
Are you interested in knowing this feature and its procedure? Please scroll down for the tutorial.
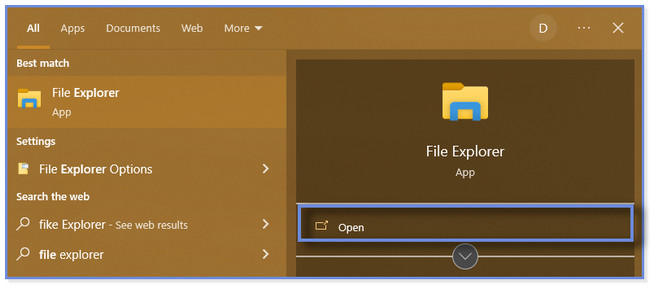
Step 1On your computer, please locate the File Explorer icon. If you cannot find or locate it on the desktop, please click the Windows Search Bar at the bottom left corner. After that, type in File Explorer. You will see or view the results on the right side. Please click the Open button to launch it.
Step 2Locate the folder where you lost your databases. After that, its content will appear on the right side. Once you see the particular folder, please right-click it using the computer mouse. You will see and notice a lot of new options for the folder. Locate the Restore Previous Versions button and click it.
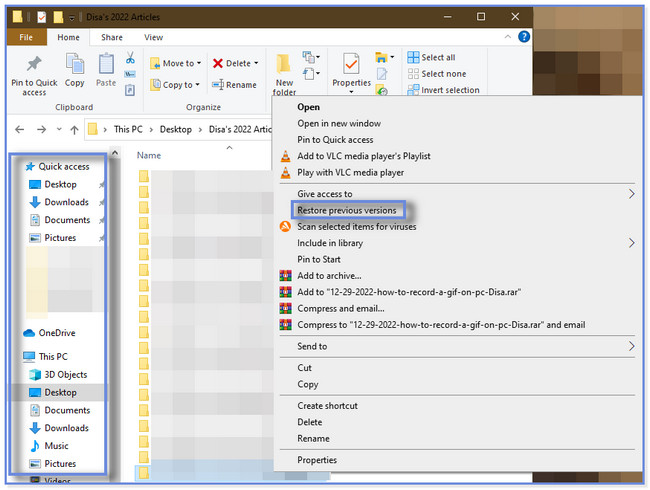
Step 3The new small window for the folder will pop up. Please choose the Previous Version button at the top. Choose the relevant and most recent version of the folder. Later, click the Restore button at the bottom right corner. The previous version of the folder, including its databases, will be retrieved afterward.

Part 3. Database Recovery via Backup
Do you have a backup for your lost or deleted databases? If so, this method is destined for you! Windows has a built-in feature that can back up your files and data regularly. It is called Backup and Restore. This feature can create or copy files and folder backups, including system image backups. But the Backup and Restore feature of Windows is far from perfect. Sometimes, it cannot recover all the databases you want.
Do you want to discover this technique? Well, you can use the steps below accordingly.
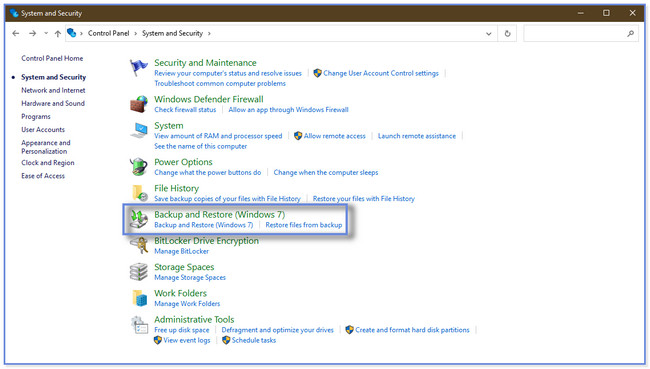
Step 1Click the Windows Search Bar button or the Windows icon in the bottom left corner. After that, please type the Control Panel and launch it on your computer. Click the System and Security buttons.

Step 2Please click the Backup and Restore button on the main interface's right side. Click the Restore My Files or Restore All Users’ Files button. After that, select the Browse For Files or Browse For Folders button. In this case, you will see the contents of a particular backup. Click the OK button. Choose the backup you want to retrieve and follow the onscreen instruction afterward.
Part 4. FAQs about Database Recovery
1. How to check database corruption in an SQL server?
You only have to run the DBCC CHECKDB command. After that, you will see a new small window on the main interface. Please type in the DBCC CHECKDB'database_name' codec. Later, press the Enter key or icon on your keyboard. You will confirm if the file is corrupt afterward because it will show consistent errors and error messages.
2. How long does a database restore take?
The restore process for your databases commonly lasts more than 5 hours. But it still depends on the data or files it contains. Most of the time, the process is stuck at 100% or 99.99% progress. But if you don't prefer to wait longer or face minor issues, use the software called FoneLab Data Retriever mentioned in this post. Download it now!
This post will reveal the 3 proven and tested methods to recover lost or deleted databases. The leading tool is FoneLab Data Retriever, which can recover data on computers, flash drives, hard drives, and more devices. Also, it offers you a preview feature to see the content of your data or folders before you recover them. If you want to utilize this software, download it now!
FoneLab Data Retriever - recover the lost/deleted data from computer, hard drive, flash drive, memory card, digital camera and more.
- Recover photos, videos, documents and more data with ease.
- Preview data before recovery.