Capture video, audio, online tutorial, etc on Windows/Mac, and you can easily customize size, edit the video or audio, and more.
- Screen Recorder
- Mac Video Recorder
- Windows Video Recorder
- Mac Audio Recorder
- Windows Audio Recorder
- Webcam Recorder
- Game Recorder
- Meeting Recorder
- Messenger Call Recorder
- Skype Recorder
- Course Recorder
- Presentation Recorder
- Chrome Recorder
- Firefox Recorder
- Screenshot on Windows
- Screenshot on Mac
How to Record Audio on iPad: A Step-by-Step Guide
 Updated by Somei Liam / Feb 18, 2022 12:20
These days recording audio has been helpful in some parts of people's lives. As a matter of fact, you can easily record audio or video using phones, tablets, and with other devices. And one of the best devices that can give high-quality audio sound is the Apple devices, like iPhone, iPad, and more. When you buy a new iPad from Apple, and it's your first time, you also need to record sound, music, or audio, and you don't know how? Well, we'll teach and show what and how you can do it. Keep reading and find the best answer that fits your needs.


Guide List
Part 1. Audio Recording on iPad with Voice Memo
Voice Memos is a default audio recording application for iOS devices. It is actually one of the most straightforward ways to record sound or audio from your iPhone or iPad. And every iOS users already know and is familiar with this app. Also, after recording the audio you want to, you can edit it, such as trimming it, resume, and replacing it. See the procedure below to know how to record audio, like classroom lessons, personal notes, music, and more on iPad.
Steps on How to Record Audio on iPad with Voice Memos:
Step 1Firstly, go to or launch the Voice Memos app on your iPad device.
Step 2Next, tap the red circle or the Record button to begin the recording. You can also pause the recording, then continue or resume it by tapping the icons.
Step 3When you have completely recorded the audio, click the Done button to finish it and save it.

It is a simple way of recording audio on your iPad. There is another app that you can use to record sound, music, audio from your iPad. You can move on to the next part.
FoneLab Screen Recorder allows you to capture video, audio, online tutorial, etc on Windows/Mac, and you can easily customize size, edit the video or audio, and more.
- Record video, audio, webcam and take screenshots on Windows/Mac.
- Preview data before saving.
- It is safe and easy to use.
Part 2. Audio Recording on iPad with GarageBand
GarageBand is also one of the pre-installed applications on Macs, iPhones, and iPads. It is also free from the said devices and has a lot of features and capabilities that not everyone knows. It allows users to record their voice, sounds, play the built-in instrument, and a lot more. So, you can play audio or whatever sound on your iPad using GarageBand. Here’s how to use this application.
Steps on How to Record Audio on iPad with GarageBand:
Step 1First of all, launch the GarageBand app on your iPad. If you don’t have it, you can download it on the App Store then open it.
Step 2Next, tap the Record button in the control bar to start the recording.
Step 3After that, you can sing, play, or make sounds into the microphone.
Step 4When you are done, in the control bar, tap the Play icon to stop the recording when you are done. Finally, tap the Play button again to hear the sound.
The only downside is that users may find it a little complex because the interface is bombarded with lots of feature icons.
Part 3. Audio Recording on iPad with Screen Recording Build-in Feature
On iPhone, iPad, and iPod Touch with iOS 11 and later, there’s a built-in screen recorder feature where you can record with or without a microphone, as well as with or without audio. So with the help of this feature, you can do audio recording on an iPad. However, you cannot record audio only, and it needs to have a recorded screen or video along with it. As a result, you might need to convert it. Hence, you can still use this to record your audio, see the steps below and follow it.
Steps on How to Record Audio on iPad with Screen Recording Built-In Feature:
Step 1Firstly, add the Screen Recording option on the Control Center. To do that, Settings > Control Center, then tap the plus sign button next to Screen Recording.
Step 2Next, go to your Home Screen, then open the Control Center.
Step 3After that, tap and hold the Screen Recording icon. Then, turn on the Microphone to record the external sound or audio.
Step 4When you are done setting up the Microphone, begin the recording by tapping the Start Recording.
Step 5Finally, go to Control Center and tap the Screen Recording icon again to stop the recording. Or simply tap on the recording time at the top-left corner of the screen, then select the option Stop. And the recorded screen with audio or mic will be automatically saved on the Photos app. That’s it!
You don’t want to record audio with video? Do not worry. In the next part of this post, we have introduced a tool that can help you record audio on an iPad with a computer.
Part 4. Audio Recording on iPad with FoneLab Screen Recorder
One of the most powerful and professional tools you can use to record audio is FoneLab Screen Recorder. In fact, you can record and take a snapshot of any screen in a hassle-free way using this program. It offers screenshots, audio, and a video recorder with your computer, iOS, and Android screen. Of course, you can record your screen and audio on this device. Anytime, you can record your favorite songs, voice, and sound from your iPad on your computer and save them wherever you want. Are you now eager to know how to record audio on your iPad? You can see and follow the steps below.
FoneLab Screen Recorder allows you to capture video, audio, online tutorial, etc on Windows/Mac, and you can easily customize size, edit the video or audio, and more.
- Record video, audio, webcam and take screenshots on Windows/Mac.
- Preview data before saving.
- It is safe and easy to use.
Steps on How to Record Audio on iPad with FoneLab Screen Recorder:
Step 1First and foremost, go to the official website of FoneLab Screen Recorder to download and install it on your computer.
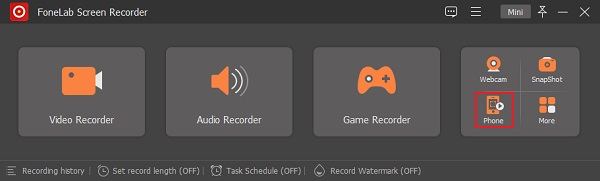
Step 2Next, connect your iPad using a USB cable. And on the mini main interface of the program, click the Phone option on the left pane.
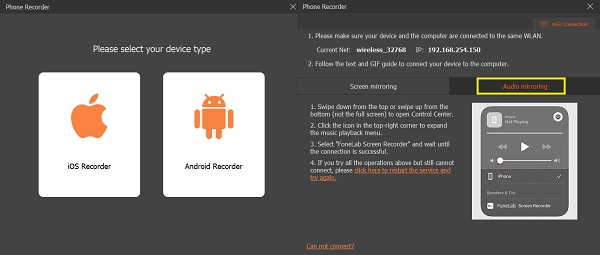
Step 3Then, choose the iOS Recorder on the next window. Then, you will see the option Audio mirroring, click and follow the steps to connect your iPad.
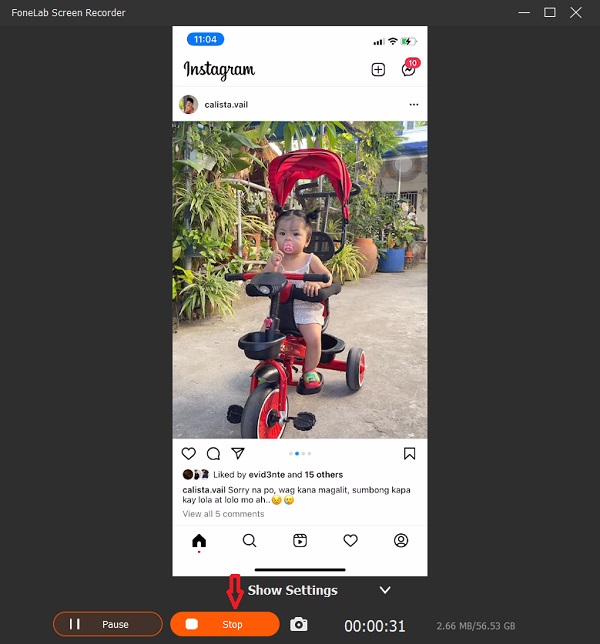
Step 4When your iPad is connected successfully, play any song or audio on your iPad. Then, click the Record button.
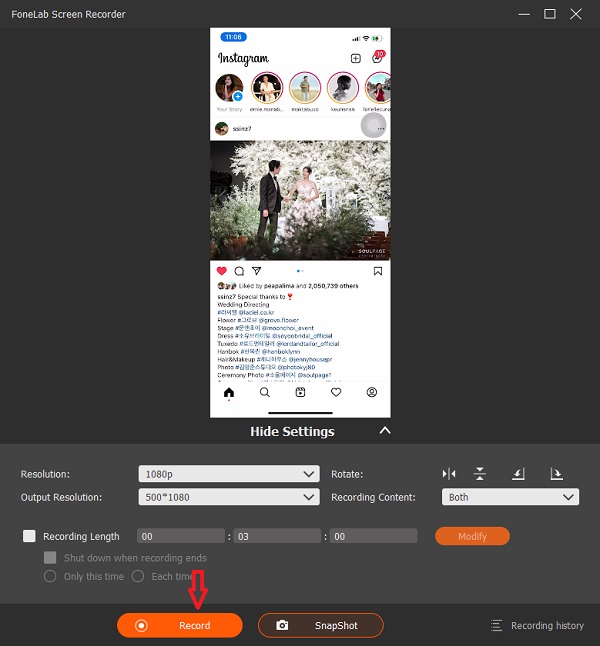
Step 5After recording the sound you like, click the Stop button.
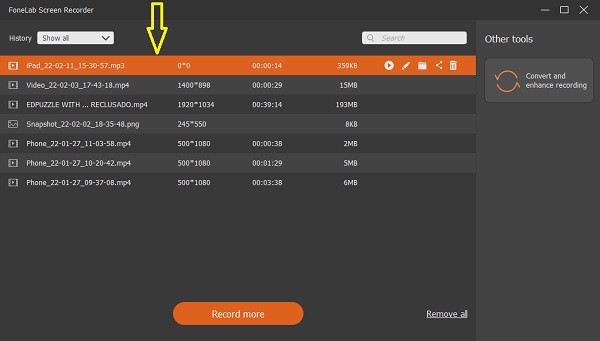
Step 6Finally, you’ll see the recorded audio, and you can play it with your chosen audio player. You can also Rename it, choose a Folder Path for it, Share it, or Delete it to re-record it.
So, that’s it! We see that there are a lot of features and functions FoneLab Screen Recorder can offer. That is why we highly recommend this tool as the best recorder that you can use to fit your needs.
Part 5. FAQs About Audio Recording on iPad
1. Where is microphone on iPad?
The iPad's microphone is placed on its top near the front camera. But, there are different models of the iPad, so it is also possible that the microphone's location is also different.
2. How long can an iPad record audio?
Know that there are no limits in taking a record on iPad with audio recording. But, you will only be limited if you have limited storage only. However, you can always upgrade your storage plan to record more take lots of videos and photos.
In summary, you now know detailed steps of audio recording an iPad. There are many ways to record audio, sound, music, voice, and more. Yet, FoneLab Screen Recorder is the tool that you can depend on whatever recorder you want to do. It is an all-in-one program that will ease your burden. But, in the end, it is still your choice.
FoneLab Screen Recorder allows you to capture video, audio, online tutorial, etc on Windows/Mac, and you can easily customize size, edit the video or audio, and more.
- Record video, audio, webcam and take screenshots on Windows/Mac.
- Preview data before saving.
- It is safe and easy to use.