Proven Methods to Record Screen on Windows, Mac and Online
 Posted by Lisa Ou / Dec 25, 2020 16:00
- I want to record an important meeting with my customers. How to record screen on Windows with high quality?
- How to record screen on Mac? I need to get a video tutorial for a Mac application, but I cannot find a suitable screen recorder for Mac.
- Is there any method to capture a screen online? I do not want to download or purchase extra programs for this.
What should be the best method to record screen on Windows, Mac and online?
Whether you need capture videos, audios, videos, games, or even edit the videos with annotation tools, FoneLab Screen Recorder should always the first choice. Just record a video for the computer screen with few clicks now.


Guide List
1. How to Record Screen on Windows
Option 1. Record Screen on Windows with FoneLab
FoneLab Screen Recorder is an all-rounded onscreen capturer to record screen, capture computer audio and take snapshots. The Blue light real-time encoding technology guarantees you excellent image and sound quality.
- Customized screen size to record onscreen activities in high quality.
- Record online commentary from system audio and microphone.
- Take a snapshot at any customized size and save useful part.
- Multiple editing tools, annotation widgets and drawing panels.
FoneLab Screen Recorder allows you to capture video, audio, online tutorial, etc on Windows/Mac, and you can easily customize size, edit the video or audio, and more.
- Record video, audio, webcam and take screenshots on Windows/Mac.
- Preview data before saving.
- It is safe and easy to use.
Step 1Customize video screen size
Once you install video recorder program on your computer, you can click the Video Recorder option. It will automatically recognize recording window. In order to record a selection screen on Windows, you can enter the pixels or adjust the frame to capture the desired area.

Step 2Capture desired audio file
Click the Audio Recorder to enter the audio recording interface. Choose the System sound only if you need to record music of computer. As for video meetings, you have to turn on both System sound and Microphone. After that adjust the volume.
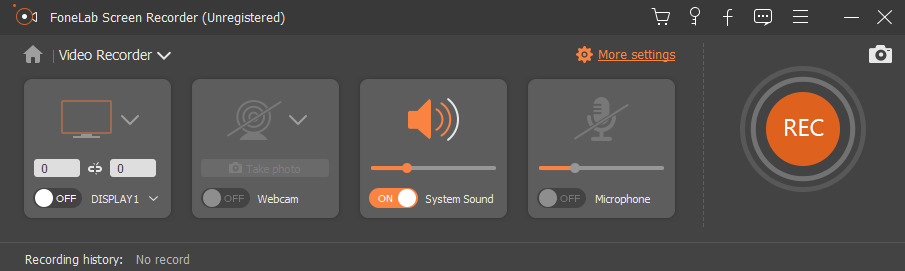
Step 3Record screen on Windows
You can also make a schedule for the screen recording process. Once you have everything set up, you can click the REC button to record screen on Windows. During the process, you can also take screenshots for some important points.
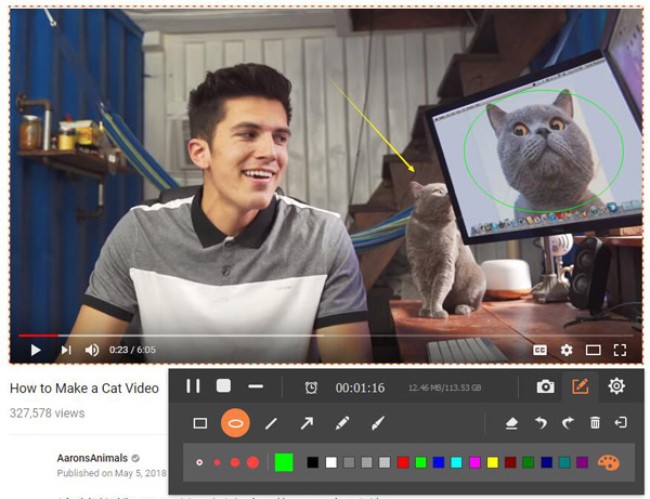
Step 4Edit the captured videos
While screen recording, you can add annotation elements to the captured videos, such as text, line, callout, and even adjust the color of these elements to highlight the important part. Click the REC button again to finish recording screen on Windows.
Option 2. Record Screen on Windows with Powerpoint
If you are a powerpoint user, you can use its built-in screen recording feature to make powerpoint into a video without downloading other recording programs.
Step 1Launch powerpoint and click Insert > Screen Recording.


Step 2Click Select Area to choose what you want to capture, and then begin to record screen.
Option 3. Record Screen on Windows 10 with Default Settings
Windows 10 has a new feature to help users record screen with its built-in feature. You can check its tutorial as below.
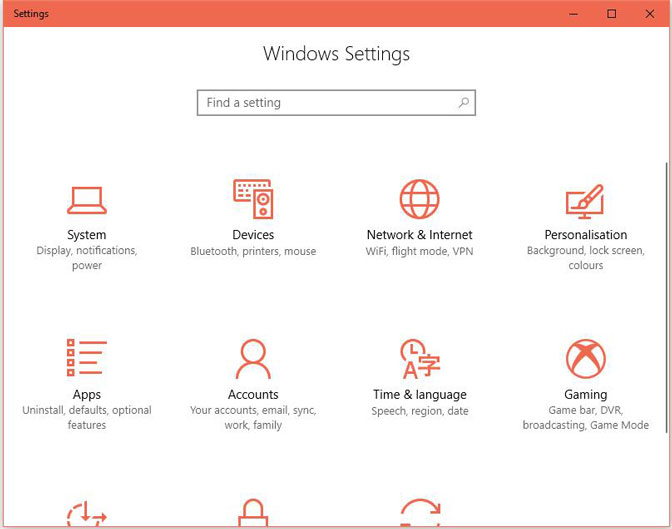
Step 1Click Windows icon > Settings > Gaming.
Step 2Locate Game bar, and then turn on the button under Record game clips, screenshots and broadcast using Game bar.
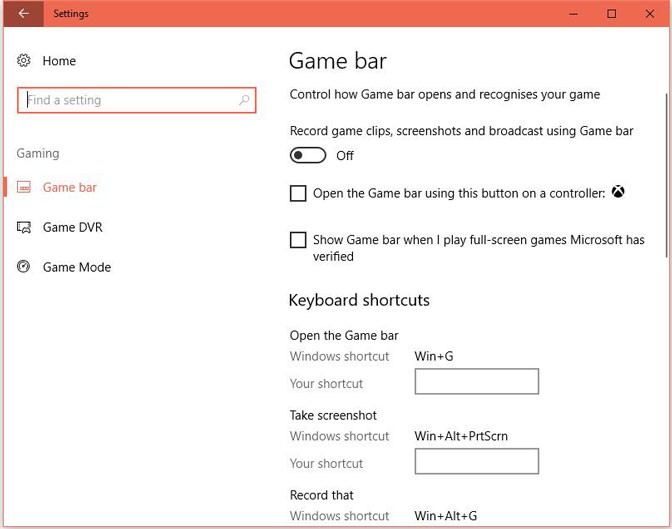
Step 3Press Win and G keys at the same time, check the box next to Yes, this is a game. Finally, press Win + Alt + R to begin the recording.
2. How to Take Screen on Mac
Option 1. Record Screen on Mac with FoneLab
FoneLab Screen Recorder for Mac is one of the most professional screen recorders on Mac. The program takes live videos, web meetings, Skype chats, and so on in different formats.
- Record screen in customized size according to your requirement.
- Capture audio files from different sources in high quality.
- Edit the captured Mac screen with multiple annotation tools.
- Locate, share, and view the captured files with ease.
FoneLab Screen Recorder allows you to capture video, audio, online tutorial, etc on Windows/Mac, and you can easily customize size, edit the video or audio, and more.
- Record video, audio, webcam and take screenshots on Windows/Mac.
- Preview data before saving.
- It is safe and easy to use.
As for recording gameplay screen on computer, Bandicam should be a free capturing software. It enables you to record the target files in both DirectX and OpenGL.
- Capture screen, voice and video simultaneously in an easy process.
- Custom the logo for the video and real-time drawing features.
- The recorded video for free version has watermark and minute limitation.
Step 1Choose the screen size
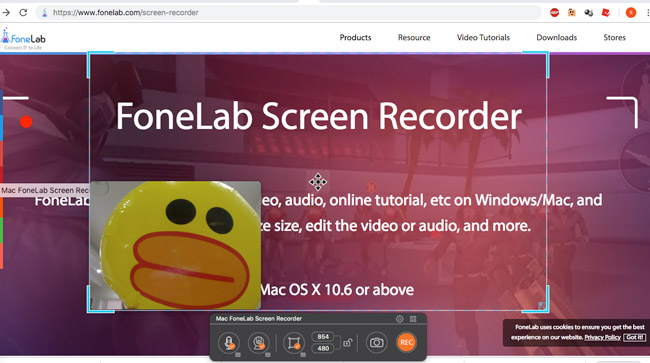
Click the third icon to select a screen size, Full size, Fixed region, or a Custom region. Just choose one default size or adjust the frame of the recording window to record screen on Mac.
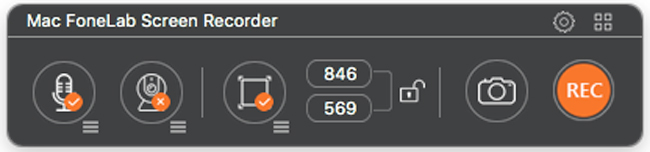
Step 2Add the built-in camera
In order to take screen on Mac for gameplay or web meetings, you have to add the built-in camera to record commentary or presentation. Just click the second Camera icon to active the FaceTime HD Camera.
Step 3Adjust the audio files
After that you can click the Audio icon to add the built-in Input or other audio settings to record audio from different source. Of course, you can also adjust the volume to get the best result.
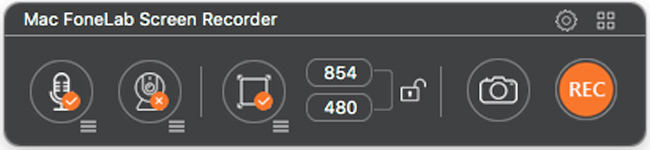
Step 4Record screen on Mac
Click the red REC button to take screen on Mac. After that you can click the Annotation button to add text, line, arrow and more other elements to highlight the important points.
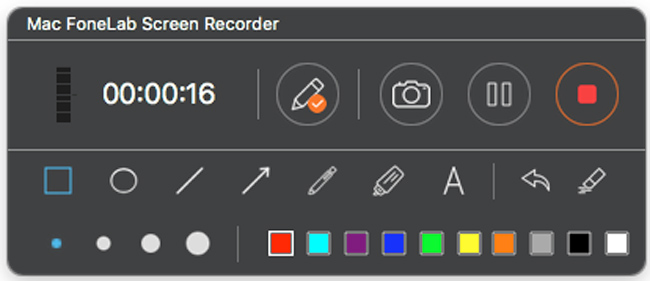
When you need to get some important points for the video, or make some thumbnails for the video, you can use the camera button to get screenshots within one click.
Option 2. Record Screen on Mac with QuickTime
Step 1Launch Quick Time.
Step 2Click File > New Screen Recording.

Step 3Click the red recording button to begin.
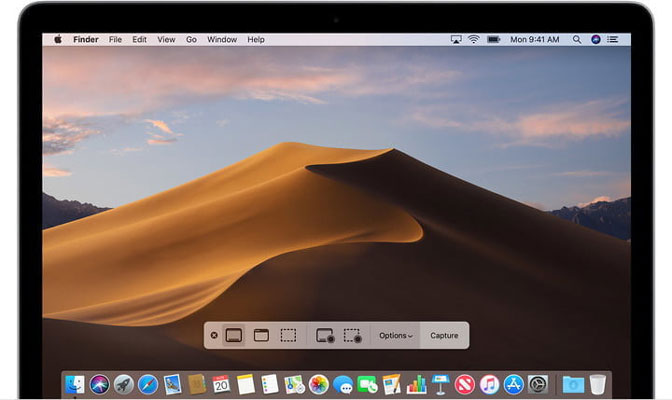
Option 3. Record Screen on macOS Mojave
If you are using macOS Mojave, you have the third option - its new feature to record screen on Mac.
Step 1Press Command + Shift + 5 to launch the recording toolbar.
Step 2Select the recording area and click Capture.
Step 3Save the recording video.
FoneLab Screen Recorder allows you to capture video, audio, online tutorial, etc on Windows/Mac, and you can easily customize size, edit the video or audio, and more.
- Record video, audio, webcam and take screenshots on Windows/Mac.
- Preview data before saving.
- It is safe and easy to use.
3. How to Capture Screen Online
What should you do if you just want to record screen online without extra programs? This part shares two major online screen recorders to capture desired files.
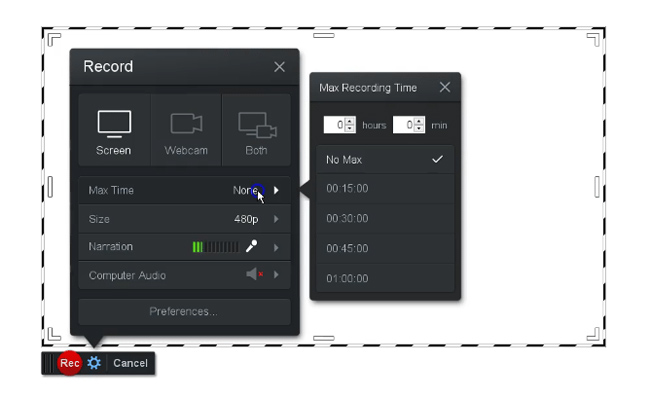
Option 1. Screencast-O-Matic
Screencast-O-Matic is an online screen capturer to record screen online for all activities on your computer. The free version only supports 15 minutes, you can upgrade to Pro version with US$1.50 per month.
Step 1Click the Launch Free Recorder button, which the program will start up a recording window. After that, you can choose from Screen, Webcam or Both to record onscreen activities online.
Note: Add audio and narration with one click. You can record audio files from both the system sound and microphone.
Step 2he free version only enables you to trim the video files. When you need to further edit the videos with more features, you have to upgrade to the Pro version, or import the video to some professional video-editing program instead.
Step 3After that you can save the video to computer, Chromebook or Google Drive. Of course, you can also publish your video to social media sites.
It should be a handy screen recorder to record some short videos. When you need to add mouse-tracking features, drawing tools, remove watermark or record unlimited video clips, you have to upgrade to the Pro version instead.
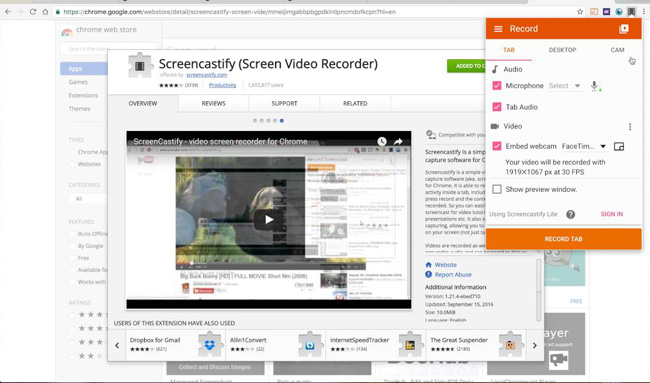
Option 2. Screencastify
If you just need to record files, online games, meetings or other screen of browser, Screencastify is chrome plugin for free. Different from the other screen recorder, the program has a function to record Browser Tab.
Step 1Just add the screen recorder into Chrome. After that you need to activate and launch the program to take screen online. Choose the desired recording mode to get the desired video. Adjust the settings for recording audio files.
Step 2Moreover, you can get the best quality for the videos and audios in Settings. After that, you can annotate your screen with a pen tool or focus a spotlight on your mouse.
Step 3Once you record screen online, you can save the files to Google Drive. When you need to publish to YouTube website, or save the video to your computer, you can always find a solution from the online screen recorder.
If you need to export the files as MP4 or GIF files, crop/trim your recording, or remove the watermark from the video files, you have to upgrade to the Premium version in order to record screen online.
Conclusion
If you are looking for the methods to record screen for your computer, you can find the detailed process from the article. As for capturing screen online, some browser plugins should be helpful.
When you need to record screen on Windows or Mac, FoneLab Screen Recorder is definitely the first choice. If you have any other query about how to record screen on Windows, Mac, or online, you can share more comments in the article.
FoneLab Screen Recorder allows you to capture video, audio, online tutorial, etc on Windows/Mac, and you can easily customize size, edit the video or audio, and more.
- Record video, audio, webcam and take screenshots on Windows/Mac.
- Preview data before saving.
- It is safe and easy to use.