How to Record Messenger Video Calls in Easy Different Ways
 Posted by Lisa Ou / July 06, 2023 16:00
Messenger is one of the most famous apps existing at this present time. You can use it to stay connected to your relatives and friends via chats and video calls, even if they are far from you.

Many people wonder if you can record the Messenger app video calls. Definitely, yes. Messenger does not prohibit you from doing that, unlike other apps. However, you need to tell the person on the other line that you are recording and not to take any illegal actions. Consent is a must.
Anyway, we prepared easy different ways to record your Messenger video calls. Please choose the most appropriate method for you below.
FoneLab Screen Recorder allows you to capture video, audio, online tutorial, etc on Windows/Mac, and you can easily customize size, edit the video or audio, and more.
- Record video, audio, webcam and take screenshots on Windows/Mac.
- Preview data before saving.
- It is safe and easy to use.

Guide List
Part 1. How to Record Messenger Video Calls on iPhone or iPad
You can have and use the Messenger app on your iPad and iPhone. This method is for you if you use these devices to record your Messenger video calls! You will not have difficulties recording if you use an iPhone or iPad. They have a built-in screen recorder that can be served as your Messenger video call recorder. In this case, you do not need an alternative or supporting third-party apps. Also, the recording is unlimited, and it only depends on the storage space of your iPhone or iPad. The mentioned 2 devices have the same process and button for iOS recording. Please see the detailed steps below.
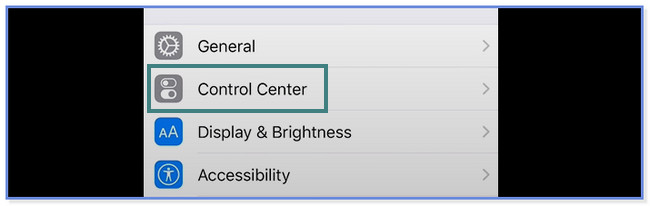
Step 1Please look for the Settings app on your iPhone and launch it by tapping its icon. After that, scroll down and find the Control Center button. Tap it, and you will see the customizations you can edit.
Step 2Tap the Customize Controls button at the bottom of the main interface. Later, swipe down the screen and locate the Screen Recording icon. Once you have found it, please tap the Plus icon on the right. Later, you will see the built-in feature at the top of your screen.
Step 3Please start the video call session on your Messenger app. After that, swipe down the Control Center at the top and locate the Screen Recording icon. Tap the icon, and the screen recording will start automatically.
Part 2. How to Record Messenger Video Calls on Android
If you are using an Android phone, refer to the methods of this post. You only need to choose the most appropriate way to fit your requirements. Please scroll down to learn more information and know the app and built-in tool you could use.
Option 1. Use Built-In Mirroring Feature
Not all Android phones have built-in screen recording, unlike iPhones and iPads. If yours does not have one, please proceed with option 2.
However, you are lucky if your Android phone has a built-in screen recorder, especially if your phone runs out of storage. The reason is that you do not need to download any recording app. Please imitate the steps below to discover how to record Messenger video calls on an Android built-in recorder.
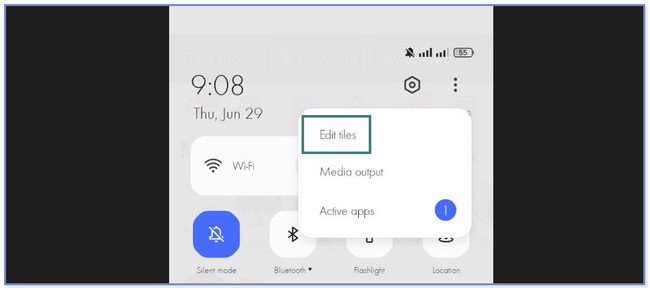
Step 1Swipe down the Notification Bar of your Android phone. Later, you will see the active tiles listed on the main interface. If you cannot see the screen recording feature, please tap the Three Dots icon at the top-right corner.
Step 2A new list option will appear on your screen. Please tap the Edit Tiles button. After that, locate the Screen Recording icon on the inactive tiles.
Step 3Tap the Plus button or icon to add the screen recording feature to the top, the active tiles. Launch the Messenger app and video-call the person you want to record the session. After that, please swipe the Notification Bar and tap the Screen Recording icon. The recording will start automatically.
FoneLab Screen Recorder allows you to capture video, audio, online tutorial, etc on Windows/Mac, and you can easily customize size, edit the video or audio, and more.
- Record video, audio, webcam and take screenshots on Windows/Mac.
- Preview data before saving.
- It is safe and easy to use.
Option 2. Use A Third-Party App
Screen Recorder - XRecorder is the recommended app to record Messenger video calls in this post. It has the highest ratings on the Google Play Store based on the experiences of the people who downloaded and used it. This app allows and permits you to draw on the screen using different colors while screen recording. Also, you can adjust the resolution, quality, and destination folder before you record your screen.
But this tool is far from perfect. You can encounter its downside while using it. The app causes lag on your screen when you start the recording. Also, it requires you to rate the app every time. In addition, ads will keep on popping on your screen.
Please see the steps below to learn how to use the Facebook Messenger recorder.
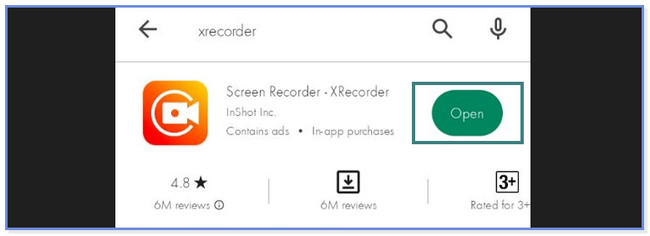
Step 1Go to the Google Play Store to download Screen Recording - XRecorder on your phone. After that, search for the name of the app. Please choose it from the options. If you cannot see its icon, refer to the screenshot below. Later, click the Install button and wait until the downloading process ends. To launch the app, please tap the Open button on the right.
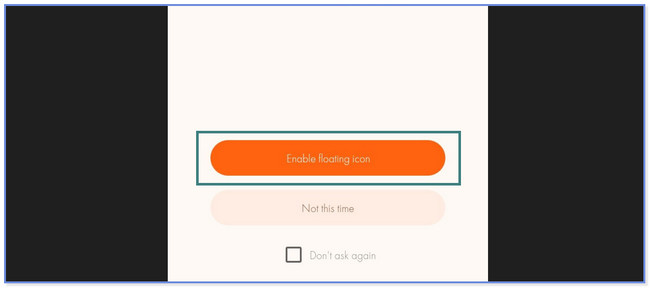
Step 2Tap the Got It icon after launching the app. Afterward, please choose the Enable Floating Window button. Locate the Messenger app on the next screen and tap the Allowed button.
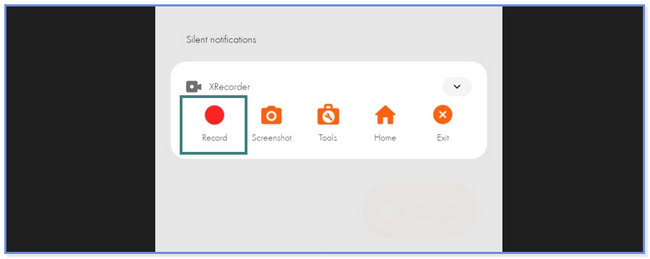
Step 3Start the video calling session and swipe down the Notification Bar section at the top. Tap the Red Record button, and the screen recording will start automatically.
Part 3. How to Record Messenger Video Calls on Computer with FoneLab Screen Recorder
What if you are using your computer while video calling on Messenger? FoneLab Screen Recorder is the most effective recording tool on Mac or Windows. Also, this software can record in high quality. In this case, you do not need editing tools to enhance the video. In addition, it allows you to customize the recording size of the recording you will make. This feature is beneficial if your computer runs out of storage space.
FoneLab Screen Recorder allows you to capture video, audio, online tutorial, etc on Windows/Mac, and you can easily customize size, edit the video or audio, and more.
- Record video, audio, webcam and take screenshots on Windows/Mac.
- Preview data before saving.
- It is safe and easy to use.
Furthermore, you can use this tool to learn how to record Facebook videos. The tool lets you take screenshots while you are currently recording. You can also edit the video after you capture it. You only need to use the tool’s editing features. There’s a lot more you can discover about this tool. Please see its steps below as your guide.
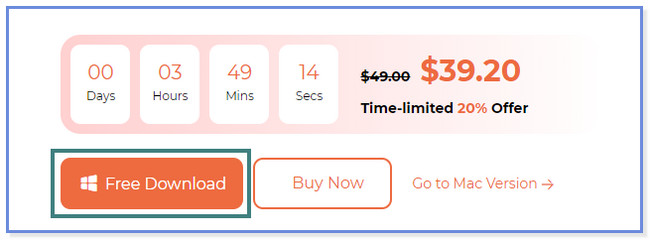
Step 1Get FoneLab Screen Recorder on your computer by clicking the Free Download button. If you are using Windows, please click the Download File at the bottom of the main interface. But if you use Mac, please click the Downloaded File at the top and drag it to the Application Folder. Later, set it up and install it afterward to launch the software.
Step 2You will see the different recording modes of the software. After that, please choose the Video Recorder icon on the left side of the tool.
Note: If you want to record your iPhone or Android, please click the Phone icon on the right. Follow the onscreen instruction to capture your phone afterward successfully.
Step 3If you want to capture the whole screen, please click the Full button on the left side of the tool. But if you prefer recording only a portion of the screen, please click the Custom button on the left. Later, trace the screen you want to capture using the Adjustable Frame of the software. In addition, you can also use the Webcam, System Sound, and Microphone features of the tool. You only need to turn them on by sliding their sliders. After that, click the REC button on the right to start the recording process.

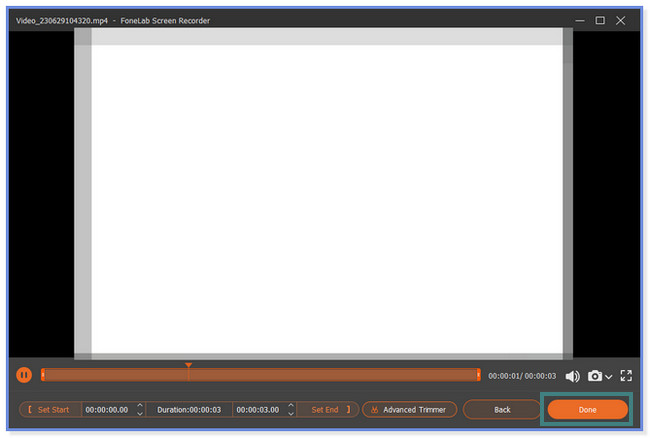
Step 4To end the recording session, click the Red Box icon. After that, the video will appear on the screen. Click the Done icon or button to save the video on your computer.
Part 4. FAQs about How to Record Messenger Video Calls
1. How to save voice messages on Messenger?
Sadly, there's no way you can save voice messages on Messenger on your phone or computer. Messenger only allows you to bump, pin, delete, forward, and report the voice message. You only need to long-press the voice message and tap the voice message to perform that. If you want a copy of the message, you can record it instead of saving it. In that case, you can use the methods of this post.
2. How long can you voice record on Messenger?
Before, you could only voice record on Messenger with its built-in feature for only 1 minute or 60 seconds. But thanks to Facebook, it extended the time duration to 30 minutes.
FoneLab Screen Recorder allows you to capture video, audio, online tutorial, etc on Windows/Mac, and you can easily customize size, edit the video or audio, and more.
- Record video, audio, webcam and take screenshots on Windows/Mac.
- Preview data before saving.
- It is safe and easy to use.
That's all about how you will record Messenger video calls. We hope these different methods for recording Messenger video calls on phones and computers helped you greatly.