- Part 1. How to Screenshot on Mac with Key Shortcut Commands
- Part 2. How to Take a Screenshot on Mac with the Preview App
- Part 3. How to Take Screenshot on Mac with Screenshot Toolbar
- Part 4. How to Take a Screenshots on a Mac with FoneLab Screen Recorder
- Part 5. FAQs about How to Screenshot on a Mac
How to Take a Screenshot on Mac in 4 Convenient Ways
 Updated by
 Hi! How do I screenshot on my Mac? My professor sent the video of his detailed explanation about our topic this morning, as suggested by us. He posted presentations on the screen. I want to take note of them and save them to my Mac by taking a screenshot. However, I am unsure how to take a screenshot on a Mac. I hope you can help me with this process. Thank you!
Taking screenshots on computers, such as a Mac, is convenient because it allows for a larger screen view compared to smartphones. In this post, we have listed 4 proven and tested practices for taking a screenshot on your Mac. Spend a few minutes scrolling through the article below to learn the full details.


Guide List
- Part 1. How to Screenshot on Mac with Key Shortcut Commands
- Part 2. How to Take a Screenshot on Mac with the Preview App
- Part 3. How to Take Screenshot on Mac with Screenshot Toolbar
- Part 4. How to Take a Screenshots on a Mac with FoneLab Screen Recorder
- Part 5. FAQs about How to Screenshot on a Mac
Part 1. How to Screenshot on Mac with Key Shortcut Commands
If you're looking for the quickest way for a Mac screenshot, shortcut key commands are the way to go. It is a technique that utilizes the Mac keyboard to create combinations that access the screenshot features. In fact, there are 3 shortcut key combinations that you can use to take a screenshot on the mentioned Apple device.
Before anything else, please ensure that you press the correct key combinations. Pressing the wrong key might lead to other Mac functionalities that might be harmful to your data. How to take a screenshot on Mac with a shortcut key command? The steps are provided below.
| Shortcut Key Command | Action | Destination Folder |
|---|---|---|
| Shift + Command + 3 | It captures the entire Mac screen. | Mac Desktop |
| Shift + Command + 4 | It allows you to capture or take a screenshot of a portion of the screen, depending on your preference. | Mac Desktop |
| Shift + Command + 4 + Space Bar | It enables you to take a screenshot of a Mac window or menu. | Mac Desktop |
Part 2. How to Take a Screenshot on Mac with the Preview App
Preview is a built-in Mac program responsible for viewing photos. The best thing about this feature is that it offers 3 options for taking a screenshot of your Mac screen. It enables you to take a quick screenshot of the entire screen of your Mac, a portion of it, and windows. How to screenshot on a Mac with Preview? The steps are provided below.
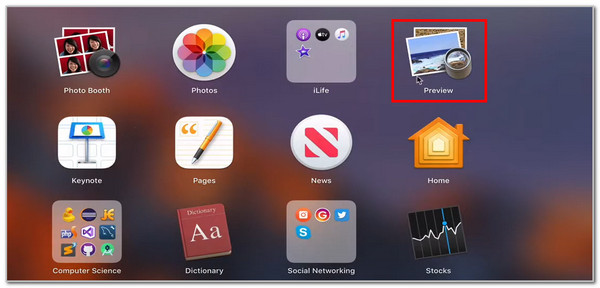
Step 1Open your Mac by unlocking it. After that, click the Launchpad program at the bottom left of the screen. Locate the Preview tool in the list and click it to open. Then, no window will appear on the screen. Click the File button at the top left. The drop-down options will appear on the screen.
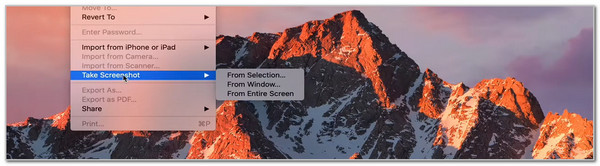
Step 2Select the Take Screenshot button from the drop-down option list. Then, 3 features will appear on the right. You can click the From Selection, From Window, and From Entire Screen features. Use the cursor to select the Mac screen you want to capture as a screenshot. Release the cursor to take the screenshot.
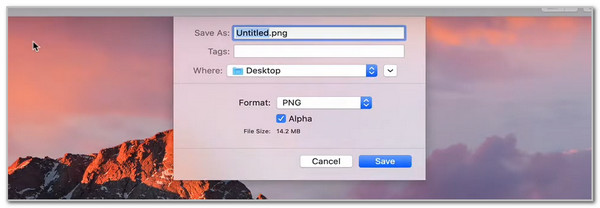
Step 3The screenshot preview will be prompted on the screen. You may select the destination folder of the screenshot. Rename it first to locate it in the destination folder easily. Then, select Save to save the settings. Then, click the Export button at the top left to save the screenshot on your Mac.
Part 3. How to Take Screenshot on Mac with Screenshot Toolbar
There is also a Mac screenshot shortcut that allows you to access different screenshot features, called the Screenshot Toolbar. This tool offers 3 screenshot options and 2 screen recording features. You can access the Screenshot Toolbar by pressing the Shift + Command + 5 key combination. Then, you can choose one of the screenshot features. The guide can be found in the screenshot and table below.
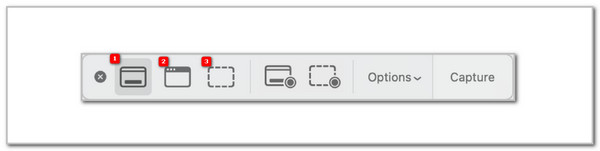
| Number from the Screenshot Above | Function |
|---|---|
| 1 | This feature captures the entire screen on your Mac. |
| 2 | It allows you to capture a window from the Mac. |
| 3 | It enables you to select a portion of the screen to capture as a screenshot on your Mac. |
Part 4. How to Take a Screenshots on a Mac with FoneLab Screen Recorder
FoneLab Screen Recorder is a third-party tool for screen recording. The good thing about it is that it has a screenshot feature that allows for high-quality screenshots. It enables you to take a screenshot of the entire Mac screen, a window, or a portion of it. This tool will allow you to make basic edits to the screenshot after the procedure. You can add number signs, blur a portion, add text, and more. Please view the guide below for instructions on how to screenshot a Mac using this tool.
FoneLab Screen Recorder allows you to capture video, audio, online tutorial, etc on Windows/Mac, and you can easily customize size, edit the video or audio, and more.
- Record video, audio, webcam and take screenshots on Windows/Mac.
- Preview data before saving.
- It is safe and easy to use.
Step 1Click the Free Download option on the official website of FoneLab Screen Recorder. Then, the download process will begin. Set up, install, and launch the tool afterward.

Step 2Go to the Mac screen where you want to take a screenshot. Then, click the Camera button at the top right of the screen. The cursor will allow you to select the area of the Mac screen that you want to capture. Release the cursor to take the screenshot.
Step 3The toolbar will appear. You may edit the screenshot before saving it on your Mac. Then, click the Save button afterward to save the screenshot to your Mac.
Part 5. FAQs about How to Screenshot on a Mac
Why can't I take a screenshot on my MacBook?
The reason you cannot take a screenshot on your Mac depends on the method used. If you use shortcut key combinations, you must check your Mac keyboard. They might be malfunctioning or broken. On the other hand, using the Preview program, the issue might be with the program or the Mac system. We suggest restarting the Mac or force-quitting the mentioned programs to fix the problem with the screenshot process.
Why aren't my screenshots saving on my Mac?
First, ensure that the location you are checking is associated with the method used for taking a screenshot. You need to check all of the possible folders where the tool can store them. If you found nothing, please check the Mac's storage space. A low storage space can prevent screenshots from being saved in your Mac album. If the storage is fully occupied, free up some space to fix the issue.
All in all, you can take screenshots on a Mac in numerous ways. This article outlines the procedures for using Mac shortcut key combinations, built-in programs, and a third-party tool. FoneLab Screen Recorder is the most beneficial method encountered. After taking screenshots on your Mac, you can make further basic edits to your screenshots. There's more to discover about this tool. Downloading it is the key to exploring more of its features.
FoneLab Screen Recorder allows you to capture video, audio, online tutorial, etc on Windows/Mac, and you can easily customize size, edit the video or audio, and more.
- Record video, audio, webcam and take screenshots on Windows/Mac.
- Preview data before saving.
- It is safe and easy to use.