
 iPhone Data Recovery
 iOS System Recovery
 iOS Data Backup & Restore
 iOS Unlocker
 iPhone Password Manager
 Location Changer
 Android Data Recovery
 Broken Android Data Extraction
 Android Data Backup & Restore
 Android Unlocker
 FoneTrans for iOS
 iPhone Data Eraser
 iPhone Cleaner
 HEIC Converter
 HyperTrans
 WhatsApp Transfer for iOS
 Mac Sweep
 Data Retriever
 Mac Data Retriever
 Video Converter Ultimate
 Screen Recorder
 Phone Mirror
- Convert AVCHD to MP4
- Convert MP4 to WAV
- Convert MP4 to WebM
- Convert MPG to MP4
- Convert SWF to MP4
- Convert MP4 to OGG
- Convert VOB to MP4
- Convert M3U8 to MP4
- Convert MP4 to MPEG
- Embed Subtitles into MP4
- MP4 Splitters
- Remove Audio from MP4
- Convert 3GP Videos to MP4
- Edit MP4 Files
- Convert AVI to MP4
- Convert MOD to MP4
- Convert MP4 to MKV
- Convert WMA to MP4
- Convert MP4 to WMV
The Complete iPhone QuickStart Guide: For Your New Device
 Updated by
 Opening a brand-new iPhone is one of those rare tech moments that still feels genuinely exciting. The clean screen, the unmistakable "fresh Apple" scent, and the promise of a faster, smoother experience. But that excitement can quickly turn to anxiety when you realize you need to move years of photos, messages, settings, and app data from your old device.

I've unboxed and set up dozens of iPhones over the years—for myself, for family members, and for friends who'd rather hand me the box than deal with the setup process themselves. After all that experience, I can tell you this: the process has gotten significantly better, but it still has its gotchas. I've seen transfers fail, backups get corrupted, and friends realize two weeks later that their WhatsApp history never made it across.

Guide List
- Part 1: Pre-Setup Checklist (Don't Skip This!)
- Part 2: Using Apple's "Quick Start" (Device-to-Device Transfer)
- Part 3: Transferring Data and Choosing the Right Method
- Part 4: Post-Setup Optimization (The Expert Edge)
- Part 5: Troubleshooting Common QuickStart and Transfer Errors
- Part 6: Conclusion and Next Steps
Part 1: Pre-Setup Checklist (Don't Skip This!)
I cannot overstate how important this phase is. In my experience, about 80% of setup problems trace back to something that should have been done before the new device was even powered on.
Step 1Back Up Your Current iPhone. This is non-negotiable. I learned this lesson the hard way years ago when I skipped a backup and spent hours re-downloading apps and reconfiguring settings. More recently, a friend of mine lost three years of WhatsApp photos because she assumed Quick Start would grab everything—it didn't, and she had no backup to fall back on.
Action: Create a fresh backup of your old device using one of these methods:
- iCloud Backup: Go to Settings > [Your Name] > iCloud > iCloud Backup > Back Up Now. Make sure you're on Wi-Fi and have enough storage. Apple provides 5GB free, but if you're like most users with years of photos and messages, you'll likely need more. The good news: Apple often offers temporary iCloud storage when you buy a new iPhone—check your purchase confirmation email for details. Apple recommends having a backup before you begin.
- Encrypted Computer Backup: Connect to a computer, open Finder (Mac) or iTunes (Windows), select your device, and check Encrypt local backup to backup iPhone to iTunes/Finder. This preserves Health data, Keychain passwords, and browsing history—things that won't transfer with a standard unencrypted backup.
Pro Tip I've Learned: If you're low on iCloud storage and don't want to upgrade, the computer backup route is completely free and often faster for large data sets.
Step 2Gather Your Essentials. Having these ready before you start will save you from hunting around mid-setup while your new phone stares at you expectantly:
- Your Wi-Fi network name and password
- Your Apple ID email address and password (if you use a passkey, have that ready too)
- Your old device (charged and unlocked)
- If you're using a physical SIM card, have it ready to transfer. For eSIM, confirm with your carrier that they support activation on your new device—most major carriers do now, but smaller regional carriers sometimes require a call.
Step 3Charge Both Devices. Plug both devices into power. I've seen transfers fail halfway through because a battery died, and once the transfer fails, you're often forced to restart from scratch. Keep both devices plugged in until the migration completes—this is especially important for wireless transfers which can take 30 minutes or more depending on your data size.

With FoneTrans for iOS, you will enjoy freedom to transfer your data from iPhone to computer. You can not only transfer iPhone text messages to computer, but also photos, videos and contacts can be moved to PC easily.
- Transfer photos, videos, contacts, WhatsApp, and more data with ease.
- Preview data before transferring.
- iPhone, iPad and iPod touch are available.
Part 2: Using Apple's "Quick Start" (Device-to-Device Transfer)
Quick Start is Apple's automatic setup feature, introduced in iOS 11 and significantly refined over the years. It's by far the easiest method—when it works correctly. I've used it on every iPhone upgrade since the iPhone X, and it's gotten noticeably faster and more reliable with each iOS update.
Important Note: Quick Start only works during the initial setup of your new iPhone. If you've already passed the Hello screen and completed setup, you cannot use Quick Start without erasing your device and starting over.
Step 1Power On and Position Your Devices. Power on your new iPhone. You'll see the familiar Hello screen in multiple languages. Place it next to your old iPhone. Both devices need Bluetooth and Wi-Fi enabled. Your old device should automatically display a prompt saying Set Up New iPhone.
From my experience: If the prompt doesn't appear within about 30 seconds, restart both devices. Press and release Volume Up, press and release Volume Down, then hold the Side button until the Apple logo appears. This fixes the issue about 90% of the time.
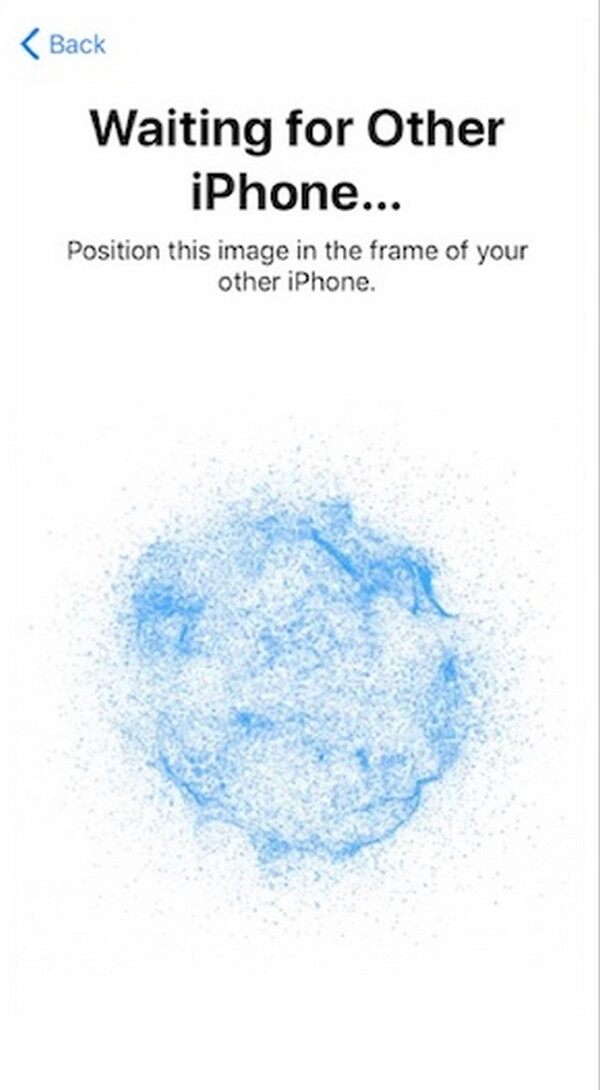
Step 2Scan the Encrypted Pattern. Your new iPhone will display a swirling blue particle animation. Use your old device's camera to center this animation in the viewfinder. This establishes an encrypted, secure connection between the two devices—Apple uses a combination of Bluetooth and Wi-Fi Direct to create a peer-to-peer link that doesn't go through the internet.
Step 3Complete Authentication and Security Setup. You'll be prompted to complete several steps:
- Enter your old device's passcode on the new iPhone—this confirms you have physical access to both devices
- Set up Face ID or Touch ID (I recommend doing this now rather than later—it saves time and ensures your biometrics are ready for app downloads and Apple Pay)
- Configure Apple Pay and Wallet if you use these services
With FoneTrans for iOS, you will enjoy freedom to transfer your data from iPhone to computer. You can not only transfer iPhone text messages to computer, but also photos, videos and contacts can be moved to PC easily.
- Transfer photos, videos, contacts, WhatsApp, and more data with ease.
- Preview data before transferring.
- iPhone, iPad and iPod touch are available.
Part 3: Transferring Data and Choosing the Right Method
At the Apps & Data screen, you have several options. Here's how to choose based on your situation, based on what I've seen work best across many upgrades.
3.1 Direct Wireless or Wired Transfer (Apple Quick Start)
Best for: Users who have not yet passed the Hello setup screen on their new iPhone.
Pros: Fastest method overall, transfers almost everything including apps, app data, messages, photos, home screen layout, and settings. No iCloud storage needed. No internet dependency beyond the initial activation.
Cons: Must be done during initial setup. Both devices need to be physically close and on power.
Step 1On the Apps & Data screen, select Transfer from iPhone.
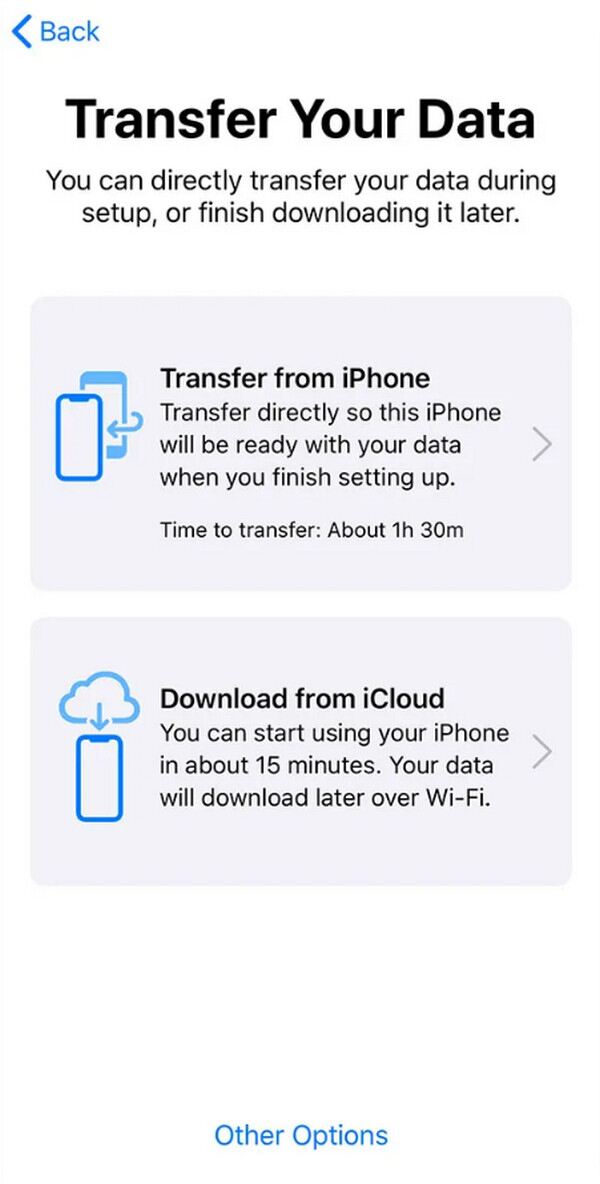
Step 2Keep both devices near each other and plugged into power. The transfer will begin automatically.
Step 3Wait for the transfer to complete. Your new iPhone will restart and you'll be prompted to complete the final setup steps.
The Wired Option (My Recommended Approach): For significantly faster transfer speeds, connect both iPhones using a Lightning-to-USB-C cable with the appropriate adapter, or a USB-C-to-USB-C cable if you're transferring between newer models.
With FoneTrans for iOS, you will enjoy freedom to transfer your data from iPhone to computer. You can not only transfer iPhone text messages to computer, but also photos, videos and contacts can be moved to PC easily.
- Transfer photos, videos, contacts, WhatsApp, and more data with ease.
- Preview data before transferring.
- iPhone, iPad and iPod touch are available.
3.2 Restoring from an iCloud Backup
Best for: Users upgrading remotely, replacing a lost or broken phone, or who prefer a completely wireless transfer that doesn't require both devices present.
Pros: No need to keep your old device nearby. Works anywhere with Wi-Fi. Preserves all settings and data just like Quick Start.
Cons: Requires sufficient iCloud storage. Slower than direct transfer, especially for large backups.
Step 1Before erasing your old device, ensure a fresh iCloud backup exists. Go to Settings > [Your Name] > iCloud > iCloud Backup > Back Up Now. Wait for the progress bar to complete.
Step 2On your new iPhone, reach the Apps & Data screen and select Restore from iCloud Backup.
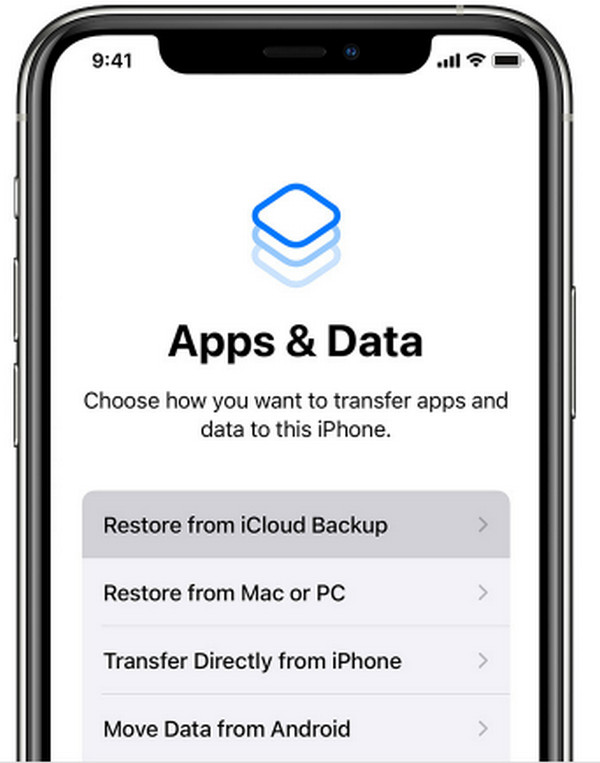
Step 3Sign in with your Apple ID and choose the most recent backup from the list.
3.3 Migrating from Android (Move to iOS)
Best for: Users switching from an Android device .
Step 1On your Android phone, download the Move to iOS app from the Google Play Store.
Step 2On your new iPhone, reach the Apps & Data screen and select Move Data from Android.
Step 3A secure code will appear on your iPhone. Enter this code on your Android device .
Step 4Select what you want to transfer—contacts, message history, photos and videos, web bookmarks, mail accounts, and calendars. WhatsApp chat history requires additional steps (see note below).
Step 5Wait for the transfer to complete.
Handling WhatsApp Chat History from Android: WhatsApp on Android backs up to Google Drive, not iCloud. To move your chat history to iPhone, use the official WhatsApp Move to iOS feature during the setup process . This transfers chats directly from Android to iPhone during the Move to iOS flow.
3.4 The Best Alternative: FoneTrans for iOS (Recommended for Post-Setup and Selective Transfer)
Best for: Users who have already completed the iPhone setup, want to transfer only specific files (not everything), or need a faster, no-reset solution.
Here's a scenario I've seen play out at least a dozen times: someone excitedly sets up their new iPhone, taps through the setup without reading carefully, and realizes an hour later that their messages, WhatsApp history, or photos didn't transfer. The official advice is always "erase your device and start over." That's frustrating—and often unnecessary.
Apple's built-in methods have a significant limitation: they only work during initial setup with a single exception for iCloud restore (which still requires an erase). If you've already completed setup, you're out of luck with Apple's tools.
This is where FoneTrans for iOS has become my go-to recommendation for clients, friends, and family. Unlike Apple's tools, it works on an iPhone that's already fully configured—no reset, no erasing, no starting over .
With FoneTrans for iOS, you will enjoy freedom to transfer your data from iPhone to computer. You can not only transfer iPhone text messages to computer, but also photos, videos and contacts can be moved to PC easily.
- Transfer photos, videos, contacts, WhatsApp, and more data with ease.
- Preview data before transferring.
- iPhone, iPad and iPod touch are available.
Why I recommend FoneTrans over other third-party tools:
- Works after setup—no reset required
- Selective transfer—move only what you need (photos, messages, WhatsApp chats, contacts, music, documents)
- Supports iOS-to-iOS and Android-to-iOS
- Very fast via USB—bypasses Wi-Fi limitations and iCloud storage caps
- Works on Windows and Mac
What FoneTrans for iOS can transfer: Contacts, messages (SMS, iMessage, WhatsApp, WeChat, Line, Viber, Messenger, QQ), photos, videos, music, podcasts, voice memos, ePub and PDF documents, notes, calendars, Safari bookmarks, call history, and app data.
Step 1Download and install FoneTrans for iOS on your computer. It works on both Windows and Mac.
Step 2Launch the software and connect both your old and new iPhones to the computer using their USB cables.
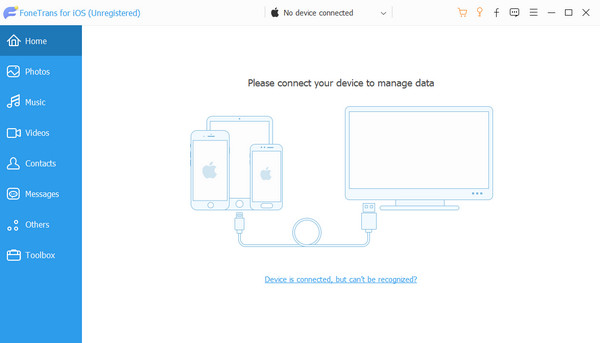
Step 3Once both devices are recognized, select the Phone to Phone transfer mode from the main interface.
Step 4Choose the specific data categories you wish to transfer. If you only want your WhatsApp chats and photos, select only those. If you want everything, select all categories.
Step 5Click the Transfer button and wait for the process to complete. Your new iPhone will retain all its existing settings and app data while receiving the selected files from the old device.
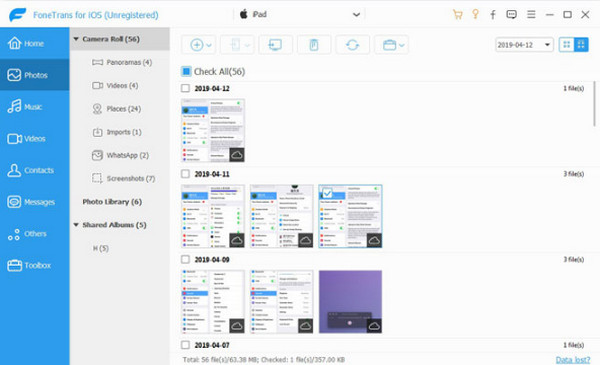
With FoneTrans for iOS, you will enjoy freedom to transfer your data from iPhone to computer. You can not only transfer iPhone text messages to computer, but also photos, videos and contacts can be moved to PC easily.
- Transfer photos, videos, contacts, WhatsApp, and more data with ease.
- Preview data before transferring.
- iPhone, iPad and iPod touch are available.
Part 4: Post-Setup Optimization (The Expert Edge)
Once your data is transferred, most guides stop. But the setup isn't really complete until you've configured a few critical settings. This is where I see the biggest difference between a basic setup and a fully optimized one.
4.1 Essential Privacy and Security Tweaks
Enable Stolen Device Protection:
Step 1Go to Settings > Face ID & Passcode > Turn On Stolen Device Protection.
Step 2Enter your passcode to confirm.
Why this matters: This feature, introduced in iOS 17.3, requires Face ID or Touch ID for critical actions even when you're away from familiar locations. It prevents someone who knows your passcode from changing your Apple ID password or disabling Find My.
Review App Tracking Permissions:
Step 1Go to Settings > Privacy & Security > Tracking.
Step 2Turn off Allow Apps to Request to Track. This prevents apps from asking to track you across other companies' apps and websites.
Check Location Services:
Step 1Go to Settings > Privacy & Security > Location Services.
Step 2Review each app and set to While Using for most apps, and Never for those that don't need your location at all.
4.2 Customizing Your Experience
Lock Screen and Widgets:
Step 1Press and hold on the Lock Screen (when the phone is awake but not unlocked).
Step 2Tap Customize at the bottom.
Step 3Add widgets for weather, calendar, fitness, or anything else you check frequently.
Optimizing Battery Health Settings:
Step 1Go to Settings > Battery > Battery Health & Charging.
Step 2Enable 80% Limit. This stops charging at 80% to reduce battery aging, particularly useful if you leave your phone plugged in overnight.
Step 3Turn on Optimized Battery Charging if it's not already enabled. This learns your charging habits and delays charging past 80% until you're about to unplug.
4.3 Software Update Check
Step 1Go to Settings > General > Software Update.
Step 2If an update is available, tap Download and Install.
Step 3Enter your passcode and agree to the terms.
With FoneTrans for iOS, you will enjoy freedom to transfer your data from iPhone to computer. You can not only transfer iPhone text messages to computer, but also photos, videos and contacts can be moved to PC easily.
- Transfer photos, videos, contacts, WhatsApp, and more data with ease.
- Preview data before transferring.
- iPhone, iPad and iPod touch are available.
Part 5: Troubleshooting Common QuickStart and Transfer Errors
Here are the most common problems I've encountered and the steps I use to resolve them. These come from actual experience helping others, not just theory.
Issue 1: The Quick Start animation doesn't appear
Step 1: Verify both devices have Bluetooth and Wi-Fi enabled. Toggle them off and on again to refresh the connection .
Step 2: Restart both devices. Press and release Volume Up, press and release Volume Down, then hold the Side button until the Apple logo appears .
Step 3: On the new iPhone, confirm you are on the Hello screen. If you have already passed it, Quick Start will not work.
Step 4: Check that your old device is running iOS 11 or later. Quick Start requires iOS 11 or newer .
Issue 2: The transfer freezes midway
Step 1: Wait 2–3 minutes. Sometimes the progress indicator stalls but the transfer continues in the background.
Step 2: If truly frozen, do not disconnect either device immediately. Force restart both devices.
Step 3: If you're using the direct wireless method and the freeze persists, try the wired method. Use a Lightning-to-USB-C cable with the appropriate adapter for a stable connection.
Issue 3: Apple ID verification code fails
Step 1: Double-check your Apple ID email and password for typos.
Step 2: Choose the option to Send Verification Code to a trusted phone number linked to your account.
Step 3: If you are setting up a new device and cannot access the trusted number, tap Didn't Get a Code? and select Send to Trusted Device if you still have your old iPhone active and signed in.
Step 4: As a last resort, visit iforgot.apple.com to initiate account recovery.
Issue 4: What if I already set up my new iPhone but forgot to transfer data?
Step 1: Do not panic and do not immediately erase your device. You have options that don't require starting over.
Step 2: Use FoneTrans for iOS. Since it works on already-configured devices, simply connect your old and new iPhones to your computer and transfer only the missing data—photos, messages, contacts, WhatsApp history, or whatever else didn't make it across.
Step 3: If you prefer a native Apple method, you must erase your new iPhone. Go to Settings > General > Transfer or Reset iPhone > Erase All Content and Settings.
Issue 5: WhatsApp history didn't transfer
Step 1: If you're coming from Android and used Move to iOS, check that you selected WhatsApp during the transfer process. Many people miss this step.
Step 2: If the transfer was incomplete, use FoneTrans for iOS which supports WhatsApp transfer from both Android and iOS devices.
Step 3: For iOS-to-iOS WhatsApp transfer, iCloud backup is the native method. Go to WhatsApp > Settings > Chats > Chat Backup > Back Up Now on your old device, then log into the same iCloud account on your new device and WhatsApp will offer to restore from backup.
Part 6: Conclusion and Next Steps
You've done it. Your data is transferred, your settings are configured, and your new iPhone is ready to become your daily driver.
Quick recap of what we covered:
- Pre-setup checklist—back up your old device, gather essentials, charge both devices
- Quick Start—use Apple's built-in transfer tool during initial setup
- Choosing your method—direct transfer, iCloud restore, Android migration, or FoneTrans for iOS for post-setup scenarios
- Post-setup optimization—security, privacy, battery health, and updates
- Troubleshooting—real solutions for common problems
What I recommend you do next:
- Review your privacy settings—go through Settings > Privacy & Security and review each category
- Enable Stolen Device Protection if you haven't already
- Set up your Apple Watch if you have one
- Configure Family Sharing if you're sharing purchases or subscriptions
With FoneTrans for iOS, you will enjoy freedom to transfer your data from iPhone to computer. You can not only transfer iPhone text messages to computer, but also photos, videos and contacts can be moved to PC easily.
- Transfer photos, videos, contacts, WhatsApp, and more data with ease.
- Preview data before transferring.
- iPhone, iPad and iPod touch are available.



