iPhone Data Recovery
 iOS System Recovery
 iOS Data Backup & Restore
 iOS Unlocker
 iPhone Password Manager
 Location Changer
 Android Data Recovery
 Broken Android Data Extraction
 Android Data Backup & Restore
 Android Unlocker
 FoneTrans for iOS
 iPhone Data Eraser
 iPhone Cleaner
 HEIC Converter
 HyperTrans
 WhatsApp Transfer for iOS
 Mac Sweep
 Data Retriever
 Mac Data Retriever
 Video Converter Ultimate
 Screen Recorder
 Phone Mirror
- Part 1. Quick Reference: BIOS Keys by PC & Motherboard Brand
- Part 2. The Hotkey Method
- Part 3. Access BIOS via Windows Settings
- Part 4. Troubleshooting: What to Do If You Can’t Enter BIOS?
- Part 5. Lost Data After Changing BIOS Settings?
- Part 6. Monopolizing Long-Tail Searches by Region
- Part 7. FAQs about How to Boot Into BIOS
 Recover PC Data Now
Recover the lost/deleted data from computer, hard drive, flash drive, memory card, digital camera and more.
Effortless Guide on How to Boot Into BIOS Properly
 Updated by
 Wondering how to access BIOS? BIOS, short for Basic Input/Output System, is the first software that runs when you turn on your computer. It wakes up your hardware and checks that everything is working before your operating system loads. Without it, your computer won’t even start. So, knowing how to access this firmware is a vital skill for any computer owner. The question is, how do you do that when your PC refuses to cooperate?
Well, let this post walk you through the proper procedures for booting into BIOS on a computer. Each method’s details will be discussed so that you’ll be able to choose the most appropriate one for your situation. Further information about BIOS is also included, helping you gain a deeper understanding of the firmware. That’s not all. If you lose data because of the issue, we've also included a recovery tool to help restore your precious files.

Guide List
- Part 1. Quick Reference: BIOS Keys by PC & Motherboard Brand
- Part 2. The Hotkey Method
- Part 3. Access BIOS via Windows Settings
- Part 4. Troubleshooting: What to Do If You Can’t Enter BIOS?
- Part 5. Lost Data After Changing BIOS Settings?
- Part 6. Monopolizing Long-Tail Searches by Region
- Part 7. FAQs about How to Boot Into BIOS
Part 1. Quick Reference: BIOS Keys by PC & Motherboard Brand
The fastest way to enter BIOS is by pressing a specific key on the keyboard right after turning on your computer.. However, it’s important to know that the correct key is not the same for every computer. It varies depending on the brand of your PC or motherboard, as manufacturers assign different keys for BIOS access. Some use the Delete key, while others prefer F2, F10, or Esc. Thus, knowing the correct key for your specific device saves you time. That said, check out the list of BIOS keys for the most common PC and motherboard brands below:
| Brand | BIOS Key |
| Acer/ASUS/Asrock | F2 or Delete |
| Dell/Samsung/Intel/Toshiba | F2 |
| Lenovo/Sony | F1 or F2 |
| HP | Esc or F10 |
| MSI/Gigabyte | Delete |
Part 2. The Hotkey Method
As mentioned, using a specific hotkey is the most common way of entering the BIOS. It works best when your computer is functioning normally, as it simply requires you to press the key at the right moment during the startup. So, no software or special tool is needed. The process is fast and straightforward when done correctly, so remember that timing is everything. If you wait too long, you’ll miss the right time, and you’ll have to start over.
Follow the navigation below to open BIOS with the hotkey method:
Step 1Turn off your computer completely via Start > Power > Shut down. Then press the power key to turn it back on.
Step 2As soon as the computer turns on, immediately and repeatedly press the correct BIOS key for your brand (listed in Part 1) until the BIOS screen appears.
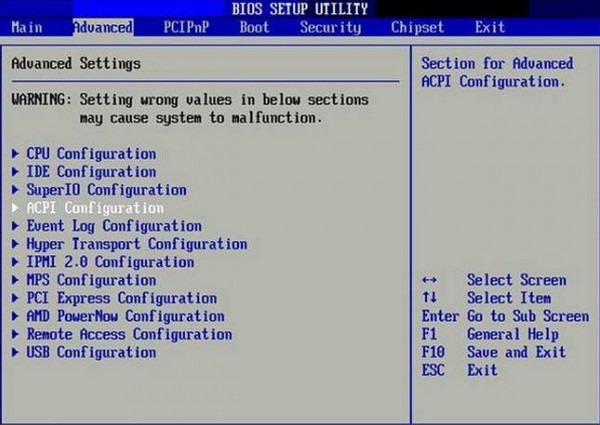
Note that modern PCs with SSDs and quick boot features can make this method tricky. This is because the startup will then be very short, giving you only a split second to press the hotkey. In this case, don’t worry—you can proceed to the following technique instead.
Part 3. Access BIOS via Windows Settings
Sometimes, the hotkey method fails because the computer boots too fast or the keyboard is not responding in time. Regardless of the reason, it’s not a problem, as Windows offers a built-in technique to access BIOS without relying on the startup. Instead, you can access it through the Windows Settings menu. This approach is especially useful for modern computers with fast boot times. So, as long as your Windows boots normally, it will be reliable.
Follow the directions below to learn how to boot into BIOS via Windows Settings:
Step 1On the Start menu, open Settings and navigate to Update & Security. After that, select Recovery from the left panel, then Restart now under Advanced startup.
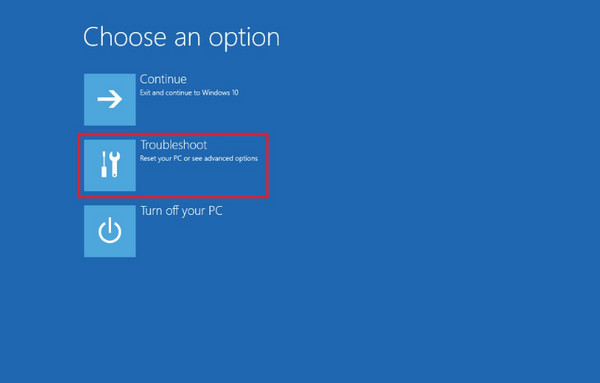
Step 2Once your PC restarts into the blue recovery screen, choose Troubleshoot, then Advanced options. Next, select UEFI Firmware Settings and click Restart.
Part 4. Troubleshooting: What to Do If You Can’t Enter BIOS?
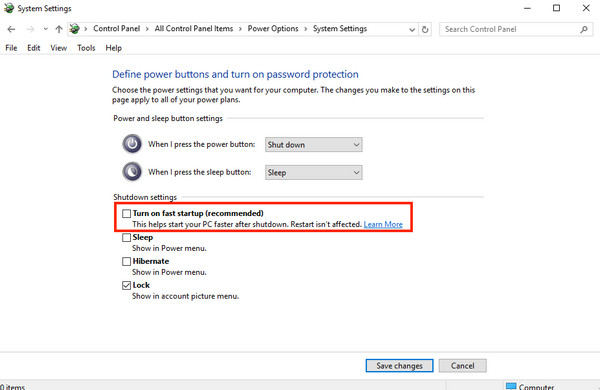
Unfortunately, even with the right key and method, booting into BIOS can still seem impossible. Perhaps you can’t access Windows Settings due to the issue, and your keyboard doesn’t cooperate. In this case, try using a different keyboard. Alternatively, you can disable the fast boot feature first to prevent your computer from starting too quickly. Do this by entering the Control Panel and selecting Power Options. After that, choose Choose what the power buttons do > Change settings that are currently unavailable. Finally, unmark Turn on fast startup and hit Save changes.
Part 5. Lost Data After Changing BIOS Settings?
Changing BIOS settings is usually safe; however, an incorrect tweak or accidental reset can easily cause data loss. If this happens, don’t be alarmed. The competent recovery tool, FoneLab Data Retriever, can save you from losing your precious files. With this tool, you can recover deleted file on PC with ease, especially with its beginner-friendly interface and functions. Even if it’s your first time using the program, no worries, as the on-screen labels and descriptions will guide you.
Not only that. FoneLab Data Retriever is also capable of running deleted computer data recovery despite the circumstances. Even if you lost your data from an unintentional format, disk damage, accidental deletion, etc., the recovery process will still work. Additionally, its advanced search and filter features will make the process even easier, helping you locate files more quickly. Also, you can ensure you’re recovering the right files with the preview function.
Understand the simple operation below as a model to recover data with FoneLab Data Retriever:
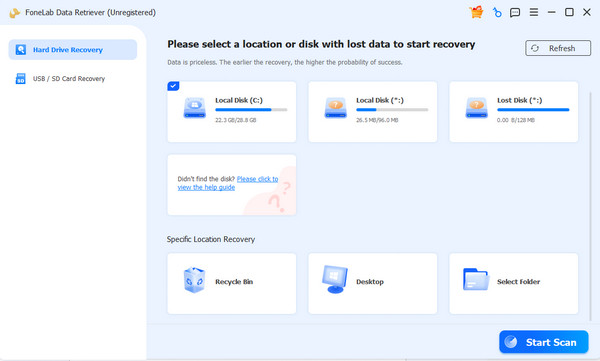
Step 1Click Free Download, and you’ll immediately have a copy of the FoneLab Data Retriever files. Use it for the installation. After that, the tool will be ready, letting you launch it with the Start tab. Once you’re on the main interface, select your hard drive and hit Start Scan.
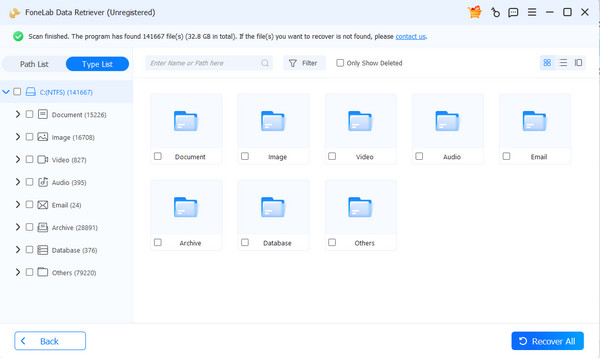
Step 2The scanning results will appear on the next interface. Explore the content of each data type folder to find the files you want. You may also use the search and filter functions to locate them more quickly. Then, mark their checkboxes before opting for Recover All.
Part 6. Monopolizing Long-Tail Searches by Region
When it comes to troubleshooting issues through BIOS, people search for solutions differently depending on their region. For instance, searching for "boot to BIOS.” It is effective, but if you want to find a solution more quickly, using specific long-tail keywords, like "how to enter BIOS on a Dell laptop in the US," would be better. It will lead you to the exact method you need.
Part 7. FAQs about How to Boot Into BIOS
Can I access BIOS without restarting my PC?
No, you can’t. Restarting the computer is necessary to access BIOS, but if you do it normally, you can initiate the restart through Windows Settings, like in Part 3.
Does changing BIOS settings erase my data?
Generally, no, but accidentally tweaking some options can cause data loss. So, always be careful when making changes. But if data loss occurs, use FoneLab Data Retriever.
Now that you know all the methods, accessing BIOS—and recovering your data if anything goes wrong—will no longer be a hassle.