Recover the lost/deleted data from computer, hard drive, flash drive, memory card, digital camera and more.
[Top Options] Deleted Computer Data Recovery For You
 Updated by
 I accidentally deleted important files from my computer. I already deleted them from the Recycle Bin as well. How do I recover permanently deleted files from my PC? How to choose a good deleted computer data recovery? Thanks!
Each of us has a huge amount of information and data stored on our computers, both for work and for life. Have you ever wondered how to recover deleted files which you have accidentally or intentionally deleted from your PC or Mac?
When you delete any files on your computer, it goes to the Recycle Bin where you can comfortably restore it. What if you deleted it permanently by pressing Shift+DEL or emptying the Recycle Bin? Sometimes we accidentally delete images, videos and important documents from our computer, Pen drive, memory card but we don't hold any recovery options.

Well, it's not a reason to worry as there is many file recovery software available on the internet which lets you recover deleted files from a computer.
Now, I'd like to share a useful data recovery software and alternatives to recover deleted files on Windows and Mac from backup.

Guide List
Part 1. Recycle Bin or Trash
As you may know, computers have a Recycle Bin (Windows) or Trash (Mac) that temporarily stores deleted files until they are permanently removed, either automatically or manually. Therefore, if you've lost something, check there first—you can often restore files easily.
Simply open the Recycle Bin or Trash, select the items you want back, and choose Restore. The files will return to their original location.
What if they aren’t there?
Deleted files may be cleared after a certain period. In that case, you will need to use data recovery software to retrieve them.
FoneLab Data Retriever - recover the lost/deleted data from computer, hard drive, flash drive, memory card, digital camera and more.
- Recover photos, videos, contacts, WhatsApp, and more data with ease.
- Preview data before recovery.
Part 2. Windows Files History for Backups
The Windows System Backup serves as the foundation for data protection, as it contains a complete copy of all data within the selected files and folders. Because it stores files in full, performing backups regularly enables faster and simpler restore operations. Please note that other backup types may result in longer restoration times.
Important: When performed consistently, Windows System Backup offers the most reliable solution for comprehensive data protection.
If you have a Windows backup available, you can use it to restore deleted files easily. Otherwise, proceed to the next recovery method.
To restore files from a Windows backup:
Step 1Click the Start menu, then navigate to: Control Panel > System and Maintenance > Backup and Restore > Restore my files.
Step 2In the Restore Backup window, browse the backup contents to find your files. You can search or browse using these options:
- Search: Enter the file name, select the found file(s) or click Select All, then click OK.
- Browse for files: Select the relevant backup, navigate to the folder containing your file, check the file(s), and click Add Files.
- Browse for folders: Select a folder to restore all files within it, then click Add Folder.
Step 3Select where you want the recovered files to be saved, then follow the on-screen instructions to complete the process.

FoneLab Data Retriever - recover the lost/deleted data from computer, hard drive, flash drive, memory card, digital camera and more.
- Recover photos, videos, contacts, WhatsApp, and more data with ease.
- Preview data before recovery.
Part 3. Time Machine on Mac
If you use Time Machine to back up your Mac, you can restore individual files or recover your entire system from a backup.
To restore your Mac from a Time Machine backup, follow these steps:
Step 1Begin by restarting your computer.
Step 2As your Mac restarts, immediately press and hold the Command (⌘) + R keys together until you see the Apple logo or a spinning globe. Release the keys when the macOS Utilities window appears.
Step 3From the macOS Utilities menu, select Restore From Time Machine Backup and click Continue.
Step 4On the Restore Your System screen, review the information and click Continue.
Step 5Select your Time Machine backup disk from the list and click Continue.
Step 6Choose the most recent backup of your hard drive (or a specific date if needed) and click Continue.
Step 7Your Mac will begin the restoration process. Once complete, it will restart automatically. Please do not interrupt the process.
Your Mac will restore the Time Machine backup and then restart once the process is done.

Part 4. FoneLab Data Retriever
Not everyone maintains a regular computer backup habit. When deleted files are gone from the Recycle Bin and weren't included in a backup, manual recovery is no longer an option. In these situations, a dedicated data recovery tool becomes your only solution.
Unlike basic system tools, FoneLab Data Retriever is powerful and secure software designed to thoroughly scan your storage devices and retrieve almost all types of lost files. It's the comprehensive tool you need when other methods fall short.
FoneLab Data Retriever - recover the lost/deleted data from computer, hard drive, flash drive, memory card, digital camera and more.
- Recover photos, videos, contacts, WhatsApp, and more data with ease.
- Preview data before recovery.
Let's see how it works.
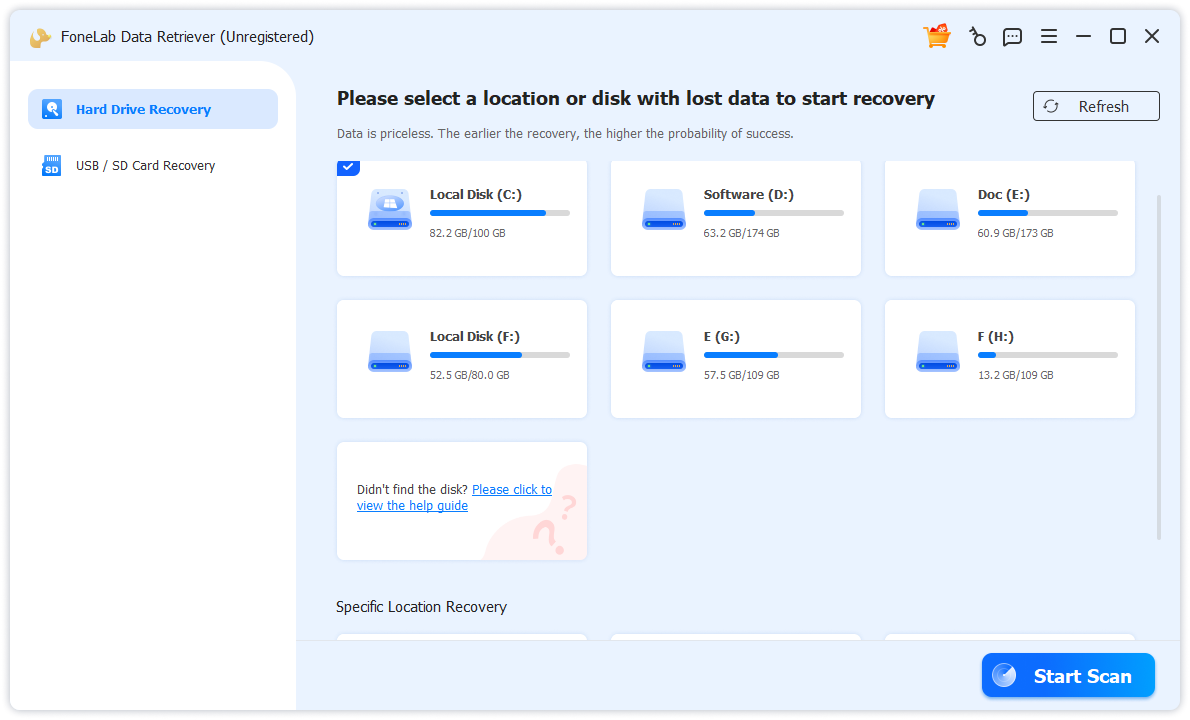
Step 1Run This Software
Download and install this program on your computer. Both PC and Mac versions are available. Then launch this program. Choose Hard Drive Recovery from the left panel and then click the Start Scan button.
If you want to recover data from other electronic data storage devices such as memory card, flash drive, etc., you need to connect them to the computer and choose USB / SD Card Recovery and then select your drive after detection.
Step 2Choose Data
Look through the files displayed in the window and look for the files you intend to recover. You can also use Filter feature to quickly locate your needed files.
Checkmark the files you want to retrieve, and then click the Recover All button to save the selected files to your computer.
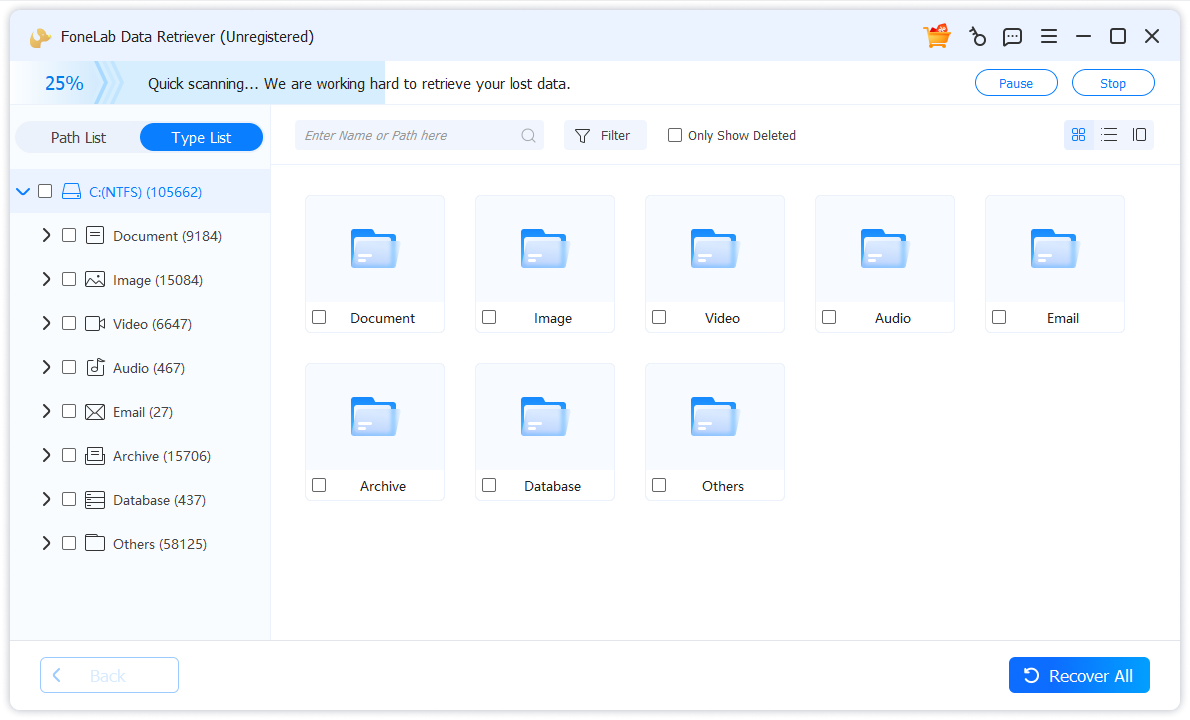
This software can recover email, documents, images, videos, and more data types.
Moreover,
In addition to recovering data from computer, it can recover data from memory card, hard drive, pen drive, camera, and more storage devices.
FoneLab Data Retriever - recover the lost/deleted data from computer, hard drive, flash drive, memory card, digital camera and more.
- Recover photos, videos, contacts, WhatsApp, and more data with ease.
- Preview data before recovery.
Part 5. Comparison of Deleted Computer Data Recovery
| Feature / Aspect | Recycle Bin / Trash | Windows File History | Time Machine | FoneLab Data Retriever |
|---|---|---|---|---|
| Type | Built-in temporary storage | Built-in backup utility | Built-in backup utility | Third-party data recovery software |
| Primary Purpose | Temporarily hold deleted files before permanent removal | Backup & restore versions of personal files | Full-system backup & point-in-time recovery | Recover deleted/lost data from various storage media |
| Recovery Scope | Only recently deleted files (not emptied) | Files from backups (requires prior setup) | Files or entire system from backups (requires prior setup) | Deleted files even after emptying Recycle Bin, without backup |
| Ease of Use | Very simple; direct restore | Requires initial setup; intuitive restore interface | Requires initial setup; seamless restore via macOS Utilities | User-friendly wizard interface; no prior setup needed |
| Pre-Recovery Preview | No | Yes (when browsing backups) | Yes (when selecting backup points) | Yes – preview files before recovery |
| Backup Required? | No | Yes (must be enabled beforehand) | Yes (must be configured beforehand) | No – recovers directly from drive |
| Supported Storage | Internal drives only | External drives or network locations | External drives (Time Machine compatible) | Internal/external drives, USB flash drives, memory cards, cameras, etc. |
| Platform | Windows / macOS | Windows only | macOS only | Windows & macOS |
| Best For | Quick restore of recently deleted files | Restoring previous versions of files; incremental backup users | Mac users wanting full-system or file-level restore from backup | Recovering data when no backup exists, or from formatted/corrupted drives |
| Limitations | Files permanently lost if emptied or deleted via Shift+Delete | Only works if backup was enabled and drive is accessible | Only useful if Time Machine was set up and backup drive is available | success depends on drive condition |
Part 6. FAQs about Deleted Computer Data Recovery
I never set up Windows File History or Time Machine. Can I still recover deleted files?
A: Yes. If you don’t have backups, your best option is data recovery software such as FoneLab Data Retriever. It can scan your hard drive, USB, or memory card to locate files that were deleted even after the Recycle Bin was emptied.
How soon should I try to recover a deleted file?
Immediately. The longer you use the drive after deletion, the higher the chance the space will be overwritten by new data—making recovery difficult or impossible. Avoid saving new files or installing software on the same drive.
While there are many data recovery tools on the market, finding one that is both powerful and user-friendly can be a challenge. FoneLab Data Retriever stands out with its comprehensive features and intuitive interface, designed to meet your recovery needs efficiently. Experience the difference for yourself — download and try it now!
FoneLab Data Retriever - recover the lost/deleted data from computer, hard drive, flash drive, memory card, digital camera and more.
- Recover photos, videos, contacts, WhatsApp, and more data with ease.
- Preview data before recovery.