Recover the lost/deleted data from computer, hard drive, flash drive, memory card, digital camera and more.
BIOS Won't Boot Problems: 4 Top-Notch Solutions on Computer
 Updated by Lisa Ou / June 15, 2022 09:15
Users can change something from their computer's settings or enable a system feature, or solve some computer errors by entering BIOS. However, it can be frustrating when your system doesn't let you enter BIOS. And even after trying again, you get the same result. Yet, do not worry. If you're worried and want to look for the best ways to fix this issue on your computer, you have come to the right place. Here, learn the reasons and the most recommended solutions you can use to solve the computer won't boot into BIOS issue.


Guide List
Part 1. Why Can't Get to BIOS
There are a lot of causes why you can’t enter BIOS when you want to fix issues on your PC, change settings, etc. It could be because the startup process is turned on in your system, preventing BIOS from being accessed. Another reason could be your system has hardware malfunction because your system does not pass the Power-On Self-Test or POST. If, after hardware testing and the result is your hardware has issues, you will not be able to boot BIOS.
However, there are also 4 dependable methods you can perform to help you fix this type of issue on your PC.
Part 2. How to Fix Computer Not Booting to BIOS
If you’re experiencing ‘can’t get to BIOS’ issues, you can still solve this problem using the dependable methods mentioned below.
FoneLab Data Retriever - recover the lost/deleted data from computer, hard drive, flash drive, memory card, digital camera and more.
- Recover photos, videos, documents and more data with ease.
- Preview data before recovery.
Method 1. Use the UEFI Firmware Settings
To access BIOS, you can use the UEFI Firmware settings if you’re utilizing the Windows 10 operating system, especially if your PC boots to OS but does not give you BIOS access. Here’s how to do it.
Step 1First, open the Settings of your computer. Click the Windows icon > Settings > Update & security.
Step 2Next, select the Recovery option from the list. And under the Advanced Startup, click the Restart Now button.
Step 3Then, select the Troubleshoot button in the next window, which is the Choose an option section. And click the Advanced Options > UEFI Firmware Settings.
Step 4Finally, click the Restart button so the system will boot to BIOS. And there you have it!
Method 2. Reset CMOS by Removing BIOS Battery
If your PC runs Windows 7, you can remove the BIOS battery to reset the CMOS. Although it is available for all the operating systems, if your PC is running Windows 10 or later, you can try a different method like the one mentioned above. Now, see how you can reset CMOS on your laptop and desktop.
On desktop:
Step 1First off, power off your desktop and disconnect all HDMI and USB cables.
Step 2Then, detach the power cord and remove the protecting case. Note that the location of the BIOS battery depends on the model of your motherboard. To find it easily, find the watch-like flat battery and remove it.
Step 3Now, wait for 5-10 minutes and insert it back. Finally, reboot your computer. That’s it!
Method 3. Check the Faulty or Damaged Power Connector
Remember that you can't boot to BIOS if your CPU or motherboard’s power connector is connected improperly or it is faulty. So, ensure that the power connector is connected tightly in the right place. Or unplug it and connect it again. After reconnecting it, and it still isn’t working, there is an issue with your power connector.
Method 4. Troubleshoot RAM Sticks
When booting to BIOS or OS, a RAM issue can cause your PC to fail. Make sure that all the RAM sticks are seated correctly and in good condition. To do it, follow these steps:
Step 1Firstly, please turn off your computer and unplug its power cable.
Step 2Afterward, open its case and navigate the location of the RAM sticks on the motherboard.
Step 3Next, take them all out of their slots and then seat them again one by one.
Step 4Once you’re done seating the stick correctly, the tabs on both sides must make a clicking sound. Finally, reboot your system. And that’s it!
If this still doesn’t work, add the other RAM sticks, one by one again, until you see the faulty stick you need to change.
Are you looking for a method you can use to recover data from your computer? There’s a tool that you can use and it is the best program to retrieve your essential data. Jump to the next part of this post to discover it.
Part 3. How to Recover Data from PC with FoneLab Data Retriever
Whenever you want to retrieve important files and data from your computer, FoneLab Data Retriever can certainly help you with it. Using it, you can professionally and excellently recover your lost and deleted data on your computer, including the frequently-used data such as images, videos, songs, documents, emails, and many more. It can retrieve almost all types of data and formats. Now, to know how you can recover data on your PC, follow the tutorial we provided below.
FoneLab Data Retriever - recover the lost/deleted data from computer, hard drive, flash drive, memory card, digital camera and more.
- Recover photos, videos, documents and more data with ease.
- Preview data before recovery.
Step 1To begin with, download and install FoneLab Data Retriever on your PC for free. It will launch automatically after the installation process.
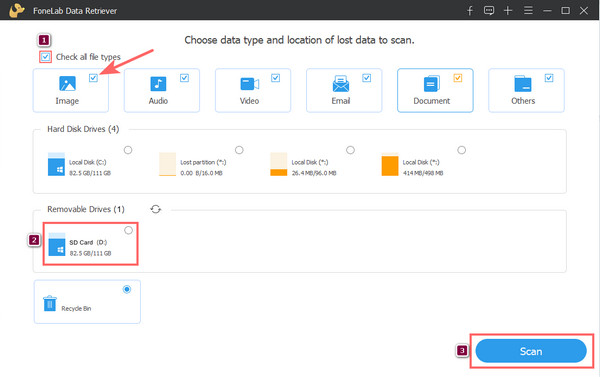
Step 2On the tool’s main interface, select the data you wish to retrieve by clicking beside the box next to the file type. Or, you can also choose the Check all file types option. And tick the Scan button.
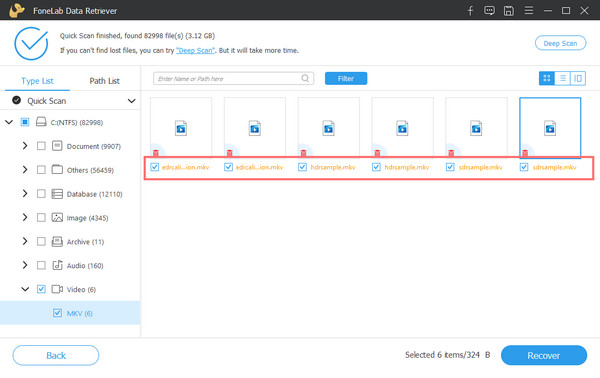
Step 3When the scanning procedure is complete, find and select the data you want to retrieve by checking the box beside the file name.
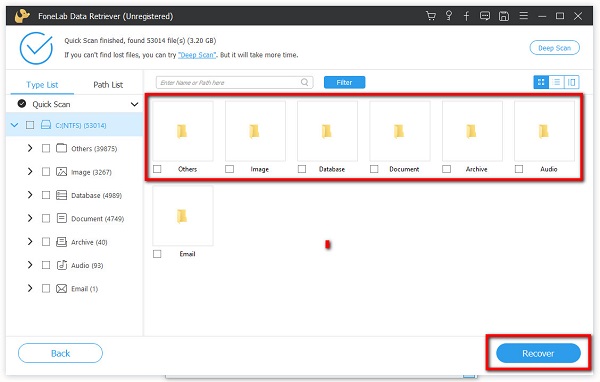
Step 4Once you’re done selecting, hit the Recover button to start the process of recovering your data from your computer. And that’s it!
This is how you can quickly and effectively retrieve your files using FoneLab Data Retriever. It is the most recommended tool for this type of problem you have. So, download and try it now!
FoneLab Data Retriever - recover the lost/deleted data from computer, hard drive, flash drive, memory card, digital camera and more.
- Recover photos, videos, documents and more data with ease.
- Preview data before recovery.
Part 4. FAQs About Can't Boot into BIOS
1. What does resetting BIOS do?
Resetting your BIOS helps you to restore it to the last saved configuration, so the process can also be used to revert your system after doing other changes. Note that resetting your BIOS is just a simple process for experienced and new users alike, so they can deal with whatever situation they are in with their PCs.
2. From which partition on a hard drive does startup BIOS try to boot an OS?
The partition on the hard drive which a startup BIOS tries to boot an OS is from the active partition.
To conclude, now you know what to do when your computer won't boot to past BIOS. All the methods mentioned above about how to fix this kind of error, including the most excellent way to recover data from your hard disk are reliable. FoneLab Data Retriever is indeed the best tool you can use to recover your essential data.
If you found this post helpful, let us know by commenting below. Also, any comments and suggestions, you can write them down below.
FoneLab Data Retriever - recover the lost/deleted data from computer, hard drive, flash drive, memory card, digital camera and more.
- Recover photos, videos, documents and more data with ease.
- Preview data before recovery.