- Part 1. What Does Windows Resource Protection Found Corrupt Files Mean
- Part 2. How to Fix Windows Resource Protection Found Corrupt Files
- Part 3. How to Recover Corrupt Files from Computer with FoneLab Data Retriever
- Part 4. FAQs about Windows Resource Protection Found Corrupt Files Repair and Recovery
Recover the lost/deleted data from computer, hard drive, flash drive, memory card, digital camera and more.
3 Fixes for Windows Resource Protection Found Corrupt Files Error
 Updated by Somei Liam / Dec 20, 2022 16:30
Windows Resource Protection found corrupt files but was unable to fix some of them. What happened?
This message appears on the System File Checker on the computer's Command Prompt. The System File Checker is an utility for scanning protected system files. And when an issue is found in these files, this tool will resolve the related problems. The sfc/scannow is the command you can type to run the program. However, the error message above is one of the common responses it presents frequently. This means the process has failed, and you may be required to fix the corrupted files manually.

The System File Checker is recommended to run every now and then. It is not meant to improve the computer's performance, but it repairs corrupted and missing system files. It is an excellent command, as it helps you when facing unknown or random issues on your PC. But note that you can only run it if you have administrator privileges. Also, you cannot always rely on this command, as you may encounter things like the mentioned error message. You don't have to worry, because this problem can be solved easily.
That being said, this article is going to tackle the effective solutions you can apply to get through this situation. After trying different methods, we finally included the most deserving solutions in this post. And as you discover different processes, the possibility of data loss is only around the corner. Hence, we readied a reliable tool if you encounter such a problem. Kindly read further to begin.

Guide List
- Part 1. What Does Windows Resource Protection Found Corrupt Files Mean
- Part 2. How to Fix Windows Resource Protection Found Corrupt Files
- Part 3. How to Recover Corrupt Files from Computer with FoneLab Data Retriever
- Part 4. FAQs about Windows Resource Protection Found Corrupt Files Repair and Recovery
Part 1. What Does Windows Resource Protection Found Corrupt Files Mean
As mentioned in the introduction, the "Windows Resource Protection found corrupt files but was unable to fix some of them" error message has something to do with the System File Checker. To further discuss it, this message basically means that the scan and repair process of the protected system files has failed. Ideally, this process is supposed to replace the problematic or corrupted files with cached copies. Then you will find these caches in the %WinDir%\System32\dllcache folder. Unfortunately, that is not always the case. Therefore, this article will help you solve the problem by yourself. You only need to read the instructions below to achieve a successful process carefully.
FoneLab Data Retriever - recover the lost/deleted data from computer, hard drive, flash drive, memory card, digital camera and more.
- Recover photos, videos, documents and more data with ease.
- Preview data before recovery.
- Recover data from device, iCloud and iTunes.
Part 2. How to Fix Windows Resource Protection Found Corrupt Files
For this problem, we have chosen the 3 most effective methods to fix the Windows Resource Protection issue. You are not required to install any third-party apps to execute the solutions. The only tool you need is the Command Prompt on your Windows computer.
Option 1. Run SFC at Safe Mode
A possible cause of the problem you face is a process running in the background. It could be third-party software, a program, or malware that hinders the System File Checker from running successfully. This happens when you are using a program while the system file scanning is in progress. To confirm if this is the case, you may need to run the SFC in Safe Mode. If this works, you can find out what program causes this issue.
Act in accordance with the following instructions below to repair the Windows Resource Protection found corrupt files error by running SFC in Safe Mode:
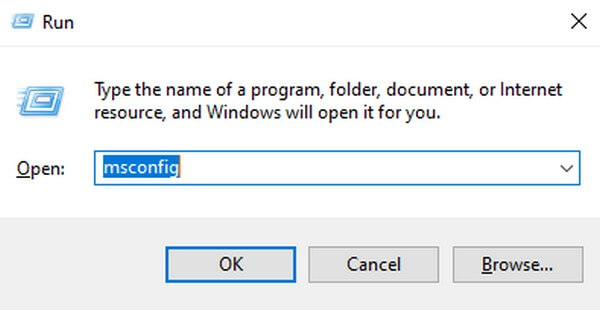
Step 1Hit the Windows + R keys on your keyboard to launch Run. On the text field, type msconfig and press Enter.
Step 2Go to the Boot section on the following window. Tick the Safe Boot checkbox on the lower-half part, then select the Minimal option.
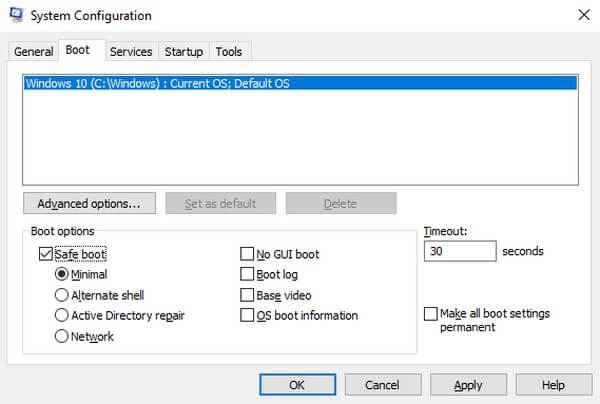
Step 3Lastly, click Apply to save changes. The computer will then reboot in Safe Mode. Rerun the System File Checker in this mode to see if the scanning works successfully.
Option 2. Run SFC at Boot-Time
This next method is commonly used when the computer has difficulties restarting Windows. But you can also use it at a time like this when the System File Checker fails to scan and fix the corrupted system files. You only need to force open the Command Prompt to run the SFC before officially restarting or rebooting into Windows.
Act in accordance with the following instructions below to fix the Windows Resource Protection found corrupt files but was unable to fix some of them message on System File Checker at Boot-Time:
Step 1Press your computer's Power switch and hold it for at least 5 seconds until you see it completely turned off. Afterward, turn it on again.
Step 2When you see the Windows loading screen, force the computer to shut down again by doing the same thing with the Power switch. Do this 3-4 times until the computer detects so many startups fail.
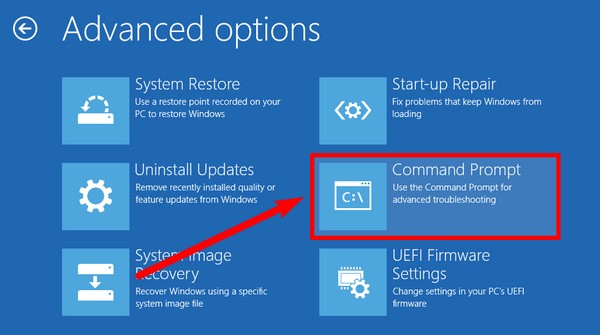
Step 3Once it does, the computer will boot on Windows Recovery automatically. To run the System File Checker, select Troubleshoot, then the Advanced options. You can finally open the Command Prompt on the following list of options and rerun the SFC command to fix issues.
Option 3. Run Check Disk Commands
The purpose of the System File Checker is to scan and fix protected system files. But if you encounter a problem with the checker itself, you can rely on other troubleshooting methods to repair it. CHKDSK is a command that can also fix some errors on the computer. Like the SFC, you can run it on the Command Prompt.
Act in accordance with the following instructions below to fix the Windows Resource Protection found corrupt files but was unable to fix some of them on Windows 10 and others by running the Check Disk Commands:
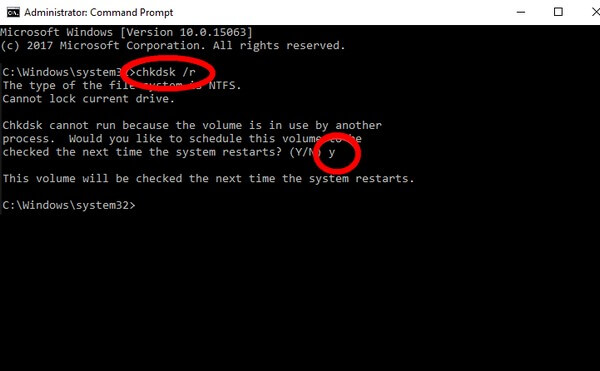
Step 1Click the search icon on the down-left part of your desktop-type cmd on the search bar. Once the Command Prompt program appears, right-click it and choose Run as administrator.

Step 2When the program launches, type chkdsk /r and press the Enter button. Following that, enter y as a response to the question about the schedule.
Step 3After that, close the programs running, then restart your computer. The program will then start scanning and fixing errors detected on the PC. Later on, you can finally rerun the System File Checker to see if it successfully works this time.
Part 3. How to Recover Corrupt Files from Computer with FoneLab Data Retriever
During the continuous checking and fixing of computer problems, many corrupted files will likely get deleted. However, you may not have wanted some of them to disappear, but they got removed anyway. It is inevitable since the programs you are running eliminate the corrupted files on your PC. But no worries, you can still recover them using only a few easy steps. FoneLab Data Retriever will help you take back the corrupt files you never wanted to remove. Even if the files were lost due to system files scan and repair, accidental deletion, unwanted format, computer virus, etc., that is not a problem. This tool will professionally recover them for you without hassle.
FoneLab Data Retriever - recover the lost/deleted data from computer, hard drive, flash drive, memory card, digital camera and more.
- Recover photos, videos, documents and more data with ease.
- Preview data before recovery.
- Recover data from device, iCloud and iTunes.
Act in accordance with the following instructions below to recover corrupt files from the computer after Windows Resource Protection found corrupt files error with FoneLab Data Retriever:
Step 1Navigate to the website of FoneLab Data Retriever. You can download the installer file by hitting the Free Download button on the down-left part of the page. After that, process the installation and run the program on your computer.

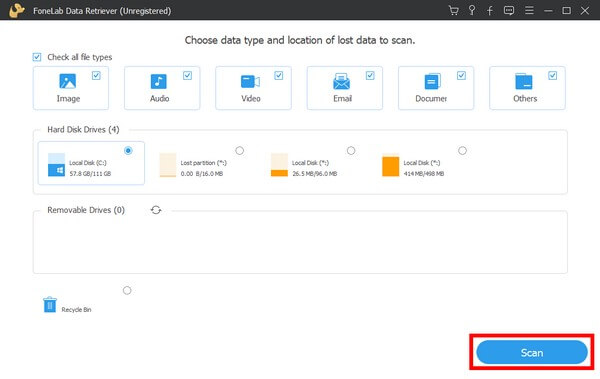
Step 2Check the supported data types listed on the main interface for the files you want to retrieve. Under that section are the hard disk drives. Pick the location of the files, then click the Scan button.
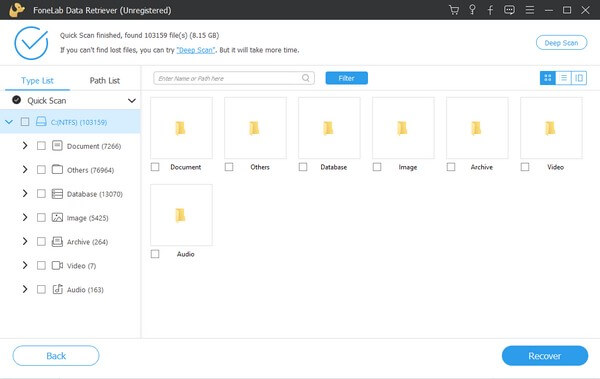
Step 3The folders of each file type will be displayed on the following interface. Check them out to find the files you plan to recover. You may also use the program's other features to see them more quickly.
Step 4Lastly, select all the files you have chosen, then hit Recover on the down-right part of the interface. The program will then start recovering your corrupt files.
FoneLab Data Retriever - recover the lost/deleted data from computer, hard drive, flash drive, memory card, digital camera and more.
- Recover photos, videos, contacts, WhatsApp, and more data with ease.
- Preview data before recovery.
Part 4. FAQs about Windows Resource Protection Found Corrupt Files Repair and Recovery
1. What does running SFC in Safe Mode do?
The computer only runs basic software programs and drivers in Safe Mode. Hence, running the SFC will be much smoother without interruption from other third-party programs.
2. Is it possible to repair the corrupted files?
Yes, it is. There are tools and methods you can find online to repair your corrupted files after recovery. You only need to be patient in looking for the tool or method appropriate for your files.
3. Can FoneLab Data Retriever recover corrupt files from a hard drive?
Yes, it can. FoneLab Data Retriever is capable of recovering corrupt and non-corrupt files from several compatible devices. Aside from computers, it includes hard drives, memory cards, flash drives, digital cameras, mobile phones, and more.
FoneLab Data Retriever - recover the lost/deleted data from computer, hard drive, flash drive, memory card, digital camera and more.
- Recover photos, videos, contacts, WhatsApp, and more data with ease.
- Preview data before recovery.
If you have any comments, suggestions, questions, or queries, kindly drop them below. You can also visit the FoneLab Data Retriever website to find more solutions to your device troubles.