iPhone Data Recovery
 iOS System Recovery
 iOS Data Backup & Restore
 iOS Unlocker
 iPhone Password Manager
 Location Changer
 Android Data Recovery
 Broken Android Data Extraction
 Android Data Backup & Restore
 Android Unlocker
 FoneTrans for iOS
 iPhone Data Eraser
 iPhone Cleaner
 HEIC Converter
 HyperTrans
 WhatsApp Transfer for iOS
 Mac Sweep
 Data Retriever
 Mac Data Retriever
 Video Converter Ultimate
 Screen Recorder
 Phone Mirror
- Part 1. Why You Need a Safety Net for Windows
- Part 2. Enabling System Protection (The Hidden Setting)
- Part 3. How to Manually Create a Restore Point Before Changes
- Part 4. How to Restore Your PC to a Previous State
- Part 5. Pro-Tips for Managing Restore Points
- Part 6. When Restore Points Are Not Enough
- Part 7. FAQs about Windows Restore Point
 Recover PC Data Now
Recover the lost/deleted data from computer, hard drive, flash drive, memory card, digital camera and more.
Learn Windows Restore Point with a Hassle-Free Guide
 Updated by
 Good day! Is it useful to learn how to create a restore point in Windows? There are times when I encounter issues with my computer, and the only solution I know is to reset it, which erases everything. I can’t do that again because I already have too much important data. Would the restore point feature really help? If so, how does it work?
The restore point feature on Windows is one of the safety nets people rely on. It works by saving a snapshot of your computer's current settings, files, and drivers at a specific moment in time. This way, if something goes wrong later, you can revert your system to its previous, normal state without losing your personal files. Hence, it is an effective safety net in many situations. To learn about it, browse the following sections in this post.

Guide List
- Part 1. Why You Need a Safety Net for Windows
- Part 2. Enabling System Protection (The Hidden Setting)
- Part 3. How to Manually Create a Restore Point Before Changes
- Part 4. How to Restore Your PC to a Previous State
- Part 5. Pro-Tips for Managing Restore Points
- Part 6. When Restore Points Are Not Enough
- Part 7. FAQs about Windows Restore Point
Part 1. Why You Need a Safety Net for Windows
As mentioned, Windows Restore Point allows you to revert your system to a previous state. Thus, you can think of it as your undo button, which is why it is an effective safety net for Windows. Without this feature, you'd be forced to face every system glitch, driver conflict, or failed update with a range of possible solutions, such as factory resetting, which can have various consequences. But a restore point offers a direct fix that reverses only the changes that caused the issue, leaving your personal files safe. It's a simple process that saves you from unnecessary stress.
Part 2. Enabling System Protection (The Hidden Setting)
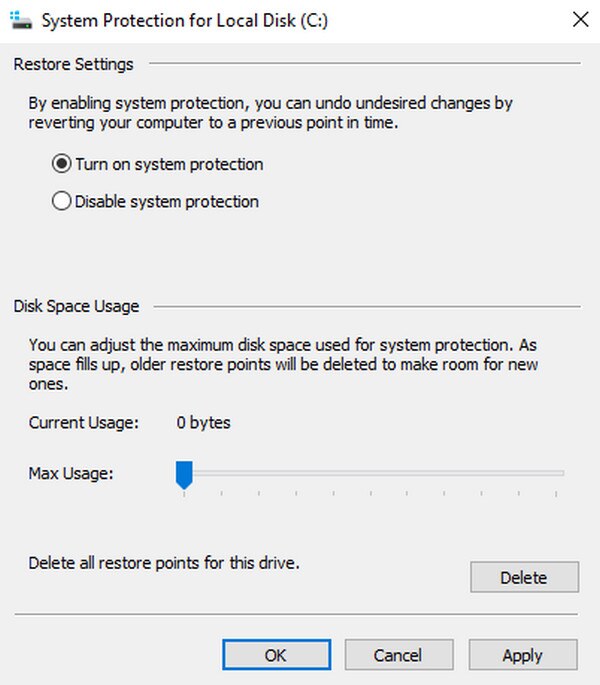
Before you can create a restore point, you must enable System Protection. It is a built-in Windows feature that is often disabled by default, so enabling it is necessary for the computer to save system snapshots. That’s because without it, the restore point option remains grayed out. To enable it, use the Start menu to search for and select Create a restore point. Next, choose your main drive in the System Protection section, then hit Configure > Turn on system protection. Lastly, adjust the Max Usage slider, then click Apply > OK.
Part 3. How to Manually Create a Restore Point Before Changes
While Windows creates restore points automatically during major system changes, there are also times when you might want to create one yourself. Usually, it is before installing new software, updating drivers, or changing system settings. Since these changes can be made at any time, manually creating a restore point is the appropriate action. This way, you can control when a snapshot is taken, ensuring you have a safety net before any changes.
Follow the process below to learn how to create a restore point in Windows manually before making changes:
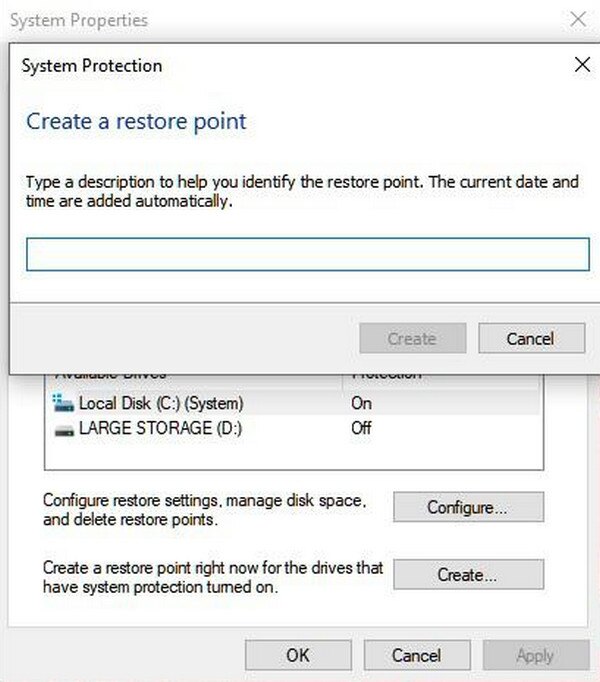
Step 1Open your desktop’s Start menu to type and select Create a restore point. When the System Properties window appears, ensure you are in the System Protection section.
Step 2After that, click Create in the lower part and enter a descriptive name for your restore point. Finally, select Create again to save it.
Part 4. How to Restore Your PC to a Previous State
Once you have restore points, you no longer have to worry if something goes wrong later, such as a bad update, a faulty driver, or a program that refuses to uninstall cleanly. Restoring your PC to a previous state is now possible, rolling back your system files, settings, and installed programs to the exact condition they were in when that snapshot was taken. All you need to do is choose the restore point you’d like to revert to, and the damage you face will be undone.
Follow the instructions below to use a restore point Windows to return your PC to a previous state:
Step 1Like before, use your Start menu to select Create a restore point and view the System Properties window.
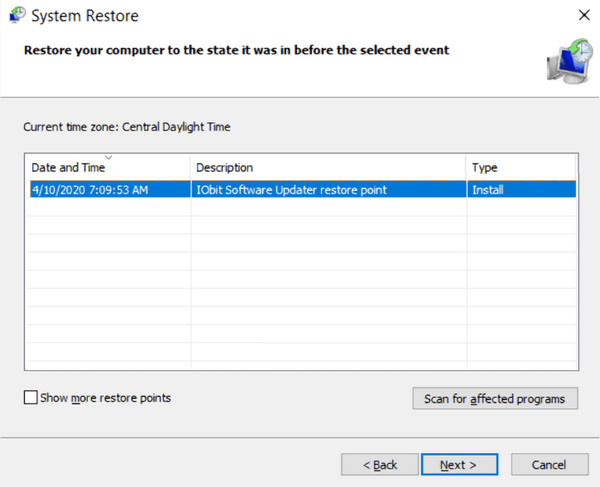
Step 2Under System Protection, select System Restore. Then, choose your desired restore point and confirm the action to begin rolling back.
Part 5. Pro-Tips for Managing Restore Points
Now that you know how to create and use restore points, here are some helpful tips to help you manage them effectively.
- • Create points manually before making major changes - Don't rely solely on automatic ones. Create your own before installing software, updating drivers, etc.
- • Label your restore points clearly - When creating one manually, give it a descriptive name, like "Before Driver Update," so you’ll know the right one to restore later.
- • Don't create too many points - Restore points take up disk space. Keep only the ones you need and let Windows clean up the older ones automatically.
- • Check your disk space allocation - If you allotted too little space, older restore points are deleted quickly. A little more room means a longer safety window.
- • Ensure System Protection is still on - Some Windows updates or other changes can disable it without warning. A quick check now and then saves you later.
- • Test a restore once - Doing a trial run when nothing is broken helps you become familiar with the process.
Part 6. When Restore Points Are Not Enough
As you may know, restore points don’t affect regular data, like documents and media files. However, accidents or unfortunate circumstances can still happen, no matter how prepared you are. You may lose files before you can even use restore points to fix the issue, or accidentally erase data afterward. In this case, the feature won’t help, as it can’t recover deleted files on PC.
Don’t worry, though. This is where a professional tool like FoneLab Data Retriever comes in. It is known for its reliability in Windows data recovery and is designed to help users of all types. Whether you’ve lost photos, documents, emails, or other files due to unintentional deletion, formatting, corruption, update failures, or other causes, this program is a suitable solution.
FoneLab Data Retriever - recover the lost/deleted data from computer, hard drive, flash drive, memory card, digital camera and more.
- Recover photos, videos, documents and more data with ease.
- Preview data before recovery.
Follow the simplified guides below to recover your files with FoneLab Data Retriever when the Windows restore point is not enough:
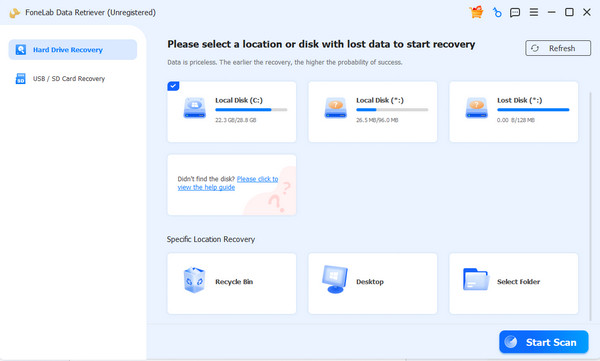
Step 1Save your copy of the FoneLab Data Retriever file with the Free Download tab, and you can use it for the installation. After a few moments, hit Start to launch the initial interface, then select your drive from the available disks. When ready, tick Start Scan.
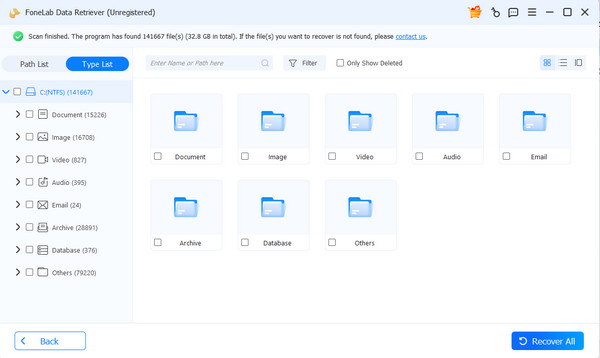
Step 2The next interface will display the results as data-type folders. Open them to find the deleted files you need, then explore the content. Once you find the data you wish to restore, mark it and choose Recover All to retrieve it.
Part 7. FAQs about Windows Restore Point
Why did my restore point go missing or get deleted?
Older points are automatically removed when disk space runs low, so don't create unnecessary restore points. Make each one count.
Does a restore point work in Safe Mode?
Yes, it does. You may run System Restore from Safe Mode if Windows can’t boot normally.
With your restore points ready, you have a simple safety net for your Windows PC. And if files ever do go missing along the way, FoneLab Data Retriever is always available to help.