iPhone Data Recovery
 iOS System Recovery
 iOS Data Backup & Restore
 iOS Unlocker
 iPhone Password Manager
 Location Changer
 Android Data Recovery
 Broken Android Data Extraction
 Android Data Backup & Restore
 Android Unlocker
 FoneTrans for iOS
 iPhone Data Eraser
 iPhone Cleaner
 HEIC Converter
 HyperTrans
 WhatsApp Transfer for iOS
 Mac Sweep
 Data Retriever
 Mac Data Retriever
 Video Converter Ultimate
 Screen Recorder
 Phone Mirror
 Recover PC Data Now
Recover the lost/deleted data from computer, hard drive, flash drive, memory card, digital camera and more.
Everything About Windows Recovery Tool with A Guide
 Updated by
 Windows recovery tools are tools that reside in a Windows computer and are often overlooked until something goes wrong. Perhaps a sudden blue screen, an endless reboot loop, or a system that simply refuses to start. For many users, the first reaction is to assume that professional repair is the only option. However, Windows has a set of built-in safety nets prepared and designed specifically for these scenarios.
Because these tools are tucked away and rarely needed during normal operation, most people never learn what they do or how they work. If you are among them, consider yourself lucky, as this article is here to help. Rather than waiting for an emergency to force you into unfamiliar menus and confusing error messages, we will cover everything you need to know about Windows recovery tools. Retrieving lost files will also be included, so enjoy learning.


Guide List
Part 1. What is Windows Recovery Tool
When talking about the Windows Recovery Tool, it's important to know that we are not referring to a single program. Instead, it is a collection of utilities designed to fix, restore, or reset a Windows computer when issues arise. Yes, that's right! When Windows fails to start normally, crashes repeatedly, or behaves strangely, standard troubleshooting inside the computer may not be possible. So, these recovery tools are designed to function outside the normal Windows environment, accessing the system even when Windows itself is broken.
Meanwhile, these tools work on every modern Windows computer, whether you use Windows 10 or Windows 11. Each serves a different purpose. Some fix boot problems automatically, while others let you reinstall Windows entirely. Specifically, among the most common recovery tools are Reset This PC, Windows Recovery Drive, and Windows Installation Media. They will be tackled in the sections that follow, so keep going as we explain each major recovery tool.
Part 2. Reset This PC
Of all the Windows recovery tools available, Reset This PC is a practical and user-friendly option for solving Windows problems.. Unlike more technical tools that require diagnostic menus, this specific option offers a straightforward way to reinstall Windows without the need for installation discs or USB drives. It is designed for regular users who want to fix serious issues but lack technical knowledge about the problem or the solution.
Follow the directions below to use the Windows Recovery Tool, Reset This PC:
Step 1On your Windows Settings, select System, followed by Recovery. When recovery settings are shown, choose Get Started under Restart This PC.
Step 2Next, pick between the Keep my files or Remove everything options, depending on your preference, then let the prompts lead you until the PC is reset.

Reset This PC is particularly useful when your computer is running slowly, crashing frequently, or facing software conflicts that standard antivirus scans and cleanup tools cannot resolve. It is also helpful if you plan to sell or give your computer away, as it removes all your personal data.
Part 3. Windows Recovery Drive
Meanwhile, Windows Recovery Drive is something you create using a USB flash drive. If your hard drive completely fails or the hidden recovery partition on your computer becomes corrupted, a Recovery Drive allows you to boot your computer and access repair tools. However, note that the Recovery Drive is a preventative tool—you must create it before the issue occurs. If not, you won't be able to use it to fix the problem.
Follow the guidance below to learn about the Windows Recovery Tool, Windows Recovery Drive:
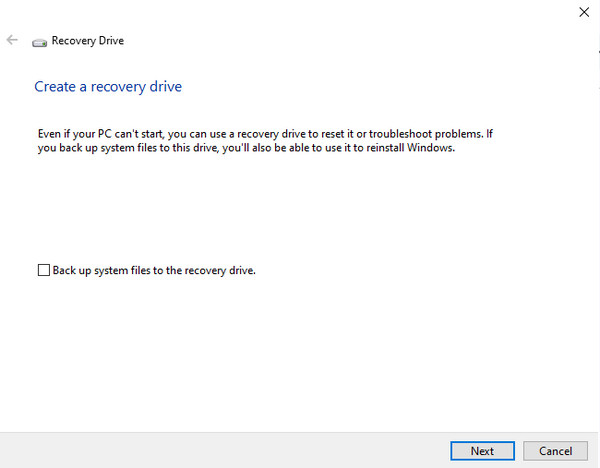
Step 1Search for Recovery Drive in your Windows Start menu, then open the app. Next, check the box saying 'Back up system files to the recovery drive' and click Next..
Step 2Attach your USB drive with at least 16 GB of space, and when detected, select it from the list. Afterward, click Create. You can then use it if issues arise later.
Part 4. Windows Installation Media
On the other hand, Windows Installation Media is often confused with a Recovery Drive, but it serves a different purpose. While a Recovery Drive gives you access to troubleshooting tools, Installation Media allows you to perform a clean, fresh installation of Windows from scratch. This tool is especially useful when your computer's operating system is too damaged for Reset This PC to work, or when you want to upgrade to a newer version of Windows.
Follow the steps below to use the Windows Recovery Tool, Windows Installation Media:
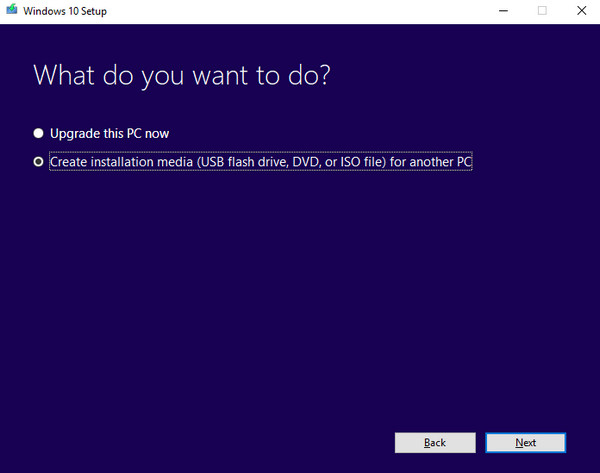
Step 1Install the Media Creation Tool from Microsoft's website, run it, and select Create installation media for another PC before clicking Next and managing further setup options.
Step 2Ensure your USB drive is attached, so you can choose it once prompted. Then, wait for the tool to finish creating your installation drive. Once created, you can use it to resolve issues later..
Note: Windows recovery tools are not the same as backups. Instead, they fix the operating system itself. Hence, they don't save your personal photos, documents, or videos, but no worries. You can proceed below for a data loss solution.
Part 5. How to Recover Data After Using Windows Recovery Tool
Sometimes, after using a Windows recovery tool, you may find that important personal files are missing. That's because these fixes could erase data or even wipe your entire hard drive. In this case, data recovery becomes the priority, and FoneLab Data Retriever is the solution we strongly recommend. It offers an easy recovery function and an intuitive design.
Unlike the previous recovery tools, FoneLab Data Retriever's purpose is to recover files from PC. It uses both quick and deep scans to find the files you lost while fixing the Windows issue, allowing you to recover them after the scan. It also doesn't involve technicalities, so no worries.
FoneLab Data Retriever - recover the lost/deleted data from computer, hard drive, flash drive, memory card, digital camera and more.
- Recover photos, videos, documents and more data with ease.
- Preview data before recovery.
Determine the easy navigation below as a sample to recover your data after using the Windows Recovery Tool:
Step 1Using the Free Download option, save FoneLab Data Retriever's file and launch it once it's saved in the Downloads section to install the program. Shortly, a Start button will be displayed, prompting you to launch the interface. Then, from there, choose the drive containing your files.
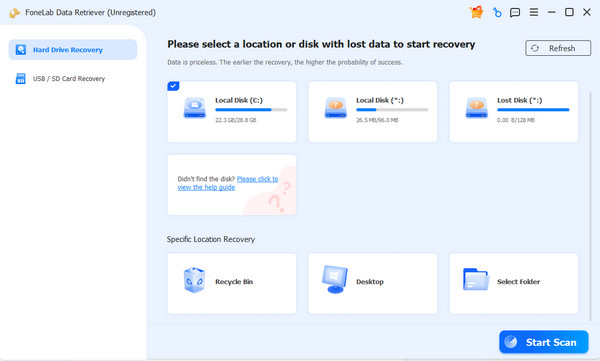
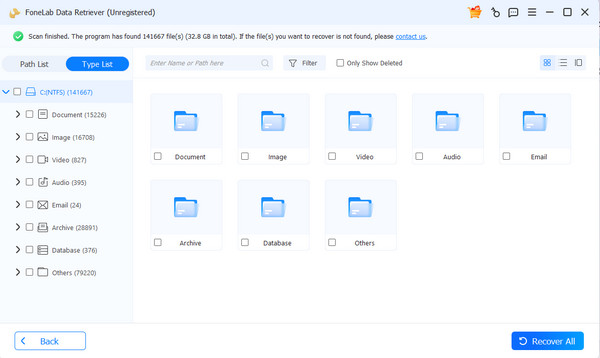
Step 2Clicking the Start Scan option will then allow the tool to find and present your deleted files. Thus, after scanning, open the data type folders to view your data and mark the items you wish to recover. When ready, select Recover All to return the files to your Windows.
Part 6. FAQs about Windows Recovery Tool
Do I need a USB drive for all recovery tools?
No, you don't. Reset This PC works without any external drive. Only Windows Recovery Drive and Installation Media require a USB drive.
How often should I create a Recovery Drive?
Create one right after setting up a new computer. Additionally, create a new one whenever you upgrade to a major new version of Windows.
No matter which Windows recovery tool you use, you can always count on FoneLab Data Retriever afterward to bring your files back in case you lose your important or cherished data.