iPhone Data Recovery
 iOS System Recovery
 iOS Data Backup & Restore
 iOS Unlocker
 iPhone Password Manager
 Location Changer
 Android Data Recovery
 Broken Android Data Extraction
 Android Data Backup & Restore
 Android Unlocker
 FoneTrans for iOS
 iPhone Data Eraser
 iPhone Cleaner
 HEIC Converter
 HyperTrans
 WhatsApp Transfer for iOS
 Mac Sweep
 Data Retriever
 Mac Data Retriever
 Video Converter Ultimate
 Screen Recorder
 Phone Mirror
 Recover PC Data Now
Recover the lost/deleted data from computer, hard drive, flash drive, memory card, digital camera and more.
6 Leading Ways to Recover Replaced File Effortlessly
 Updated by
 Greetings! Would someone please help me retrieve replaced file? I input my information into a document and was supposed to save it as a separate file to keep the original template. But out of habit, I accidentally clicked ‘Save’ instead of ‘Save As,’ causing the file to be overwritten and replaced. Would I still be able to recover it? If so, please help me with the process. Thanks!
A replaced file is one of the most frustrating problems you can face on a computer. You work hard on a document, edit a photo, or update a spreadsheet, and then, in just one click, you save over the original version by mistake. This situation will make it seem that the old file is already gone, so it’s understandable if you feel alarmed. Fortunately, a replaced file doesn’t always mean it has permanently disappeared, but the question is: is recovery possible? Read on to learn about the information provided below, along with the prominent methods to help you.


Guide List
Part 1. Can You Recover a Replaced File?
The big question is, can you actually restore overwritten file or a replaced file? The short answer is yes, but it depends on several factors. In most cases, the answer depends on how the file was replaced and whether you have backups enabled. Built-in features and cloud services like OneDrive and iCloud keep version histories that often let you restore previous files with a few clicks. Hence, recovering your replaced file is indeed possible under the right conditions.
Part 2. For Windows Users
Now that it’s clear that recovery is possible, start exploring the options below. Multiple methods are available for Windows users, so simply use the most applicable to your situation.
Option 1. File History & Previous Versions
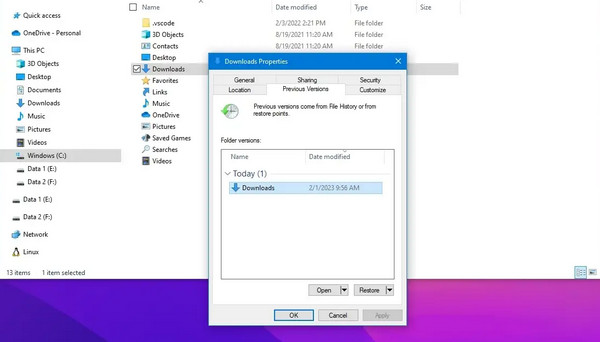
File History & Previous Versions is usually the first option for Windows users when it comes to data recovery. It is a built-in feature that continuously saves copies of your files. If you turned it on before the file was replaced, you can quickly restore the original version with ease. However, if you never set up the feature before the data loss occurred, this option won't be available to you.
Follow the directions below to recover overwritten files with File History:
Step 1Right-click the item that replaced your file in the File Explorer, then select Restore previous versions.
Step 2When the previous versions appear in the dialogue box, choose the one you need before clicking Restore.
Option 2. OneDrive Version History
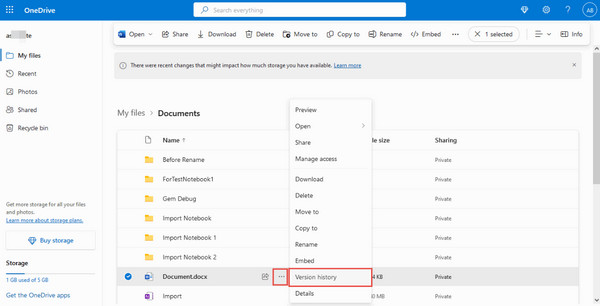
OneDrive is a cloud storage service from Microsoft that is built into Windows computers. If you save your files there, it automatically keeps a history of changes in the Version History section, allowing you to view and restore older versions of your files later. But the downside is that this only works for files stored in OneDrive, not for local files on your computer.
Follow the steps below to learn how to recover overwritten files with OneDrive:
Step 1Head to the OneDrive page, log in, and click the three-dot menu next to the file that replaced the original.
Step 2Following that, choose Version history. When the file’s versions are shown, select and restore the replaced one you want.
Option 3. Microsoft 365 AutoRecover
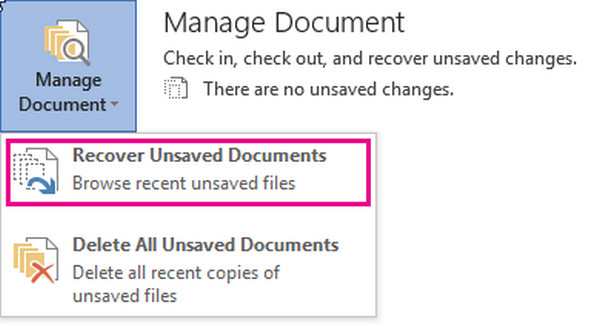
Microsoft 365 is another service that automatically saves temporary copies of your open files at set intervals with its AutoRecover feature. It is useful if your file was replaced while you were actively working on it, especially since it runs in the background without any action needed. Note that it only works for Microsoft Office files like Word, Excel, and PowerPoint. It also doesn’t keep permanent versions, so the copies may be deleted over time.
Follow the steps below to understand how to retrieve overwritten files with Microsoft 365 AutoRecover:
Step 1On Microsoft 365, open the document you work on, then click File > Info.
Step 2Next, hit Manage Document, followed by Recover Unsaved Documents. Once your versions are listed, choose the item you need and restore.
Part 3. For macOS Users
Below are the leading recovery solutions for macOS users.
Method 1. Time Machine
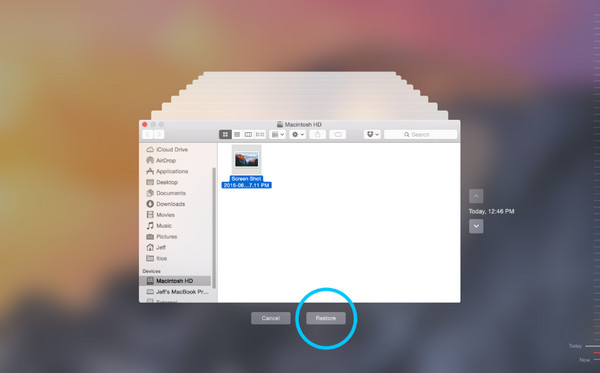
Time Machine is a well-known built-in backup feature on macOS. It routinely backs up your entire system, including all your files, to an external drive or network storage, giving you the chance to view and restore them when needed. However, like most backup features, Time Machine only works if you have already configured Time Machine with an external backup drive beforehand. If not, you won’t have any copies available to recover.
Follow the task below to restore replaced file with Time Machine:
Step 1Attach your external backup drive and start Time Machine from the menu bar.
Step 2Scroll through the timeline to find your desired version, then select it and click Restore.
Method 2. iCloud Drive
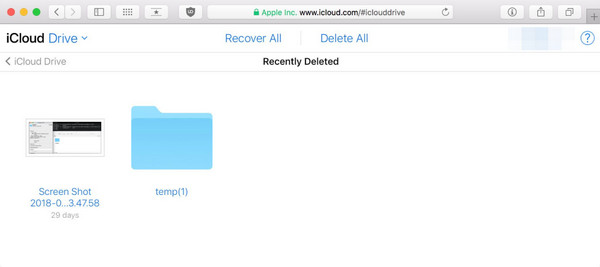
iCloud Drive is Apple's cloud storage service that syncs your files across devices. If you have set it up before the file was replaced, there is a chance that you may still find the file in the Recently Deleted section. You can then restore it within 30 days, but once that time passes, the deletion becomes permanent.
Follow the instructions below to retrieve replaced file using iCloud Drive:
Step 1Log in to iCloud Drive through your browser and proceed to Recently Deleted.
Step 2From there, pick the replaced files you wish to restore, then hit the recovery option.
Part 4. Try FoneLab Data Retriever
If the built-in options do not work, a highly effective tool like FoneLab Data Retriever is your next best option. It is designed to restore deleted files or replaced data from various storage devices, including hard drives, SSDs, flash drives, and memory cards.
Supporting a broad range of file types, you can expect a seamless recovery of your photos, documents, audio files, videos, and more. Additionally, it is known for its user-friendly interface that allows even beginners to recover files effortlessly. The best part? It works on Windows and Mac.
FoneLab Data Retriever - recover the lost/deleted data from computer, hard drive, flash drive, memory card, digital camera and more.
- Recover photos, videos, documents and more data with ease.
- Preview data before recovery.
Follow the guide below to recover replaced file with FoneLab Data Retriever:
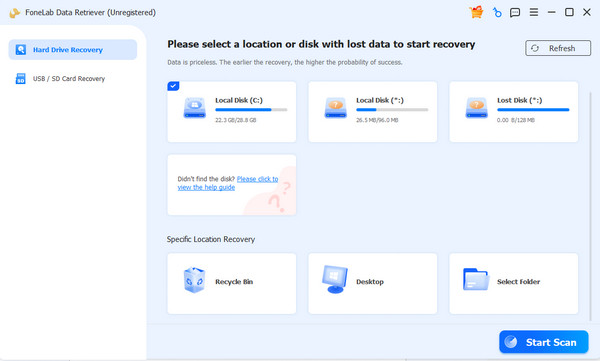
Step 1Acquire FoneLab Data Retriever with the Free Download option, then proceed with the installation. When ready, launch the tool and choose the drive that had your replaced file on the key interface. Following that, select Start Scan and wait for the results.
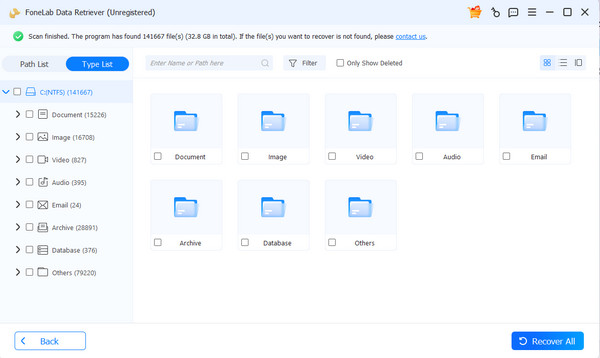
Step 2Based on your replaced file’s data type, open the suitable folder on the next screen. This way, you can browse the content and find the item you desire to restore. When found, mark its checkbox and retrieve it by clicking the Recover All button.
Part 5. Comparison of Ways to Recover Replaced File
| Method | Platform | Requires Setup? | Ease of Use | Best For |
| File History / Previous Versions | Windows | Yes | Very easy | Users who enabled backups beforehand |
| OneDrive Version History | Windows | No (if already synced) | Very easy | Files stored in the OneDrive cloud |
| Microsoft 365 AutoRecover | Windows | No | Easy | Office files you were actively editing |
| Time Machine | macOS | Yes | Very easy | Users with an external backup drive |
| iCloud Drive | macOS | No (if already synced) | Very easy | Files synced to Apple's cloud |
| FoneLab Data Retriever | Windows and macOS | No | Easy | When all other methods fail |
Part 6. FAQs about Recovering Replaced File
Can I recover a file I replaced a year ago?
The chances are low, but it will also depend on the method you use. You can try checking your backups or using FoneLab Data Retriever to see if it’s still available.
Does recovery software damage files?
No, they don’t. Generally, recovery tools only read your drive and do not alter your data.
Recovering a replaced file is often possible. With the right method, good backup habits, and quick action, you can avoid losing precious files.