- Part 1. How to Recover A Replaced File on Mac with Time Machine
- Part 2. How to Recover Replaced Files on Mac with iCloud
- Part 3. How to Recover Replaced Files on Mac with Dropbox
- Part 4. How to Recover Replaced Files on Mac with FoneLab Mac Data Retriever
- Part 5. FAQs about How to Recover Replaced Files on Mac
Recover the lost/deleted data from computer, hard drive, flash drive, memory card, digital camera and more.
How to Recover Replaced Files on Mac in 4 Excellent Ways
 Updated by
 Have you ever had files replaced with new ones? That's a total disaster! A replaced content from a file means that it has been overwritten. It occurs when the old file has the exact name as the new file you save. In this case, your Mac will keep the latest file you save in the same folder.
Suppose you accidentally replaced a file. How to recover on Mac? That's easy! We will guide you through this procedure in this article. It outlines the 4 proven and tested ways to recover your overwritten files quickly. If you are ready for the procedure, scroll down to discover the mentioned methods.

Guide List
- Part 1. How to Recover A Replaced File on Mac with Time Machine
- Part 2. How to Recover Replaced Files on Mac with iCloud
- Part 3. How to Recover Replaced Files on Mac with Dropbox
- Part 4. How to Recover Replaced Files on Mac with FoneLab Mac Data Retriever
- Part 5. FAQs about How to Recover Replaced Files on Mac
Part 1. How to Recover A Replaced File on Mac with Time Machine
Mac has a built-in backup feature that can back up your files 24 hours a day. This tool is called Time Machine. It backs up system files, applications, documents, desktop, settings, preferences, photos, music, videos, downloads, and more. However, this feature is not automatically enabled. It requires a manual setup to back up your Mac files. Have you enabled this feature before replacing your files? Please follow the steps below to use Time Machine to recover overwritten files on your Mac.
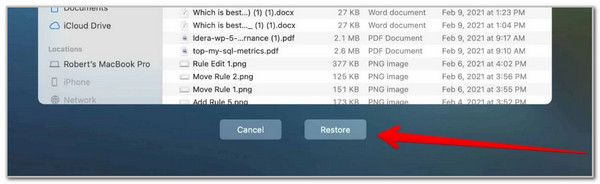
Step 1Open your Time Machine program on Mac. You can locate it from the Dock section or using the Launchpad tool. After that, the backups will appear on the screen. Use the Arrow button on the right side to locate the version of the file that you want to retrieve.
Step 2Select a version of the file that will appear on the main interface. After that, click the Restore button at the bottom center. Time Machine will retrieve the original version of the file you preferred afterward.
Part 2. How to Recover Replaced Files on Mac with iCloud
On the other hand, you accidentally replaced a file. How to recover on Mac without Time Machine? iCloud is also another backup tool that can be used on your Mac and other Apple devices. This cloud storage allows you to keep and retrieve previous versions of your files. This action can be acquired for the data that iCloud supports. In this case, the unsupported data types of iCloud cannot retrieve the previous versions of them. The steps below will be your best guide.
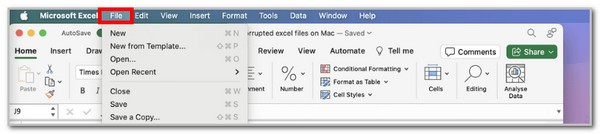
Step 1Open the newly saved file and replace the original file that has been backed up with iCloud. After that, click the File button located at the top of the screen, where the menu bar is positioned. Then, the related drop-down options will appear on the screen.
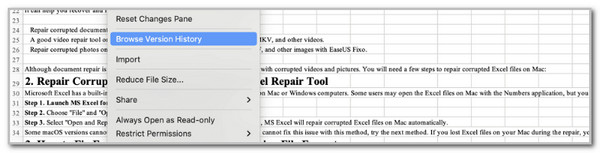
Step 2Click the Browse Version History button from the list. All recoverable versions of the files will appear on the screen. Select the version of the file you prefer to recover to your Mac. Finally, click the Restore option at the bottom of the screen to retrieve the file version.
Part 3. How to Recover Replaced Files on Mac with Dropbox
Additionally, Dropbox can also help you recover your replaced files on Mac. It features a Version History option that allows you to retrieve previous versions of the file before saving it to a new one. This procedure requires the use of a Dropbox account for backup. Please imitate the steps below to learn about the Dropbox process for recovering overwritten files.
Step 1Please open Dropbox on your Mac. After that, ensure that the account used for the file backup is signed in. Then, locate the whole version of the file you prefer to recover from the list. Finally, click the Three Dots button on the right to see more options.
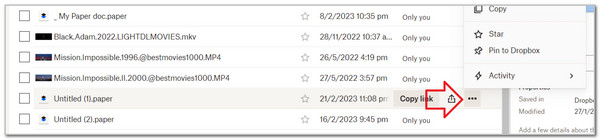
Step 2Click the Activity button from the list. After that, click the Version History button in the small dialog box. The changes in the file will become apparent after a few days. Please select your preferred version and click the Roll Back to This Version button at the top right to retrieve the file version you prefer.

Part 4. How to Recover Replaced Files on Mac with FoneLab Mac Data Retriever
What if you did not use or enable any backup feature? The best solution in this situation is FoneLab Mac Data Retriever. This third-party tool is designed to help you retrieve data from different scenarios. It includes unexpected device power off, unwanted formatting, computer virus, overwriting, and more. Furthermore, it supports various devices, allowing you to retrieve your files. Memory cards, flash drives, removable drives, Android devices, iOS devices, and iPadOS devices are some examples.
Furthermore, it can retrieve a wide range of data types. It includes emails, audio, videos, images, and documents. Recover a replaced file on Mac using this tool by following the steps below.
FoneLab Data Retriever - recover the lost/deleted data from computer, hard drive, flash drive, memory card, digital camera and more.
- Recover photos, videos, documents and more data with ease.
- Preview data before recovery.
Step 1Visit FoneLab Mac Data Retriever and click the Free Download button. Set up, install, and launch it afterward to start the file retrieval procedure.

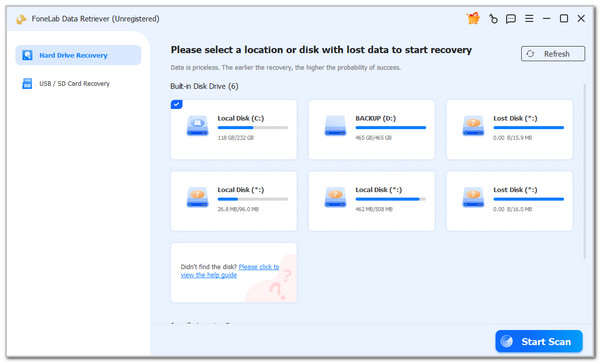
Step 2Select the location where you prefer to scan the overwritten files. Then, click the Start Scan button, located at the bottom right of the screen.
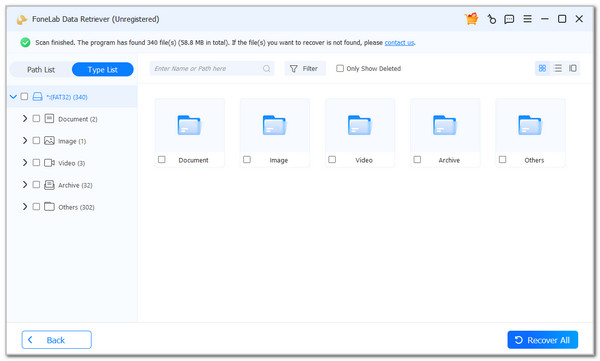
Step 3The results will appear on the next interface. Find the original file that was overwritten and click it. After that, click the Recover All button at the bottom of the screen. The recovery procedure will begin afterward. You only need to wait for the procedure to end.
Part 5. FAQs about How to Recover Replaced Files on Mac
Can we avoid overwritten files?
There are numerous methods to minimize the risk of accidentally overwriting files on your Mac. You only need to be mindful of saving habits for your Mac files. First, double-check the name before saving. Also, pay attention to the location or folder where you will save the file. There are also the Save As and Save buttons. Ensure that you use the correct button when saving the file.
Do overwritten files go to the Trash Bin?
The Trash Bin is a tool on your Mac that holds recently deleted files. However, it does not contain the overwritten files created by the mentioned Apple device. The reason is that overwritten files are not completely deleted. They are only replaced with new content from your Mac.
This article helps you recover a replaced file on a Mac. The 4 best and helpful practices for the mentioned procedure are posted for your reference. FoneLab Mac Data Retriever is included in this article. It is a third-party tool that provides overwritten file recovery, which lasts for a few seconds or minutes, depending on the quantity. What are you waiting for? Download it now on your Mac!