- iPhone X vs iPhone 8: What're the Differences?
- How to Shut Down iPhone X
- How to Restart iPhone X/8/7
- Hard Reset iPhone
- How to Close Out Apps on iPhone
- Delete Apps on iPhone
- How to Share Wi-Fi Password with iOS 11
- Screen Recording on iPhone
- Take Screenshot on iPhone X
- How to Update Latest iOS
- How to Show Battery Percentage on iPhone
- How to Backup iPhone
- How to Restore iPhone
iPhone Tips & Tricks: 13 Unmissable Answers for iPhone Users
 Posted by Lisa Ou / April 14, 2021 09:00
 Apple Inc. always releases its new models once a year. If you want to know more details about the new features and differences between iPhone X and iPhone 8, please read below contents.
Apple's iOS is a long way with a market share of 12.9 percent according to Gartner. You learn more iPhone tips to unmask more secrets of iPhone.

1. iPhone X vs iPhone 8: What're the Differences?
Both iPhone 8 and iPhone 8 Plus have 4 colors with 4.7” or 5.5” Retina HD display, including silver, space gray, gold and red. While, iPhone X has silver and space gray finish with larger 5.8” Super Retina HD display.
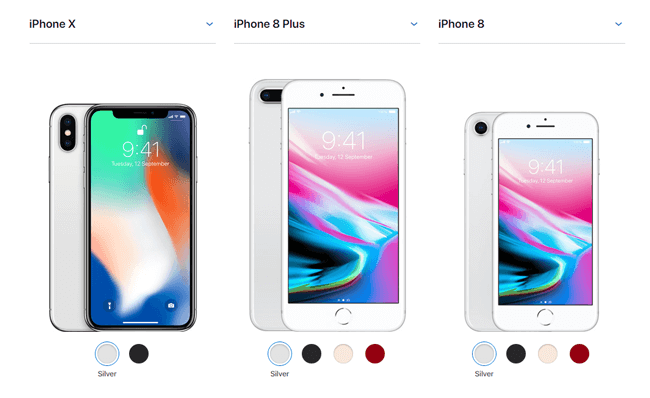
If you like 12MP wide-angle and telephoto cameras to enable portrait mode, you should choose iPhone X and iPhone 8 Plus. In addition, iPhone X is the only one has the Face ID and dual optical image stabilization feature to make animoji.
| Model | iPhone X | iPhone 8 Plus | iPhone 8 |
|---|---|---|---|
| Size | 5.8” | 5.5” | 4.7” |
| Display | Super Retina HD display | Retina HD display | Retina HD display |
| Screen | All-screen | Widescreen | Widescreen |
| Secure Authentication | Face ID | Touch ID | Touch ID |
| Rear Camera | 12MP wide-angle and telephoto cameras(Portrait Mode, Portrait Lighting) | 12MP wide-angle and telephoto cameras(Portrait Mode, Portrait Lighting) | 12MP camera |
| Front Camera | TrueDepth camera(Portrait Mode, Portrait Lighting, Animoji) | FaceTime HD camera | FaceTime HD camera |
| Power and Battery | Lasts up to 2 hours longer than iPhone 7 | Lasts about the same as iPhone 7 Plus | Lasts about the same as iPhone 7 |
After above-mentioned specifications, you should know how to choose the best iPhone for yourself.
You might have found that iPhone X has not a home button, which is always on iPhone’s screen, so here we will introduce some cases to help you solve different problems.
You can compare more different models on Apple official site.
2. How to Shut Down iPhone X
There is something different you should know to shut down iPhone x, as you are unable to simply press the power button to turn it off.
You have 2 options.
Option 1. Shut Down iPhone X through Settings
Step 1Go to Settings > General.
Step 2Scroll down to find Shut Down and tap on it.
Step 3Slide the button to power off.
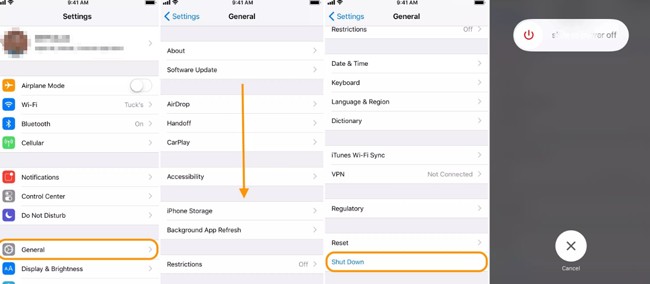
This way works for any other iPhone models.
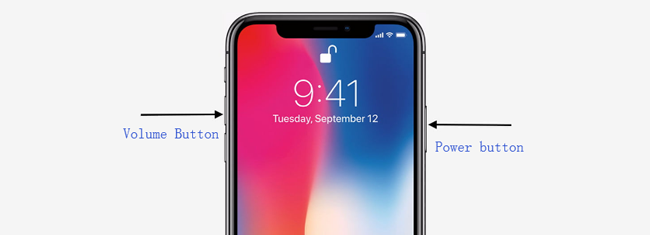
Option 2. Turn off iPhone via Pressing Buttons
Step 1Press and hold power button and either volume button until you see the slider. Press the power button only for other iPhone models.
Step 2Drag the slider to turn off iPhone.
3. How to Restart iPhone X/8/7
Restarting iPhone can fix most disable problems during the procedure of using iPhone. You should learn different methods to reboot iPhone.
Option 1. Restart iPhone normally
Step 1Select one of the above-mentioned ways to power off iPhone.
Step 2Press and hold the side button until you see the Apple logo appears.

Option 2. Force Reboot iPhone
For iPhone 6 and earlier:
Step 1Press and hold home button and power button at the same time until the iPhone turns off and then Apple logo appears, release the buttons.
Step 2Enter your iPhone password and turn it on.

For iPhone 7 and 7 Plus:
Step 1Hold down the power button and volume down button at the same time until you see the Apple logo and let the power off slider go during the procedure.
Step 2Enter passcode to unlock iPhone.

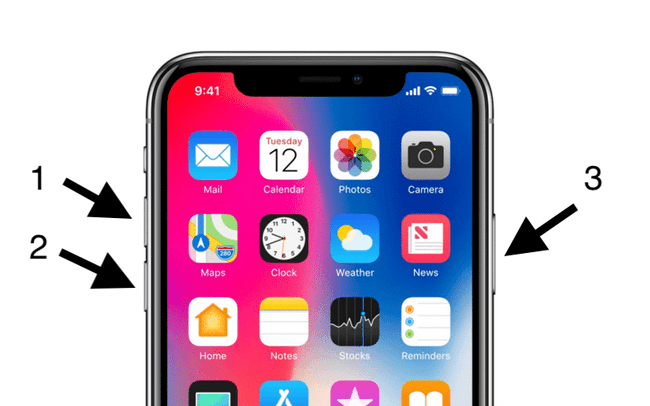
For iPhone X, 8, and 8 Plus:
Step 1Press and release volume up button quickly, and then volume down button.
Step 2Hold down the power button until the entire restarting procedure is complete.
Step 3Enter passcode to start iPhone.
4. Hard Reset iPhone
Accident happens all the time, so you would need some effective and workable methods to fix errors for you.
Resetting iPhone can help you solve some complicated problems due to the iPhone has been used for a long time without correct management. There is something wrong on your device but you can’t figure out the exact reasons.
Soft reset or hard reset can help you remove all terrible facts on iPhone and make them normal as a new phone.
Well, soft reset is a simple restarting or rebooting. Here we will talk about How to Hard Reset iPhone.
Option 1. Factory Reset iPhone via Settings
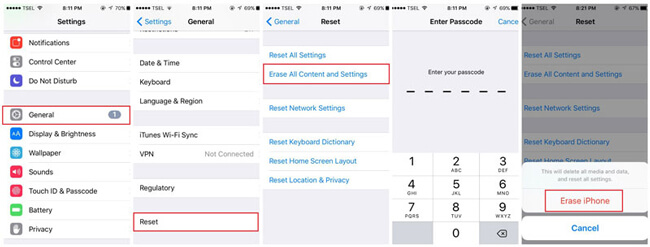
Step 1Go to Settings > General, and then scroll down to locate Reset.
Step 2You can see 6 options, you should choose Reset All Contents and Settings here.
Step 3Follow the instruction to enter password when prompted to continue the procedure. Then set up your new device or restore from backup file if you have one.
Option 2. Restore iPhone with iTunes
iTunes is a simple and convenient tool to manage iPhone data, please keep in mind that you should turn off Find My iPhone to continue to restore iPhone with iTunes.
Step 1Launch iTunes on your computer and connect iPhone to this computer via USB cable.
Step 2Click device icon > Summary > Restore iPhone after your iPhone has been detected.
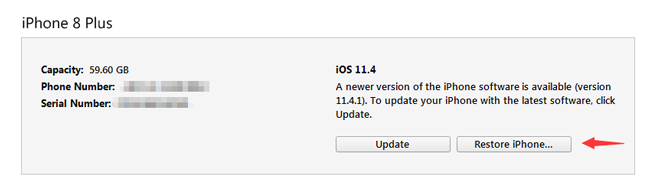
Step 3Enter passcode when asked, and then set up iPhone as usual.
What to do if you forgot the passcode for your iPhone? You can try to enter recovery mode to remove the passcode.
Option 3. Hard Reset iPhone by Entering Recovery Mode
Recovery mode is a way you can erase the device and its passcode.
Step 1Launch iTunes and then connect device to this computer.
Step 2Enter recovery mode on iPhone.
For iPhone 6 and earlier: Press and hold the home and power button at the same time until you see the recovery-mode screen.
For iPhone 7 and 7 Plus: Keep holding both power button and volume button at the same time until you see the recovery-mode screen.
For iPhone X, 8 and 8 Plus: Press and release volume up and then volume down button quickly.
Step 3Click Restore when the window pops up. Moreover, iPhone will exit recovery mode when it takes more than 15 minutes.
You can learn more ways to factory reset iPhone or iPad.
5. How to Close Out Apps on iPhone
iPhone users always running several apps on background, which will lag iPhone slower and slower. It is recommended that you can close out app on iPhone when you don’t use them anymore.
For iPhone 8 and earlier:
Step 1Double-click the home button to show your used apps.
Step 2Find the app you want to close and swipe up.
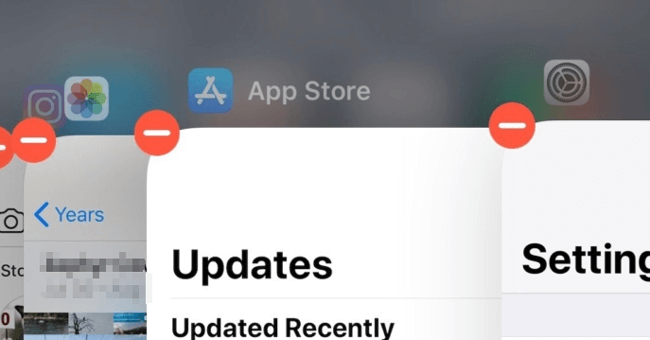
For iPhone X:
Step 1Swipe up from the home screen and pause.
Step 2Hold the app and tap the – icon to close it.
6. Delete Apps on iPhone
You might have encountered that you can easily choose which apps can be saved, while which should be abandoned to release iPhone device space.
Below is how to delete apps on iPhone.
Option 1. Delete iPhone Apps on Home Screen
Step 1Press and hold the app you want to remove on iPhone screen until it begins to wiggle.
Step 2Tap the x symbol to delete it.

Option 2. Delete iPhone Apps through Settings
Step 1Go to Settings > General > iPhone Storage.
Step 2Scroll down to locate the unwanted app, and tap on it.
Step 3Tap Delete App to delete this app.

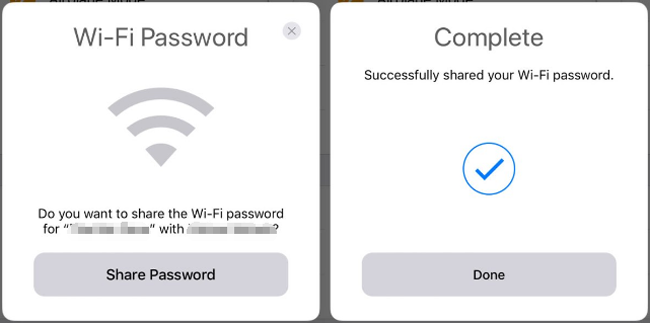
7. How to Share Wi-Fi Password with iOS 11
One of the inconveniences of iPhone is that you can’t share Wi-Fi password with others.
However, Apple has upgraded its settings from iOS 11, then iPhone users are allowed to share Wi-Fi password with friends with permissions.
Step 1Unlock your iPhone and then connect it to a Wi-Fi.
Step 2Hold your iPhone next to whom you want to share Wi-Fi password with.
Step 3Tap Send Password then the alert pops up.
8. Screen Recording on iPhone
iOS 11 enables you to create screen recording and capture sound on your iPhone. Both iPhone X and iPhone 8 have this function so you can do this easily.
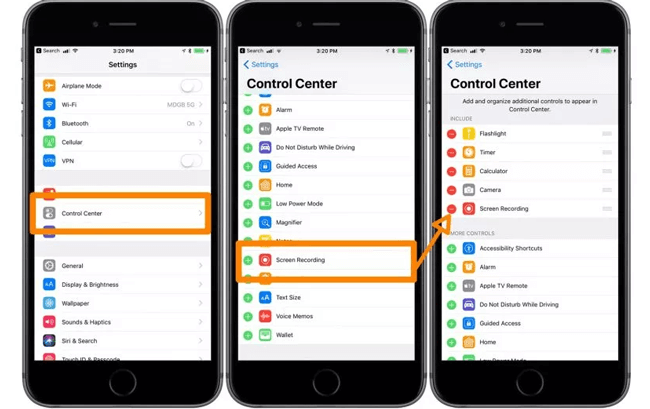
Step 1Turn on Screen Recording on iPhone through Settings > Control Center > Customize Controls, scroll down to get Screen Recording and tap + icon next to it to enable it.
Step 2Swipe up from the bottom of the screen to open control center, tap the screen recording icon to begin. If you want to capture sound on iPhone, press deeply the icon until the options pop up. Then tap the microphone audio icon to turn it on, and then tap Start Recording.
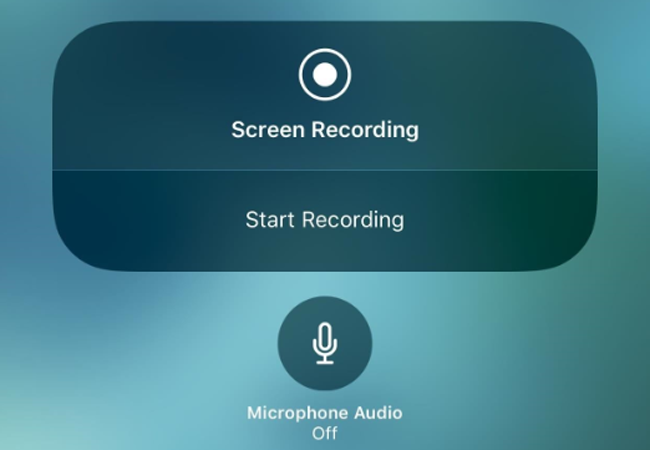
Step 3To stop recording, you can tap the red status bar on the top of the screen or swipe up the control center to tap the screen recording icon again.
If you want to capture video or audio on computer, you can try FoneLab Screen Recorder.
9. Take Screenshot on iPhone X
In some cases, you need to take a screenshot on your iPhone to share with someone or save it on device only.
It is easy to do and you can add drawing and text with markup in iOS 11.
Below is the demonstration.
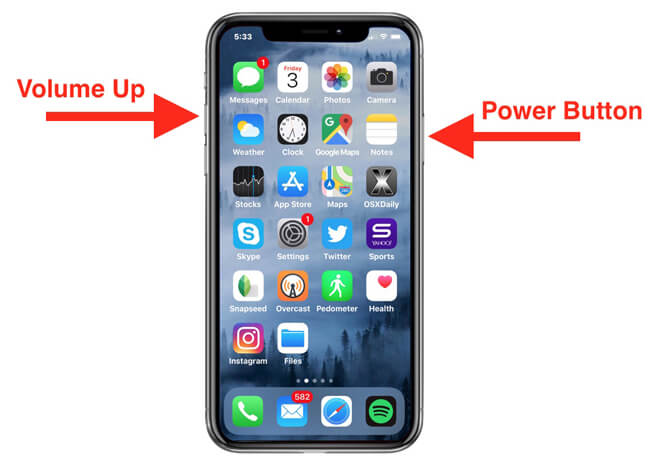
Take Screenshot iPhone X:
Step 1Press both power and volume up buttons at the same time.
Step 2Then you will see flash white on the screen.
Take Screenshot iPhone 8, 8 Plus and earlier:
Step 1Press the power and home button at the same time until you see the flash white on the screen.
Step 2Then you can tap the screenshot on the bottom left corner or find them on screenshot album.
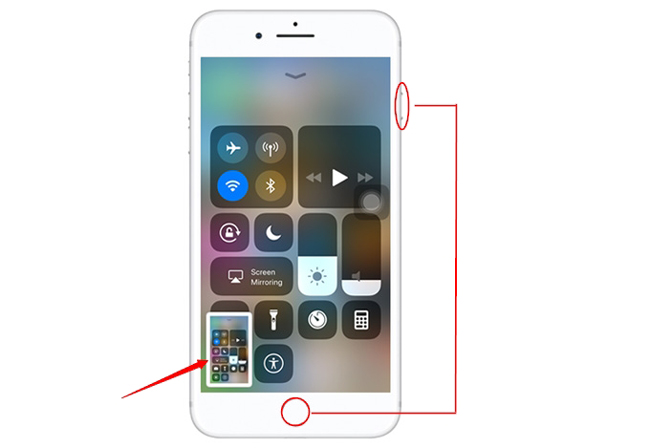
Please note that the screenshots will be saved to Photos > Albums > Screenshots.
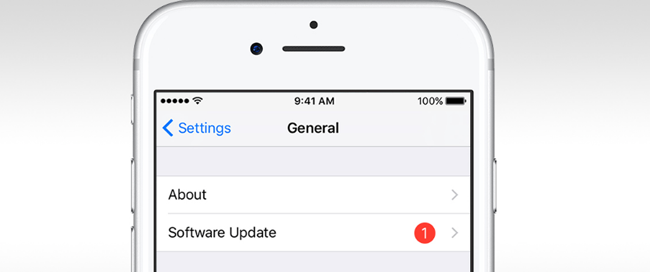
10. How to Update Latest iOS
iOS keeps updating to make its devices more and more perfectly and safely. It is better that you can keep your operating system up to date to prevent data loss or be hacked, which will cause data gone, privacy disclosure or financial loss.
Below is how to Update iOS.
Option 1. Update iOS on iPhone
Step 1Connect iPhone to stable Wi-Fi and charge it during the procedure to ensure you have enough power to finish.
Step 2Go to Settings > General > Software Update.
Step 3Tap Download and Install.
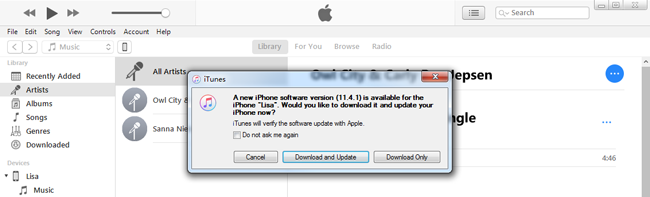
Option 2. Update iOS with iTunes
Step 1Connect iPhone computer, which is running the latest iTunes.
Step 2Click Download and Update on the pop-up window. Alternatively, click device icon > Summary > Update if there is no alert.
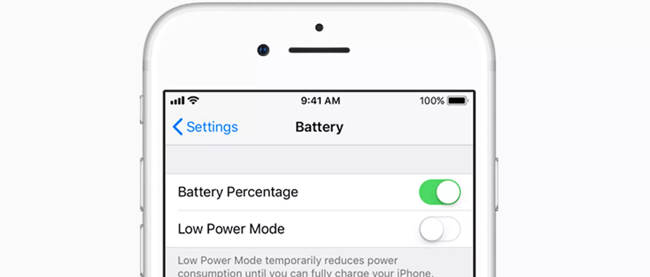
11. How to Show Battery Percentage on iPhone
Turn on Battery percentage can show you how much power left on iPhone so you can consider that how long you can use it for.
Therefore, how can you show battery percentage on iPhone?
Step 1Open Settings, and then scroll down to get Battery.
Step 2Enable Battery Percentage.
12. How to Backup iPhone
Backup equals another life of your data on iPhone. It enables you to restore iPhone data if you have saved what you want to restore.
You have 3 options, including iTunes, iCloud and FoneLab.
Both iTunes and iCloud should be familiar for iPhone users, as they are the most frequent methods to do something for iPhone.
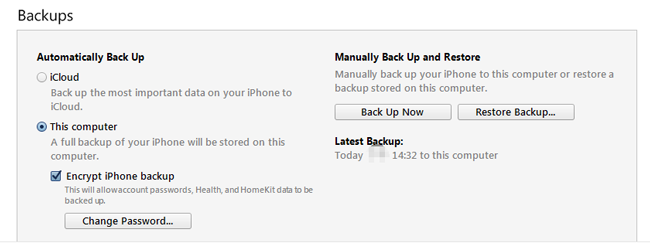
1. Backup iPhone with iTunes
iTunes helps People backup and restore iPhone data with iTunes on computer. It requires USB connection between computer and device, so you don’t need network for data transfer.
Step 1Open iTunes on your computer, and then plug iPhone into this computer.
Step 2Click device icon when it has been detected, and then click Summary > Back Up Now under the Backups section. You can choose if you want to encrypt the backup file in this step.
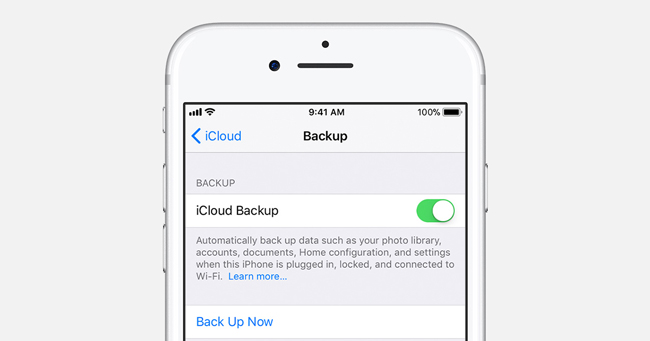
2. Backup iPhone with iCloud
If you don’t have a computer, iCloud will be another good choice for you to backup iPhone data.
Step 1Go to Settings > [your name] > iCloud > iCloud Backup.
Step 2Enable the button next to iCloud Backup.
Step 3Tap Back Up Now.
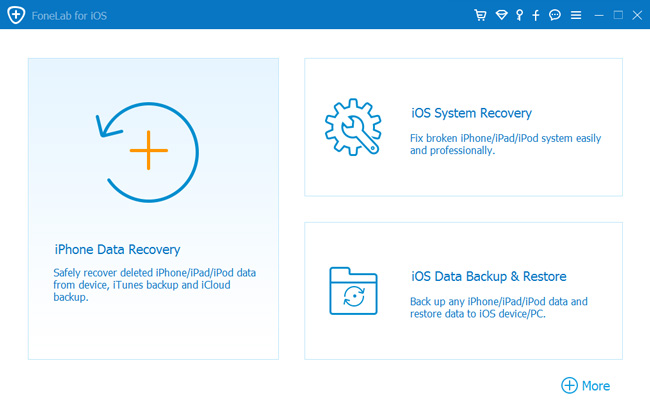
3. Backup iPhone with FoneLab
As you can see neither iTunes nor iCloud provide an option to choose that what type of data can be backed up or restored for users.
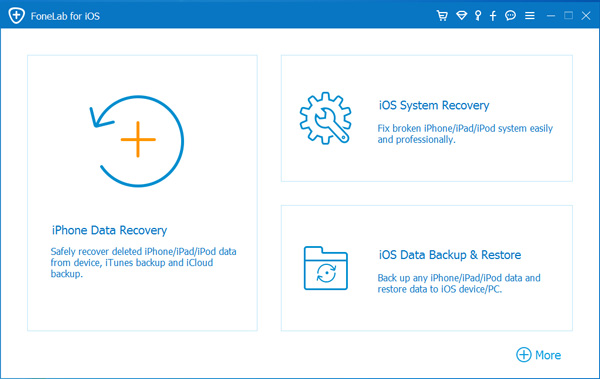
If you want to do something for separate data, FoneLab iOS Data Backup & Restore is highly recommended to you. It helps you backup and restore data selectively, and it will never read or modify the data on your iPhone.
Step 1Download and install FoneLab on computer, and then plug iPhone into this computer, which is running Fonelab.
FoneLab enables you to backup and restore iPhone/iPad/iPod without data loss.
- Backup and restore iOS data to your PC/Mac easily.
- Preview data in detail before you restore data from backups.
- Backup and restore iPhone, iPad and iPod touch data Selectively.
Step 2When the program detects iPhone, click iOS Data Backup & Restore > iOS Data Backup.
Step 3Click the box next to Standard backup or Encrypted backup according to your needs, then click Start button.
Step 4Select data type you want to back up, and then click Next.
Notes and Contacts can be easily restored after backing up with FoneLab iOS Data Backup & Restore. Below is how to do.
Step 1Choose iOS Data Backup & Restore > iOS Data Restore.
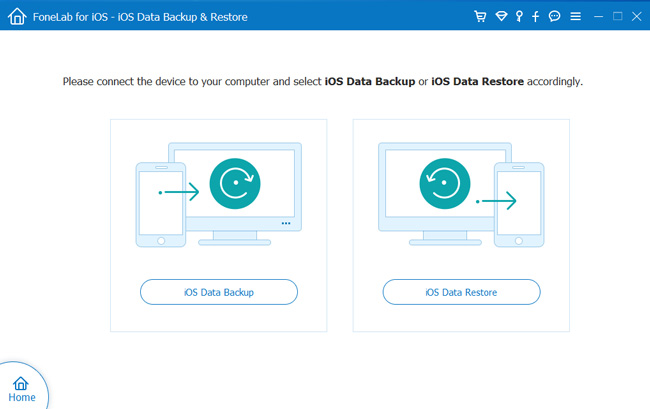
Step 2Choose local backup data, which you want to restore from, then click View Now.
Step 3View data and then check what you want and click Restore to Device or Restore to PC.
13. How to Restore iPhone
Data loss became more and more common in daily life as there are different reasons to cause this situation. Some iPhone users have a good custom to backup iPhone data with iTunes or iCloud regularly, so they can restore iPhone data from backup files without obstacles.
Below are demonstrations of how to restore iPhone with iTunes or iCloud.
1. Restore iPhone with iTunes
Step 1Running iTunes on the computer, which you have backed up iPhone before. Then connect iPhone to this computer, too.
Step 2Click device icon > Summary > Restore Backup under Backups section.
2. Restore iPhone with iCloud
Step 1Factory Reset iPhone through Settings > General > Reset > Reset All Settings.
Step 2Enter password when it asked, and follow the on-screen instruction to finish the procedure. Then wait for the resetting.
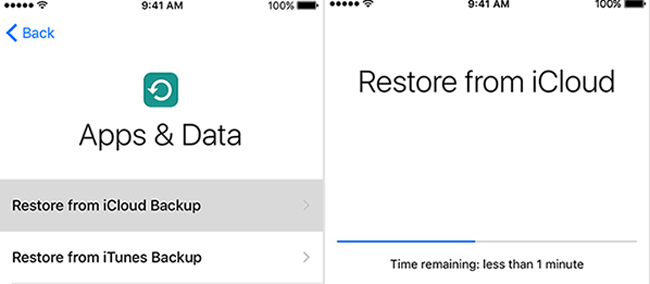
Step 3Set up the iPhone, choose Restore from iCloud backup on the App & Data page, choose which backup to be restored from.
Above-mentioned ways with iTunes or iCloud will overwrite data on iPhone, which means you will lose existing data.
If you don’t want to be like this, you can recover deleted data with FoneLab iPhone Data Recovery.
3. Recover iPhone with FoneLab
FoneLab offers three recovery modes, Recover from iOS Device, Recover from iTunes Backup File and Recover from iCloud Backup File. No matter you have backup files or not, it helps you recover lost iPhone contacts, notes, WhatsApp, photos and more effectively.
Step 1Download and install FoneLab iPhone Data Recovery on computer, and then launch it automatically.
FoneLab enables you to fix iPhone/iPad/iPod from DFU mode, recovery mode, Apple logo, headphone mode, etc. to normal state without data loss.
- Fix disabled iOS system problems.
- Extract data from disabled iOS devices without data loss.
- It is safe and easy to use.
Step 2Select iPhone Data Recovery > Recover from iOS Device on the interface. If you have backed the data with iTunes or iCloud, you can easily choose Recover from iTunes Backup File or Recover from iCloud Backup File, and then choose backup file from the list to scan. In addition, you should log in your iCloud account if you choose the third recovery mode.
Step 3Select the data type you want to recover and then click Scan.
Step 4Check the items you want to recover, and then click Recover.
What’s more,
FoneLab supports iPhone, iPad and iPod Touch. You can simply download the software and have a try now.
If you are an Android user, you can read Android Tips and Tricks to solve Android problems.
FoneLab enables you to fix iPhone/iPad/iPod from DFU mode, recovery mode, Apple logo, headphone mode, etc. to normal state without data loss.
- Fix disabled iOS system problems.
- Extract data from disabled iOS devices without data loss.
- It is safe and easy to use.