- Part 1. How to Back Up Voicemails on iPhone with FoneLab iOS Data Backup & Restore
- Part 2. Backup Voicemail on iPhone Directly
- Part 3. How to Save A Voicemail on iPhone with iTunes
- Part 4. How to Backup Voicemail on iPhone via Finder
- Part 5. Save Voicemails from iPhone to iCloud
- Part 6. FAQs about How to Back Up Voicemails on iPhone
How to Back Up Voicemails on iPhone with The Most Efficient Solutions
 Posted by Lisa Ou / Sept 26, 2022 16:00
The voicemail is a recorded message that you store to be received by the owner when you dial someone, but they are not there. Well, iPhone users can receive their voicemails after setting up on devices. It is a convenient feature to ensure you won’t miss any callers' messages.
Sometimes, these voicemails on iPhone have become essential to the information you want to save on the device. One of the simplest methods is to backup iPhone voicemails.
If you want to know how to backup iPhone voicemails effortlessly and quickly, move on to the following parts.


Guide List
- Part 1. How to Back Up Voicemails on iPhone with FoneLab iOS Data Backup & Restore
- Part 2. Backup Voicemail on iPhone Directly
- Part 3. How to Save A Voicemail on iPhone with iTunes
- Part 4. How to Backup Voicemail on iPhone via Finder
- Part 5. Save Voicemails from iPhone to iCloud
- Part 6. FAQs about How to Back Up Voicemails on iPhone
Part 1. How to Back Up Voicemails on iPhone with FoneLab iOS Data Backup & Restore
You should try FoneLab iOS Data Backup & Restore on the computer for users who want to learn how to backup iPhone voicemails and other data.
It is a useful program on the computer to backup and restore iPhone data, including Photos, contacts, videos, messages and more. Moreover, different data types on iPhone, iPad and iPod Touch are available. You can always download it from the official site and install it on your computer. Then follow the steps below to backup iPhone voicemail to the computer.
FoneLab enables you to backup and restore iPhone/iPad/iPod without data loss.
- Backup and restore iOS data to your PC/Mac easily.
- Preview data in detail before you restore data from backups.
- Backup and restore iPhone, iPad and iPod touch data Selectively.
Step 1Download and install FoneLab on your computer, and launch it when the installation is done.
Step 2Connect iPhone to a computer with a USB cable, and tap Trust on your iPhone.
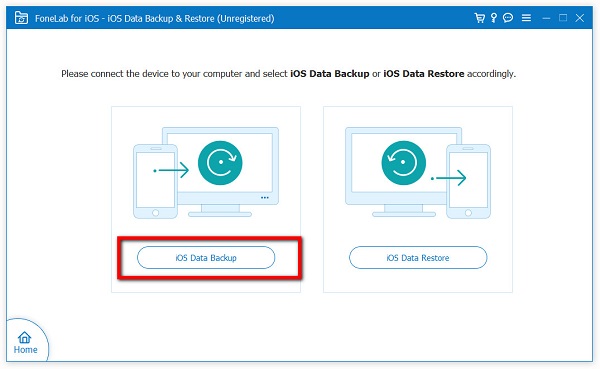
Step 3Click iOS Data Backup & Restore in the interface.
Step 4Choose iOS Data Backup if you want to backup iPhone voicemail.
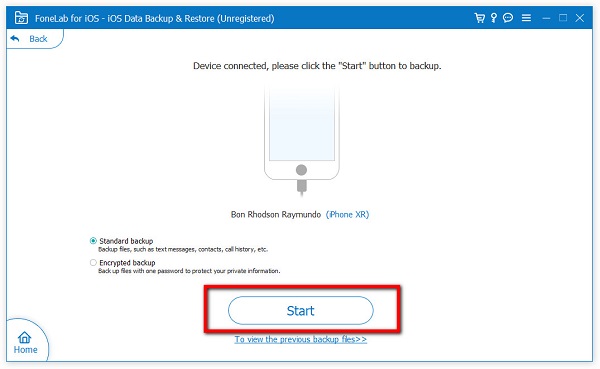
Step 5Click Start directly if you don't want to add a password to your backup file.
Step 6Uncheck Select All on the bottom, and tick the Voicemail on the Messages & Contacts section.
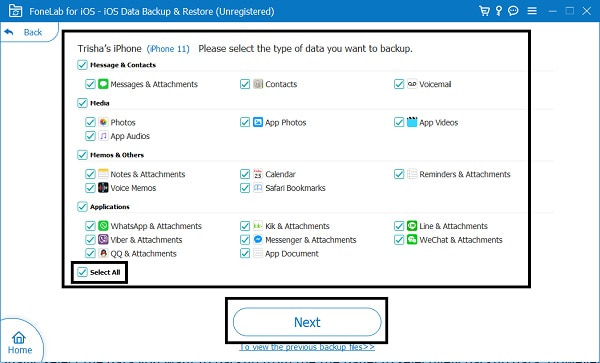
Step 7Click Next to begin the process.
That’s it. You can find that it is easy but useful to backup iPhone data. No matter you want to save selective or entire data, FoneLab iOS Data Backup & Restore can help you get what you want.
Part 2. Backup Voicemail on iPhone Directly
You know, you need to find and access voicemails from the Phone app on iPhone. Actually, you can save voicemails from iPhone app directly. It has different options to save your iPhone voicemails, please check the detailed steps for an example of backing up iPhone voicemails through Mail.
Step 1Open the Phone app on iPhone, and tap Voicemail on the bottom-right corner.
Step 2Choose a voicemail you want to backup and select the share icon.
Step 3Select Mail from the options, and enter the email address to receive the voicemail.
Step 4On the computer or iPhone, receive the new emails and save the voicemail to the computer folder or iPhone.
This method requires that you backup iPhone voicemail one by one through repeated operations. If you prefer to backup iPhone voicemails at once, you can choose iTunes instead.
FoneLab enables you to backup and restore iPhone/iPad/iPod without data loss.
- Backup and restore iOS data to your PC/Mac easily.
- Preview data in detail before you restore data from backups.
- Backup and restore iPhone, iPad and iPod touch data Selectively.
Part 3. How to Save A Voicemail on iPhone with iTunes
You know, iTunes is a convenient tool to backup and restore iPhone data, including voicemails without hassles. Without additional tools, you can simply open iTunes on your computer to sync your voicemails, photos, videos, and more for backup within simple clicks.
Steps of how to save voicemails from iPhone via iTunes:
Step 1Download and install iTunes on your computer, and double-click to launch it.
Step 2Connect iPhone to computer with a USB cable, and tap Trust on your iPhone home screen when it pops up.
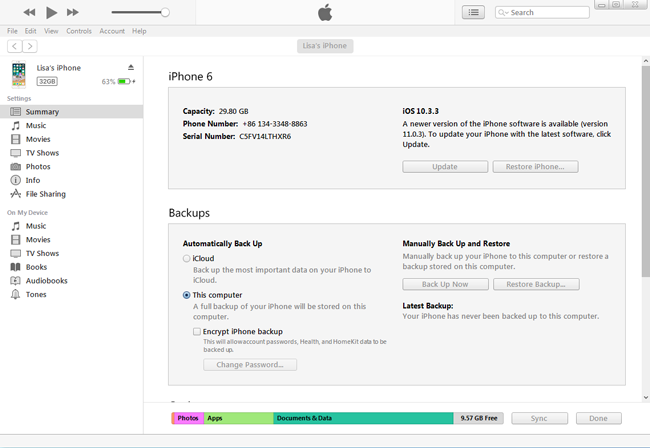
Step 3Tap the device icon on the top of the upper-right of the window.
Step 4Find the Backups section, and click Back Up Now in it.
But, you should find that the latest macOS doesn’t have iTunes anymore. You can still use its alternatives to backup iPhone data easily.
Part 4. How to Backup Voicemail on iPhone via Finder
Finder has replaced iTunes on macOS to manage iPhone data as before. You can also sync data and manage your devices with Finder quickly. Here, we will show you the demonstration on how to backup iPhone voicemails with Finder on Mac.
Step 1Open Finder on the computer, and select your iPhone from the left panel.
Step 2Select General > Backups.
Step 3Click the Back Up Now button.
However, some users might prefer a cloud service to back up iPhone voicemails without connection.
Part 5. Save Voicemails from iPhone to iCloud
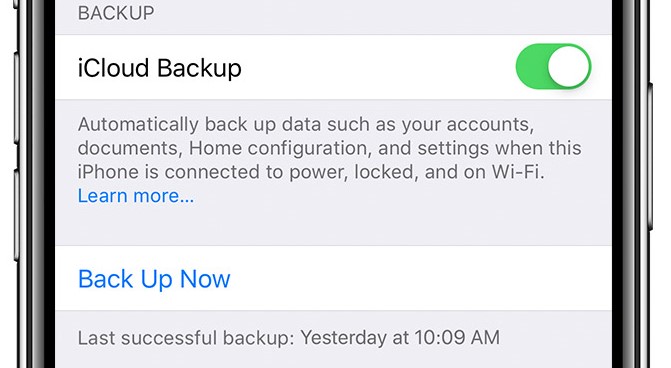
If you are a fan of cloud services, you should try iCloud for iPhone data. It helps you backup iPhone data automatically or manually with ease. You can customize the settings for whatever data you want accordingly. In the same way, you can also backup voicemails on iPhone to iCloud by following the steps below.
Step 1Connect your iCloud with a network and a power source.
Step 2Turn on iCloud Backup through Settings >[Your name]> iCloud > iCloud Backup.
Step 3Tap Back Up Now.
You should know that iTunes, Finder and iCloud are unable to backup iPhone voicemails selectively. So, you have to take a long time and large storage to save your data from iPhone. That’s also why FoneLab iOS Data Backup & Restore is the most recommended tool that stands out from competitors. You can now download it on computer and have a try!
FoneLab enables you to backup and restore iPhone/iPad/iPod without data loss.
- Backup and restore iOS data to your PC/Mac easily.
- Preview data in detail before you restore data from backups.
- Backup and restore iPhone, iPad and iPod touch data Selectively.
Part 6. FAQs about How to Back Up Voicemails on iPhone
How to reset voicemail password on iPhone?
How to reset iPhone voicemail password is not a complicated task, you can go to Settings > Phone > Change Voicemail Password. You will be asked to enter the old one before changing it, then follow the on-screen instructions to reset iPhone voicemail password.
How to transfer voicemails to new iPhone?
You can backup data with iTunes or iCloud, then restore data from backup files. Then your voicemails will be moved to the new iPhone as well.
Do voicemails transfer to new iPhone?
If you restore data from iTunes or iCloud backup files, your voicemail will be transferred to new iPhone.
How to save voicemails from iPhone to computer?
If you want to save iPhone voicemail to a computer, you can open the Phone app on iPhone, select Voicemail and choose one from the list. Tap the share icon and choose a method to transfer the voicemails. Alternatively, you can also try FoneLab iOS Data Backup & Restore to backup voicemails from iPhone to computer.
How to download voicemail from iPhone?
You can still use its sharing feature to download voicemail from iPhone. Open the Phone app, choose Voicemail > share icon. Choose a method and follow the instructions to download voicemail from iPhone.
That's all about how to backup iPhone voicemails and other data easily and quickly. You can now pick one or all of them accordingly. And FoneLab iOS Data Backup & Restore is the most reliable and effective tool you should never miss.
FoneLab enables you to backup and restore iPhone/iPad/iPod without data loss.
- Backup and restore iOS data to your PC/Mac easily.
- Preview data in detail before you restore data from backups.
- Backup and restore iPhone, iPad and iPod touch data Selectively.