
 iPhone Data Recovery
 iOS System Recovery
 iOS Data Backup & Restore
 iOS Unlocker
 iPhone Password Manager
 Location Changer
 Android Data Recovery
 Broken Android Data Extraction
 Android Data Backup & Restore
 Android Unlocker
 FoneTrans for iOS
 iPhone Data Eraser
 iPhone Cleaner
 HEIC Converter
 HyperTrans
 WhatsApp Transfer for iOS
 Mac Sweep
 Data Retriever
 Mac Data Retriever
 Video Converter Ultimate
 Screen Recorder
 Phone Mirror
- Part 1. Types of Cache on a Windows PC
- Part 2. Clear Browser Cache on Windows
- Part 3. Clear System Temp Files with Disk Cleanup
- Part 4. Clear Cache Automatically with Storage Sense
- Part 5. Clear DNS Cache on Windows
- Part 6. What Not to Delete on Windows
- Part 7. Recover Lost Files After Clearing Caches with FoneLab Data Retriever
- Part 8. FAQs about How to Clear Cache on Windows
 Recover PC Data Now
Recover the lost/deleted data from computer, hard drive, flash drive, memory card, digital camera and more.
Trouble-Free Guide on How to Clear Cache on Windows
 Updated by
When a Windows computer runs slowly, it’s best to learn how to clear Windows cache. You may wonder, are caches the guaranteed reason for a computer’s poor performance? No, they're not. But are they almost always the cause? Yes! That’s because Windows and the programs you use store temporary files called caches, to help things run faster.
While caches are useful, they can also cause issues over time as they pile up or become outdated. Hence, let us lead you through hassle-free strategies for clearing your Windows caches, whether you want to prepare in advance or have already encountered problems. We’ll cover different areas of Windows, so don’t miss any section, especially the recovery solution we've prepared in case data loss occurs.

Guide List
- Part 1. Types of Cache on a Windows PC
- Part 2. Clear Browser Cache on Windows
- Part 3. Clear System Temp Files with Disk Cleanup
- Part 4. Clear Cache Automatically with Storage Sense
- Part 5. Clear DNS Cache on Windows
- Part 6. What Not to Delete on Windows
- Part 7. Recover Lost Files After Clearing Caches with FoneLab Data Retriever
- Part 8. FAQs about How to Clear Cache on Windows
Part 1. Types of Cache on a Windows PC
In case you aren’t yet familiar, there are different types of caches on a Windows PC, and each one serves a different purpose. Here are the main ones:
- • Browser cache contains images and files from websites you visit.
- • DNS caches store records of website addresses to speed up connections.
- • System temp files are created by programs and Windows itself while they are running.
- • Windows Update cache stores downloaded update files.
- • Thumbnail caches save small previews of your photos and videos.
Part 2. Clear Browser Cache on Windows
Let’s start with browser caches. The processes to clear cache on Windows Chrome, Firefox, and Edge are similar, but since they are different browsers, expect differences in their options.
Method 1. Chrome
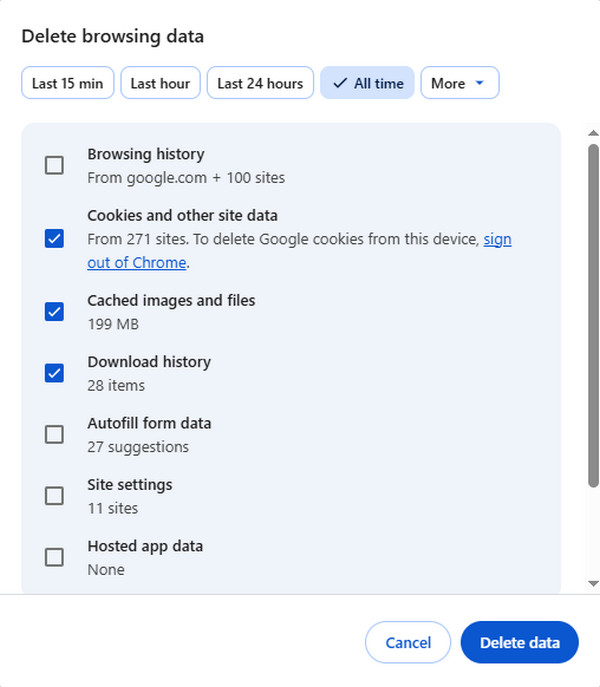
Chrome is one of the most widely used browsers, and it stores cache to help pages load faster. But when issues occur because of too much cache buildup, don’t be alarmed because clearing it in Chrome is simple and can be done in just a few clicks. Better yet, it allows you to choose how far back you want to clear, whether it's the last hour or all time.
Step 1In the Chrome interface, click the three-dot menu, then proceed to Settings > Privacy and security. Next, choose Delete browsing data.
Step 2After that, choose a time range, check Cached images and files, and click Clear data.
Method 2. Firefox
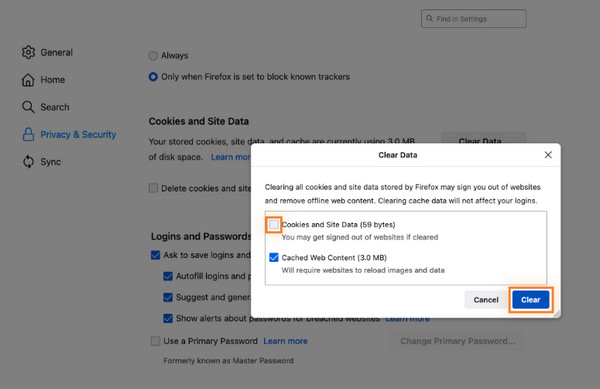
Firefox also saves cache to speed up your browsing experience. If you notice pages loading slowly or showing outdated content, you can clear cache in Firefox on Windows with ease. The browser even provides options to clear only the cache or other data, similar to the others.
Step 1Click the menu button on Firefox and choose Settings, then Privacy & Security.
Step 2Under Cookies and Site Data, hit Clear Data to view a dialogue, and from there, ensure you check Cached Web Content. Once ready, select Clear to finish.
Method 3. Edge
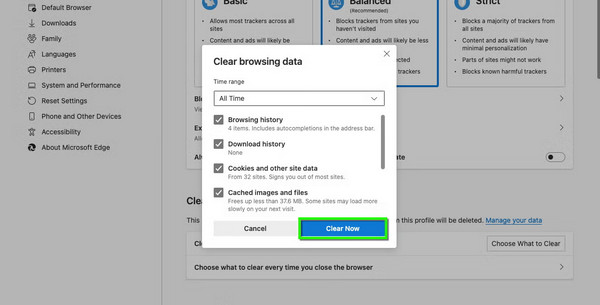
Meanwhile, Edge is Microsoft's built-in browser for Windows, and it also uses caches to improve performance. When they become outdated and cause slowdowns or display issues, clearing them is easy, as it follows a similar pattern to previous browsers to delete temporary files.
Step 1As before, opt for the three-dot menu inthe Edge window. Afterward, select Settings, then Privacy, search, and services.
Step 2Under Clear browsing data, click Choose What to Clear and check Cached images and files on the following screen. Once done, select Clear Now.
Part 3. Clear System Temp Files with Disk Cleanup
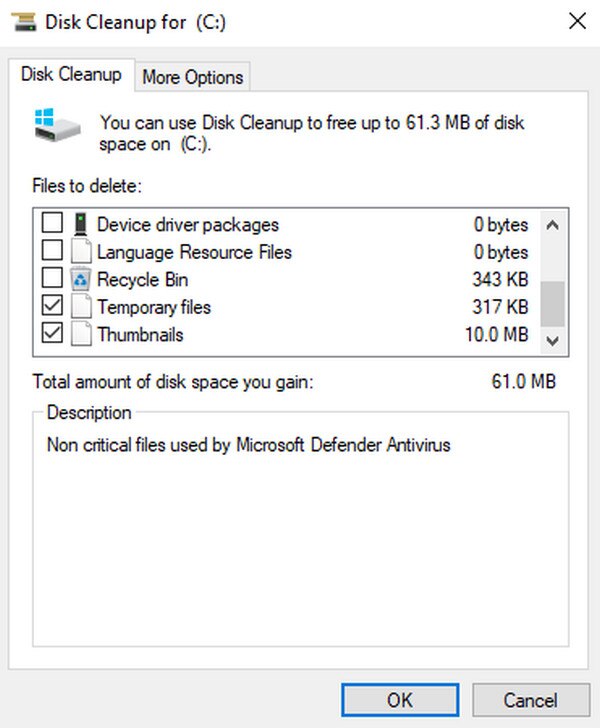
Disk Cleanup is a built-in Windows tool that helps you remove unnecessary files from your PC. It can clear temporary files, thumbnails, Windows Update leftovers, and more, making it a good option if your system is cluttered or has insufficient storage. Using it is simple and safe because Windows already knows which files can be deleted without affecting important data.
Step 1Press Windows + R to initialize the Run dialog box, then type cleanmgr before pressing Enter. Next, select your C: drive when prompted.
Step 2When Disk Cleanup appears, check Temporary files, Thumbnails, and Windows Update Cleanup, then click OK. Finally, confirm by clicking Delete Files to start the cleanup.
Part 4. Clear Cache Automatically with Storage Sense
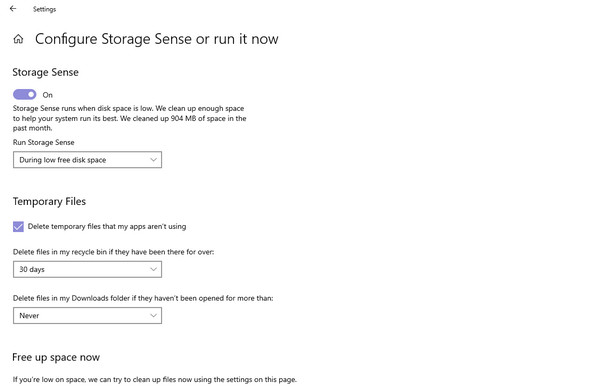
Storage Sense is another Windows feature that can clear cache Windows, temporary files, and other unnecessary data. It is also advantageous because, instead of clearing manually, you can just turn this feature on, and Windows will handle the cleanup on your chosen schedule, whether every day, every week, etc. It greatly helps if you want to keep your PC clean.
Step 1Open Settings > System > Storage, then enable Storage Sense with its slider.
Step 2Once turned on, configure its settings, depending on how often you want it to run and which data it should clear. Windows will clean up automatically on schedule.
Part 5. Clear DNS Cache on Windows
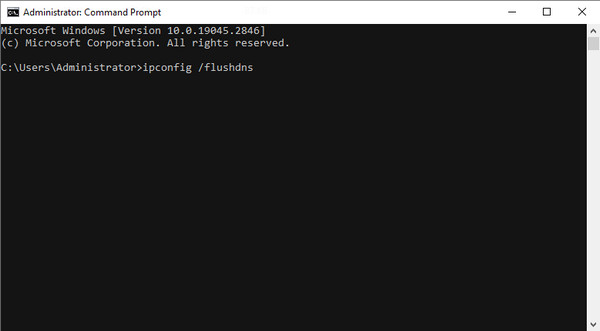
Meanwhile, clearing the DNS cache is a little more technical than the previous methods. That’s because this time, you will use the Command Prompt, a built-in Windows tool that lets users run commands. Don’t worry, though. You don’t need to be a professional to navigate it. All you need to do is run the right command, and Windows will remove the old DNS records and start fresh.
Step 1Search for Command Prompt from your Start menu and run it as an administrator.
Step 2Next, type ipconfig /flushdns and press Enter to run the command. Then, a message saying the DNS resolver cache was successfully flushed will appear.
Part 6. What Not to Delete on Windows
Now that you have learned how to clear cache in Windows, it’s time to determine what not to delete. First of all, your personal files, such as documents, photos, videos, and music, shouldn’t be deleted, as they are the ones you created or saved on purpose. The same goes for your Downloads folder, which may contain installers or important files you still need. Aside from that, Program data should also be left protected, as it contains settings and files necessary for the tool to work. You should only target caches, temp files, and thumbnails, which are safe to remove.
Part 7. Recover Lost Files After Clearing Caches with FoneLab Data Retriever
Sadly, some users, especially beginners, make mistakes and accidentally delete important files while cleaning the computer of cache and other junk. If you are among them, FoneLab Data Retriever is for you. Data loss is sometimes inevitable, so it’s worth having a recovery tool on hand.
FoneLab Data Retriever - recover the lost/deleted data from computer, hard drive, flash drive, memory card, digital camera and more.
- Recover photos, videos, documents and more data with ease.
- Preview data before recovery.
After all, the supported data includes documents, emails, photos, videos, and more, whether you lost them due to issues, accidental deletion, solution failures, or other scenarios. This tool is also perfect for beginners because of its comprehensive interface and helpful features.
Follow the trouble-free directions below to recover lost files after Windows clear cache with FoneLab Data Retriever:
Step 1Install FoneLab Data Retriever through the Free Download button, then start it on your Windows desktop. Once launched, click your file location or drive in the interface options, then select Start Scan.
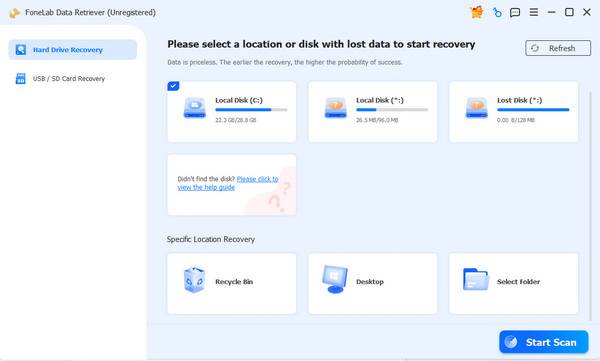
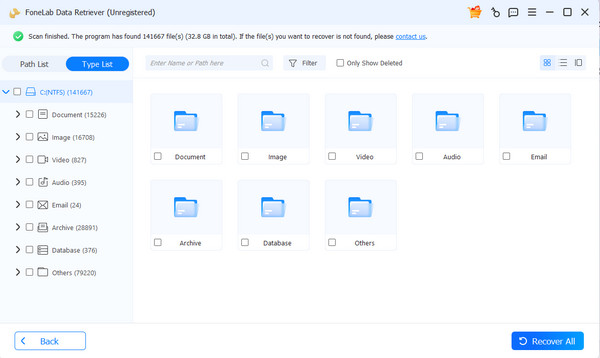
Step 2The scanning will be quick, presenting the folders designated for each data type. Open them to start looking for your lost files. Once found, click the checkboxes and tick Recover All.
Part 8. FAQs about How to Clear Cache on Windows
Will clearing cache speed up Windows?
Yes, it can help. Clearing caches removes old and unnecessary files, giving your PC more resources to run more smoothly.
How often should I clear cache?
It depends on your usage. Once a month is usually enough for most users, but you can do it more often if your PC runs slowly.
Is Disk Cleanup safe?
Yes, it is safe. Disk Cleanup only removes files that Windows no longer needs, and not the crucial files.


