
 iPhone Data Recovery
 iOS System Recovery
 iOS Data Backup & Restore
 iOS Unlocker
 iPhone Password Manager
 Location Changer
 Android Data Recovery
 Broken Android Data Extraction
 Android Data Backup & Restore
 Android Unlocker
 FoneTrans for iOS
 iPhone Data Eraser
 iPhone Cleaner
 HEIC Converter
 HyperTrans
 WhatsApp Transfer for iOS
 Mac Sweep
 Data Retriever
 Mac Data Retriever
 Video Converter Ultimate
 Screen Recorder
 Phone Mirror
- Part 1. Delete Multiple Contacts with Two-Finger Drag
- Part 2. Delete All Contacts by Turning Off iCloud Sync
- Part 3. Delete Contacts in Bulk on iCloud.com
- Part 4. Delete Contacts in Bulk with FoneTrans for iOS
- Part 5. Clean Up Your iPhone with FoneLab iPhone Cleaner
- Part 6. Which Method Should You Use?
- Part 7. Back Up Contacts Before You Delete
- Part 8. FAQs About Deleting Contacts on iPhone
 FoneLab iPhone Cleaner
Easily erase all contents and settings on iPhone, iPad or iPod completely and permanently.
- Clear iPhone Junk Files
- Clear iPad Cache
- Clear iPhone Safari Cookies
- Clear iPhone Cache
- Clear iPad Memory
- Clear iPhone Safari History
- Delete iPhone Contacts
- Delete iCloud Backup
- Delete iPhone Emails
- Delete iPhone WeChat
- Delete iPhone WhatsApp
- Delete iPhone Messages
- Delete iPhone Photos
- Delete iPhone Playlist
- Delete iPhone Restrctions Passcode
How to Delete Multiple Contacts from iPhone
 Posted by Boey Wong / September 09, 2026 09:00
Hi, all. I have a lot of useless contacts on my iPhone that I want to delete. It would take forever to remove them one by one. Is there a way to quickly delete multiple contacts from iPhone? Thanks for any solution.
Your iPhone only lets you delete one contact at a time inside the Contacts app, which is fine for a stray entry but painful when you have hundreds to clean up. The good news is there are several faster routes — a built-in multi-select gesture, an iCloud bulk delete, a web-based cleanup on iCloud.com, and two desktop tools from FoneLab that handle large batches in a couple of clicks. Pick the one that matches how many contacts you need to remove.
Part 1. Delete Multiple Contacts with Two-Finger Drag
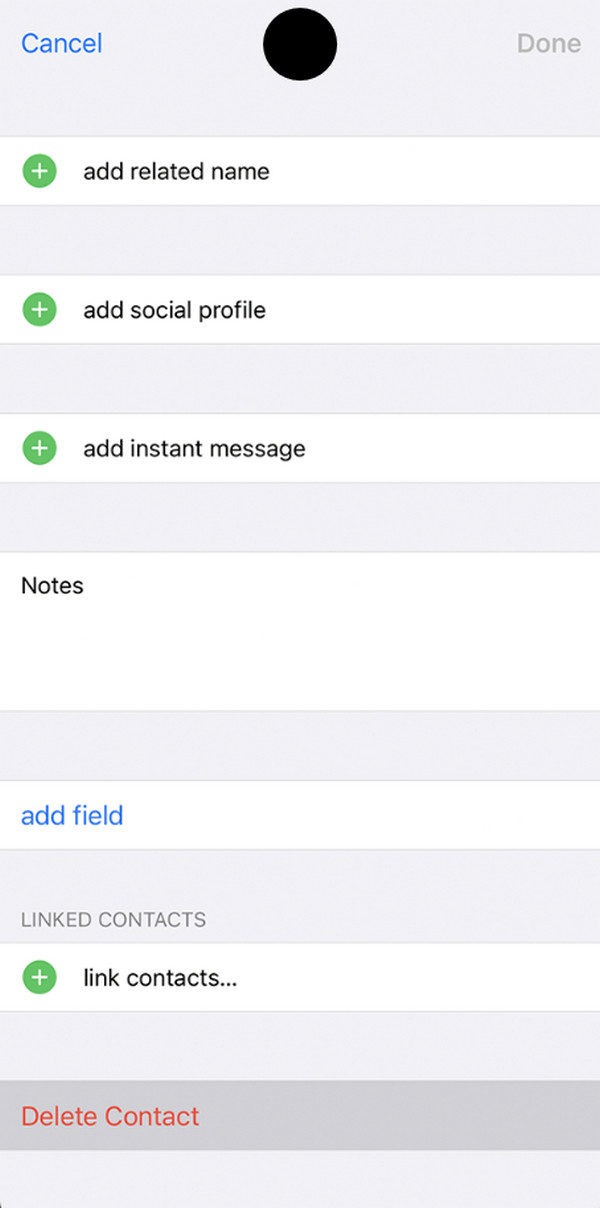
Starting with iOS 16, Apple added a hidden multi-select gesture to the Contacts app. It is the quickest way to remove a handful of contacts without leaving your phone. Before iOS 16, the only built-in option was deleting one contact at a time — open the contact, tap Edit, scroll to the bottom, and tap Delete Contact. That still works today, but for more than two or three contacts the two-finger method is far faster.
Step 1Open the Contacts app and find the list you want to clean up.
Step 2Press and hold one contact with two fingers, then drag down to select a range. You can also tap additional contacts to add or remove them from the selection.
Step 3Tap Delete at the bottom of the screen and confirm.
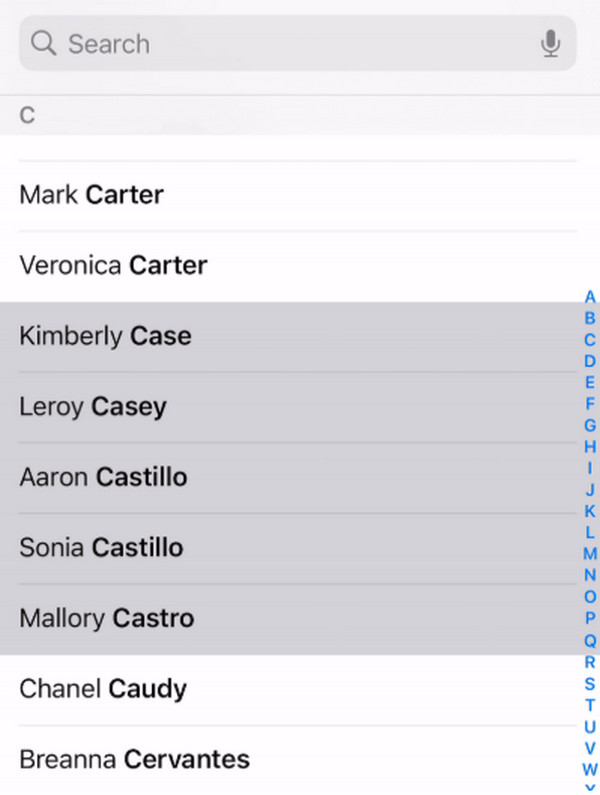
This method works best when the contacts you want to remove sit next to each other in the list. The same gesture works on iPad too, and the larger screen makes it even easier to see what you are selecting. If the drag does not register at first, make sure you are pressing with two fingers simultaneously rather than one after the other. For a scattered selection or an entire address book, move on to the next methods.
Part 2. Delete All Contacts by Turning Off iCloud Sync
If your contacts live in iCloud, turning off the sync removes every iCloud contact from the device at once. This is the nuclear option — use it only when you truly want to clear the whole list. Keep in mind that this only removes contacts from the device, not from iCloud itself. If you want to delete them from iCloud permanently, use iCloud.com (Part 3) instead.
Step 1Go to Settings > [your name] > iCloud.
Step 2Tap Show All under Apps Using iCloud, then turn off Contacts.
Step 3Choose Delete from My iPhone when prompted.
The contacts remain in iCloud, so turning the switch back on restores them. If you sync contacts from Gmail, Outlook, or another account, repeat the same steps for that account under Settings > Contacts > Accounts. For Google contacts specifically, you can also sign in to contacts.google.com in a browser and delete them there — the changes sync back to the iPhone automatically. This is handy when you want to clean up a Google address book without removing the entire account from the phone.
Part 3. Delete Contacts in Bulk on iCloud.com
iCloud.com gives you a keyboard and mouse, which makes selecting many contacts far easier than tapping on a phone. This is the best free method for a large, scattered cleanup.
Step 1Open a browser and go to icloud.com, then sign in with your Apple ID.
Step 2Open Contacts. Hold Ctrl (Windows) or Command (Mac) and click each contact you want to remove. Hold Shift to select a range.
Step 3Press the Delete key on your keyboard, or click the gear icon and choose Delete.
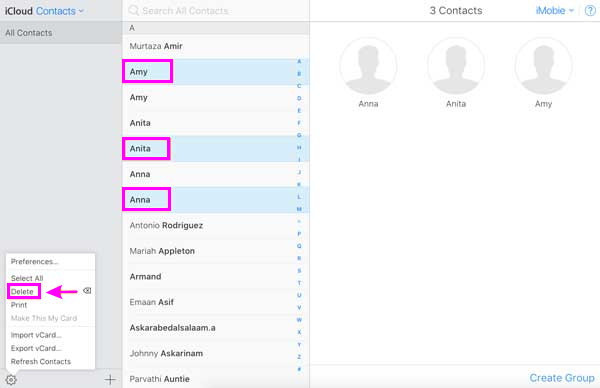
Deleted contacts sync back to every device signed in to the same Apple ID within a minute or two. If you have a very large address book, use the search bar at the top to find contacts by name, company, or phone number instead of scrolling. You can also sort contacts by first or last name from the gear menu, which makes it easier to spot duplicates and outdated entries. If you want to keep a record before deleting, select all contacts and choose Export vCard from the gear menu — this saves a single file containing every contact that you can import back later.
Part 4. Delete Contacts in Bulk with FoneTrans for iOS
When you need precision plus speed, FoneTrans for iOS lets you preview every contact on your iPhone, select exactly the ones to remove, and delete them in one click. It also handles duplicate contacts, exports, and imports, so it doubles as a full contact manager.

With FoneTrans for iOS, you will enjoy freedom to transfer your data from iPhone to computer. You can not only transfer iPhone text messages to computer, but also photos, videos and contacts can be moved to PC easily.
- Transfer photos, videos, contacts, WhatsApp, and more data with ease.
- Preview data before transferring.
- iPhone, iPad and iPod touch are available.
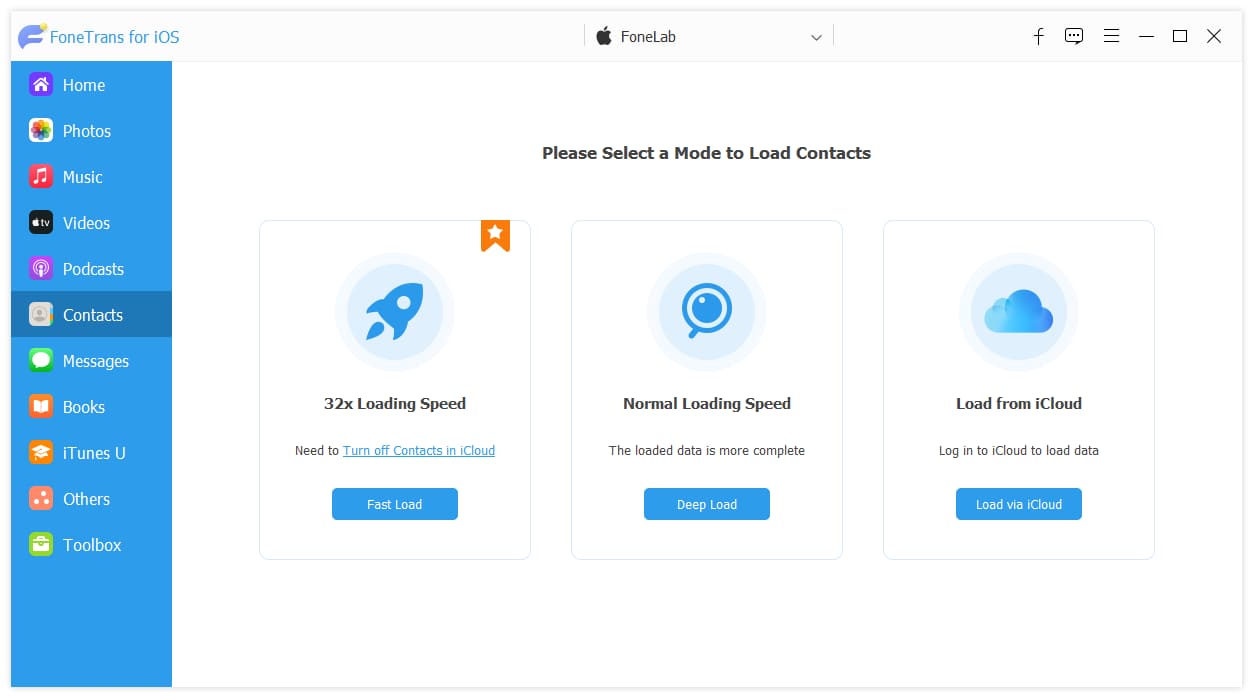
Step 1Install FoneTrans for iOS on your computer and connect your iPhone with a USB cable. On the left, click Contacts and pick a loading mode — Fast Load works for most cases.
Step 2Check the box next to each contact you want to delete, or use the top checkbox to select all of them at once.
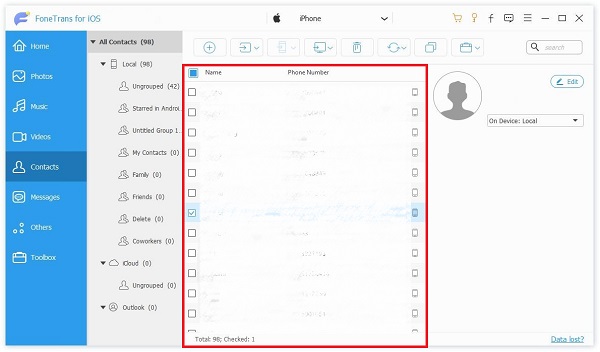
Step 3Click the Delete icon at the top of the window and confirm. The selected contacts are removed from your iPhone immediately.
Before you delete anything, you can click Export to save a backup copy to your computer. That way a wrong selection never costs you a contact for good. If duplicates are the real problem, the Find Duplicates button merges them automatically. FoneTrans also lets you transfer contacts from one iPhone to another and import vCard or CSV files from Outlook or Google, so it covers the full lifecycle of contact management, not just deletion. You can also organize contacts into groups directly in the software, which makes it easier to find and manage large address books.
Part 5. Clean Up Your iPhone with FoneLab iPhone Cleaner
After you trim the contact list, FoneLab iPhone Cleaner is the natural next step. It scans the rest of your device for junk files, unused apps, large files, and duplicate photos, then wipes them in one pass. Think of it as a full-device cleanup that goes well beyond contacts.
Easily erase all contents and settings on iPhone, iPad or iPod completely and permanently.
- Free up space by erasing junk files, uninstalling apps, deleting large files, and cleaning up photos.
- Erase all data or private data with selectable security levels.
- Works with iPhone, iPad and iPod touch.
Step 1Launch FoneLab iPhone Cleaner and plug in your iPhone. On the main screen, click Quick Scan to see how much space each category is using.
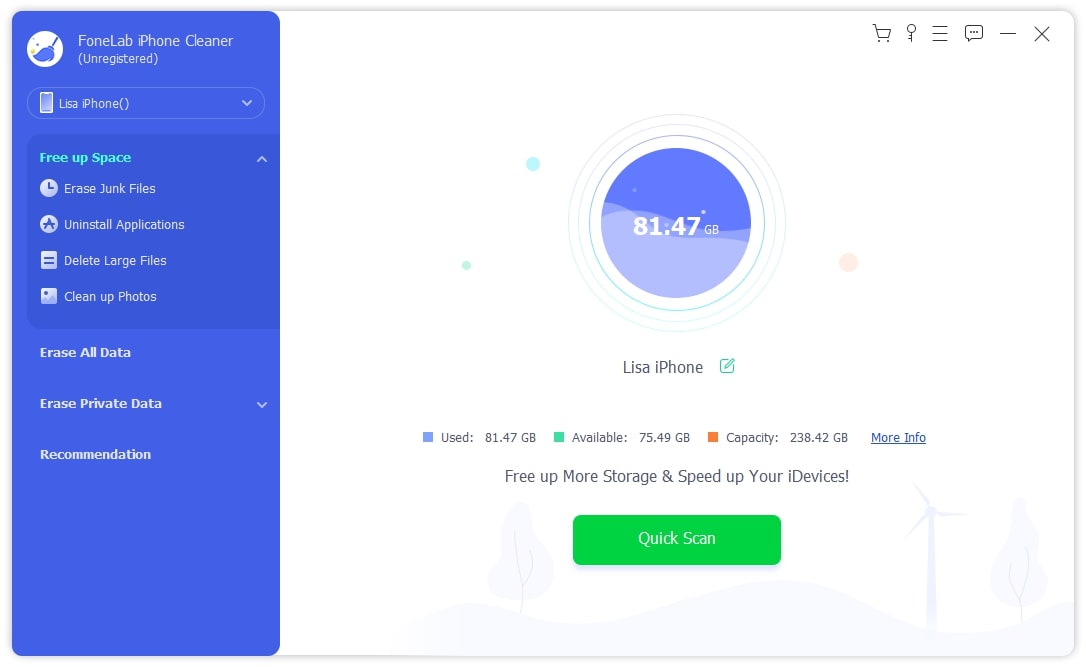
Step 2Choose a category — Erase Junk Files, Uninstall Applications, Delete Large Files, or Clean up Photos — and pick the items to remove.
Step 3Click Erase to confirm. The selected data is removed from the device.
Pairing FoneTrans for contact cleanup with iPhone Cleaner for everything else leaves your phone feeling like a fresh device without a factory reset. iPhone Cleaner also shows you exactly which apps are taking up the most space, so you can decide what to keep and what to remove based on real usage rather than guessing. The Erase All Data mode is useful when you are selling or giving away the phone — it wipes everything securely with three security levels to choose from.
Part 6. Which Method Should You Use?
| Method | Best for | Computer needed | Can select specific contacts |
|---|---|---|---|
| Two-finger drag | A few nearby contacts | No | Yes |
| Turn off iCloud sync | Wiping all contacts at once | No | No |
| iCloud.com | Large, scattered selections | Yes | Yes |
| FoneTrans for iOS | Precision bulk delete + backup | Yes | Yes |
| FoneLab iPhone Cleaner | Full-device cleanup after contacts | Yes | Not for contacts |
Part 7. Back Up Contacts Before You Delete
No matter which method you choose, a quick backup keeps a wrong click from becoming a disaster. The easiest route is to export your iPhone contacts to a computer as a vCard or CSV file before you start deleting. If you use iCloud, your contacts are already synced to the cloud, but an offline copy is still worth having.
After the cleanup, you may also want to merge duplicate contacts so the same person does not show up three times. A tidy contact list makes calling, texting, and emailing much faster. If you regularly switch phones or share contacts with family, keeping a single clean source of truth also prevents old entries from creeping back through sync. Set a reminder to review your contacts every few months — a quick five-minute cleanup keeps the list from growing out of control again.
Part 8. FAQs About Deleting Contacts on iPhone
Why do deleted contacts keep coming back on my iPhone?
They are probably synced from another account like Gmail or Outlook. Go to Settings > Contacts > Accounts and turn off contacts for any account you do not want on the phone.
Can I recover a contact I deleted by mistake?
If you use iCloud, sign in to icloud.com, go to Account Settings, and click Restore Contacts under Advanced. You can also restore from an iTunes or Finder backup, or use FoneLab iPhone Data Recovery to pull contacts from a backup without wiping the device.
Will deleting contacts on my iPhone remove them from iCloud?
Yes, if the contacts are stored in iCloud, deleting them on the phone removes them from iCloud and every other device signed in to the same Apple ID. If they come from a separate account like Gmail, they stay in that account.



