- Part 1. Clean Junk Files from iPhone with FoneEraser for iOS
- Part 2. Remove Junk File on iPhone by AssistiveTouch
- Part 3. Clean Junk Files by Offloading App
- Part 4. Clean Junk Files Using Clean App for iPhone
- Part 5. How to Remove Junk File on Settings App
- Part 6. FAQs about Removing Junk Files on iPhone
Easily erase all contents and settings on iPhone, iPad or iPod completely and permanently.
Easily erase all contents and settings on iPhone, iPad or iPod completely and permanently.
- Clear iPhone Junk Files
- Clear iPad Cache
- Clear iPhone Safari Cookies
- Clear iPhone Cache
- Clear iPad Memory
- Clear iPhone Safari History
- Delete iPhone Contacts
- Delete iCloud Backup
- Delete iPhone Emails
- Delete iPhone WeChat
- Delete iPhone WhatsApp
- Delete iPhone Messages
- Delete iPhone Photos
- Delete iPhone Playlist
- Delete iPhone Restrctions Passcode
Clean Junk Files on iPhone with The Most Recommended Solutions
 Updated by Boey Wong / July 19, 2022 14:20
What are junk files on my phone? My iPhone storage is not enough. How can I clear junk files on iPhone? Thanks!
Apple provides different storage on iPhone to help users save data and run the operating system normally. After a period, you will find some issues on iPhone, and you have to learn how to clear junk files to make it out of abnormal status.
What are junk files on iPhone?
Before diving into getting rid of junk on iPhone, you should know what junk files are.
Actually, junk files including temporary and corrupted cookies, caches, and logs produced by the third-party applications that we use frequently. Although they are small-sized, they might cause problems after they have been pilled up. As a result, your iPhone becomes slower, even dead.
To prevent this kind of issue, you should follow the methods in this post to delete junk files on iPhone.


Guide List
- Part 1. Clean Junk Files from iPhone with FoneEraser for iOS
- Part 2. Remove Junk File on iPhone by AssistiveTouch
- Part 3. Clean Junk Files by Offloading App
- Part 4. Clean Junk Files Using Clean App for iPhone
- Part 5. How to Remove Junk File on Settings App
- Part 6. FAQs about Removing Junk Files on iPhone
Part 1. Clean Junk Files from iPhone with FoneEraser for iOS
Aside from Apple ways, there are many worth-trust tools you should have a try. Here, FoneEraser for iOS is the most recommended program you should not miss on a computer. It is helpful and powerful to delete system junk files, large documents, photos, applications, and more from the device, as well as erase all data from iPhone easily.
It is also an easy tool for even beginners, its clear interface show you how to use FoneEraser for iOS on computer to remove iPhone junk files and other data.
FoneEraser for iOS is the best iOS data cleaner which can easily erase all contents and settings on iPhone, iPad or iPod completely and permanently.
- Clean unwanted data from iPhone, iPad or iPod touch.
- Erase data quickly with one-time overwriting, which can save you time for plenty of data files.
- It is safe and easy to use.
Can’t wait to learn how to use it to clear junk files on iPhone. Check the steps below.
Steps of getting rid of system junk and other data on iPhone:
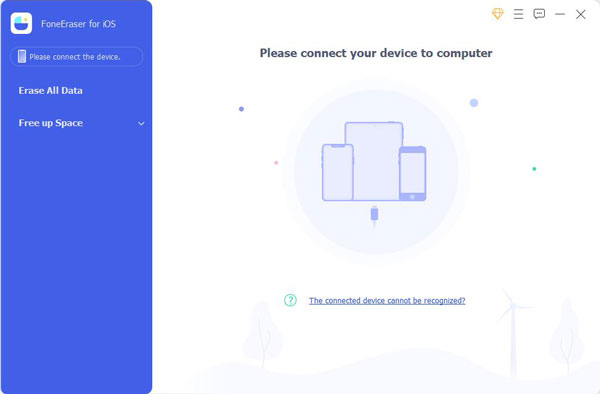
Step 1Download and install FoneEraser for iOS on the computer, then connect iPhone.
Step 2Run the program, select Free Up Space > Erase Junk Files. It will begin to scan your device.
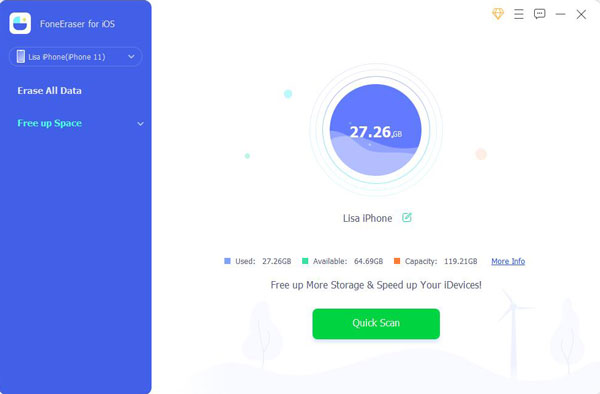
Step 3After that, you can see all available items, check them and click Erase button.
If you want to free up space, manage duplicated files or unwanted apps, you can also use this tool on a computer to do what you want.
FoneEraser for iOS is the best iOS data cleaner which can easily erase all contents and settings on iPhone, iPad or iPod completely and permanently.
- Clean unwanted data from iPhone, iPad or iPod touch.
- Erase data quickly with one-time overwriting, which can save you time for plenty of data files.
- It is safe and easy to use.
Part 2. Remove Junk File on iPhone by AssistiveTouch
Unlike Android, iPhone don’t have an appeared feature to help you clean up junk files. However, if you want to learn how to clean junk files on iPhone, you have come to the right place.
AssistiveTouch is a convenient design to make everything easier on iPhone. Moreover, it can also do something to surprise you. For example, you can use AssistiveTouch to clear iPhone junk files. And it may fix some unknown issues on iPhone at the same time.
Step pf cleaning up junk files on iPhone via AssistiveTouch:
Step 1Enable AssistiveTouch on iPhone through Accessibility > Touch > AssistiveTouch, toggle it on. Then you can see a circular button on screen.
Step 2Press and release the volume up button, then the volume down button. Hold the power button until you see the slider.
Step 3Tap the AssistiveTouch icon, and select the Home button.
Step 4You need to enter your passcode here. If you open an app and it restarts automatically, it works.
Part 3. Clean Junk Files by Offloading App
You might know iPhone provides a feature that allows you to offload apps. It will remove apps from your iPhone but keep the data. And app data will be back to your device when you reinstall this app.
So, you can also use it to remove junk files from apps on iPhone. Below is how to offload applications on iPhone.
Step 1Open the Settings app on iPhone, and tap General > Storage.
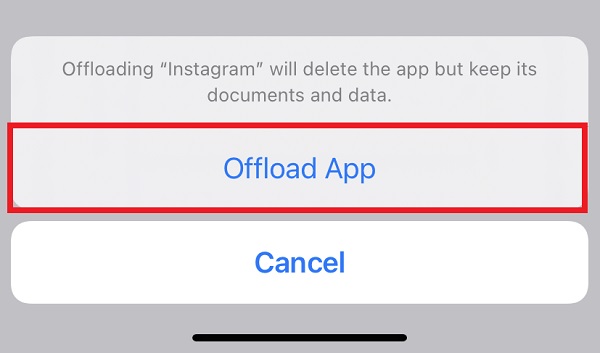
Step 2Select the app you want, and choose the Offload App button.
Step 3Select the Offload App button again when it pops up.
If nothing happens on your iPhone after trying the above methods, you will need some iPhone cleaning apps.
FoneEraser for iOS is the best iOS data cleaner which can easily erase all contents and settings on iPhone, iPad or iPod completely and permanently.
- Clean unwanted data from iPhone, iPad or iPod touch.
- Erase data quickly with one-time overwriting, which can save you time for plenty of data files.
- It is safe and easy to use.
Part 4. Clean Junk Files Using Clean App for iPhone
If some third-party programs on the computer can help you remove iPhone junk files, you can also find similar junk files through iPhone cleaning apps. Compared to the computer ones, iPhone cleaning apps won’t ask a computer when you need to clear junk files. What you need is an iPhone with internet connection only.
Here are the top 3 apps to clean iPhone for references.
Top 1. Clean Doctor (Photo, Video, Contacts, Calendar)
You can clear photos, videos, contacts, calendars, and more. And you have even have tools to edit photos, make tones, etc.
Top 2. Smart Cleaner (Photos and Contacts)
You can use it to manually organize photos, videos, contacts and more accordingly.
Top 3. Boost Cleaner (Phone, Name, Email, Photo)
It has a simple interface and you can find phone, name, email, or photo cleaners quickly. It also has an ad blocker for you.
On iPhone, you would know that Settings is the best app to easily manage all data.
Part 5. How to Remove Junk File on Settings App
First, you can check iPhone storage on Settings. Go to Settings > General > iPhone Storage.
Then, you can see the status of storage and begin to remove junk files and other unwanted data accordingly.
For example, if you want to delete junk files for the Safari app, you can tap Settings > General > iPhone Storage > Safari > Website Data > Remove All Website Data.
Similarly, if you want to junk files from other app, you can repeat the above operations.
FoneEraser for iOS is the best iOS data cleaner which can easily erase all contents and settings on iPhone, iPad or iPod completely and permanently.
- Clean unwanted data from iPhone, iPad or iPod touch.
- Erase data quickly with one-time overwriting, which can save you time for plenty of data files.
- It is safe and easy to use.
Part 6. FAQs about Removing Junk Files on iPhone
1. How to delete system junk?
If you want to remove system junk on iPhone, you can try the AssistiveTouch feature. If it is not working, try FoneEraser for iOS on the computer to easily delete system junk from iPhone.
2. What are unnecessary files on my phone?
If the files are temporary and performed on your device for special purposes, and they will become useless after that limited time, they are unnecessary files on your phone. You can use the solutions in this post to remove them.
3. How do I clean my iPhone settings?
To clean your iPhone settings, open the Settings app on your device. Within the Settings menu, navigate to the General section. Look for the option labeled Reset or Transfer iPhone and tap on it. From the available reset options, select Erase All Contents and Settings. You may be prompted to enter your passcode or Apple ID password for verification. Once confirmed, allow your device some time to complete the process of safely removing all content and settings. It's important to note that performing this action will erase all data on your iPhone, so ensure you have backed up any important information before proceeding.
4. How to clear cookies on iPhone?
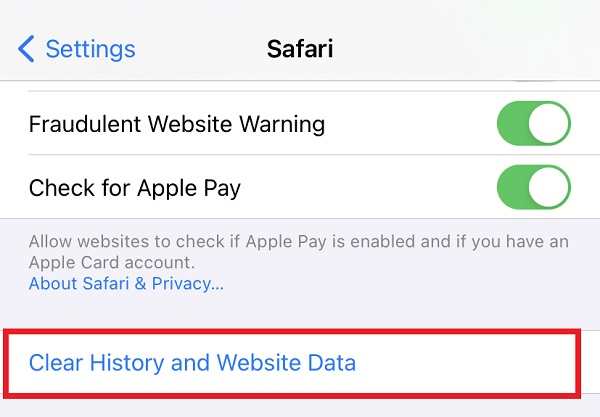
To clear cookies on an iPhone, follow these steps within the Settings app: Open Settings and scroll down to find Safari or the browser you use. Tap on Safari and scroll down to locate Clear History and Website Data. Tap on it, and a confirmation prompt will appear. Confirm by selecting "Clear History and Data." This action will remove cookies, browsing history, and other website data from your device. Restart your browser or app to ensure the changes take effect. Please note that clearing cookies will log you out of websites and may affect your browsing experience.
5. How do I know if my iPhone is clean?
To determine if your iPhone is clean, you can perform several checks. First, ensure your device is running the latest version of iOS to have the latest security updates. Next, scan your device using reputable antivirus or security apps from the App Store. Review your installed apps and remove any suspicious or unfamiliar ones. Check for any unusual behavior, such as unexpected battery drain, sluggish performance, or unfamiliar pop-ups. Regularly review your device's settings for any unusual configurations or unauthorized changes. Lastly, be cautious of phishing attempts and only download apps from trusted sources.
That's all about how you clean junk files on iPhone with the most recommended methods. All of them are proven and reliable, but FoneEraser for iOS is the best you should not miss. It provides 2 modes to let you remove iPhone data with or without erasing data. And it has features to manage photos, files, junk files and applications individually. With it, you are surely can remove junk files and other unwanted data with ease. Why not download and enjoy its benefits now!
FoneEraser for iOS is the best iOS data cleaner which can easily erase all contents and settings on iPhone, iPad or iPod completely and permanently.
- Clean unwanted data from iPhone, iPad or iPod touch.
- Erase data quickly with one-time overwriting, which can save you time for plenty of data files.
- It is safe and easy to use.
Below is a video tutorial for reference.