Recover the lost/deleted data from computer, hard drive, flash drive, memory card, digital camera and more.
5 Proven and Tested Mac Data Recovery Software to Retrieve Files
 Updated by
 Hi! I have decided to clean up my Mac storage by deleting unnecessary data. I accomplished what I wanted after a few minutes. However, I noticed that I also deleted some of the critical data from my Mac. What is the best data recovery software on Mac? Please help me discover it. Thank you!
Countless data recovery tools can be used on your Mac. On the other hand, which one is the best? 5 of the leading tools will be posted in this article. We will help you dig into their features and other components. Please continue scrolling below for their complete details.


Guide List
Part 1. Best Mac Data Recovery - FoneLab Mac Data Retriever
FoneLab Mac Data Retriever is the best Mac data recovery software that has been introduced in this post. It can retrieve different data types from your Mac, including documents, images, videos, audio, emails, and more. You can retrieve this data from multiple recoverable scenarios. You can recover them after accidental deletion, a virus attack, mistaken operations, unsaved documents, Recycle Bin recovery, and a device crash. It is the best tool to recover Mac data after factory resetting.
FoneLab Data Retriever - recover the lost/deleted data from computer, hard drive, flash drive, memory card, digital camera and more.
- Recover photos, videos, documents and more data with ease.
- Preview data before recovery.
The tool has a Deep Scan feature. This feature can scan your deleted data from your Mac more deeply, which is different from a simple scan process. You may download this tool on your Windows and Mac. Utilize this tool with the steps below.
Step 1Please visit the official website of FoneLab Mac Data Retriever. Then, click the Free Download button on the left. The downloading procedure will start immediately. Please set up, install, and open the software afterward to begin the process.

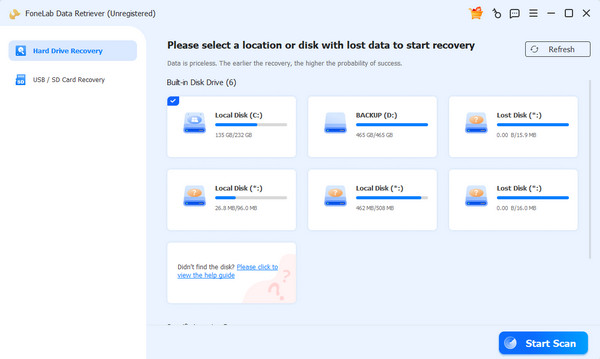
Step 2Select between the Hard Drive Recovery and USB/SD Card Recovery at the top left. Then, select the location where you want to recover your data. Later, please click the Start Scan button at the bottom right to scan your deleted data.
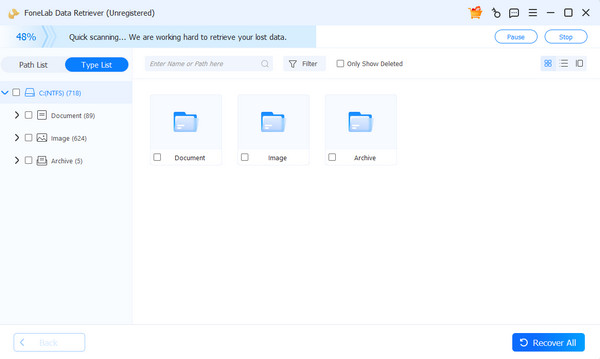
Step 3The tool will start to scan your deleted data from your Mac. You can click the Deep Scan button at the top to scan more. Then, choose the folders where you lost the data. After that, select the data you prefer to recover. Finally, please click the Recover All button at the bottom right.
Part 2. Time Machine
Time Machine on Mac automatically backs up your data. It includes documents, apps, photos, and other system files. It saves them every hour, day, etc. This tool allows you to make multiple backups without overwriting the previous ones. If so, you can restore data that has been accidentally deleted, old versions of your documents, apps, and more. Know how to use this data recovery app on Mac with the steps below.
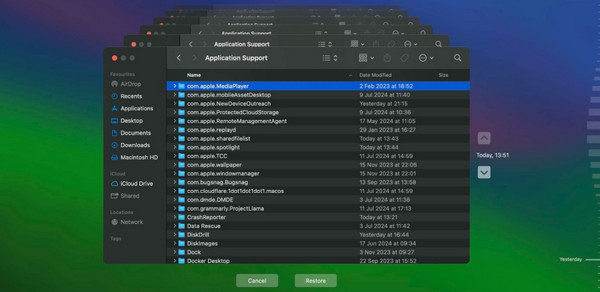
Open the Time Machine on your Mac after you unlock it. After that, you will see the backups from the main interface. Please use the Arrows button on the right side to choose the backup you want to restore. Finally, click the Restore option at the bottom.
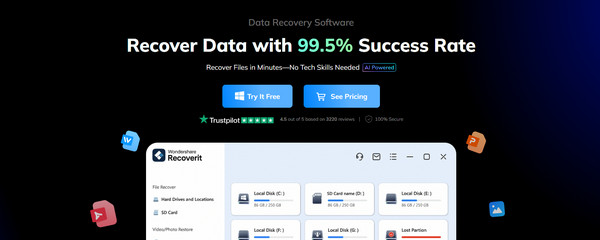
Part 3. Recoverit Data Recovery Software
Recoverit Data Recovery Software is a third-party program that is known as beginner-friendly. This tool can also recover from internal and external HDDs, SSDs, and more. However, the full subscription to this software is expensive. It is not ideal for users who will use it once or twice. Also, the scanning process of the tool lasts longer than expected. Lastly, recovery is not guaranteed. There are times when it cannot restore files that are overwritten by the new data or damaged media files. The steps on how to use this tool are available below.
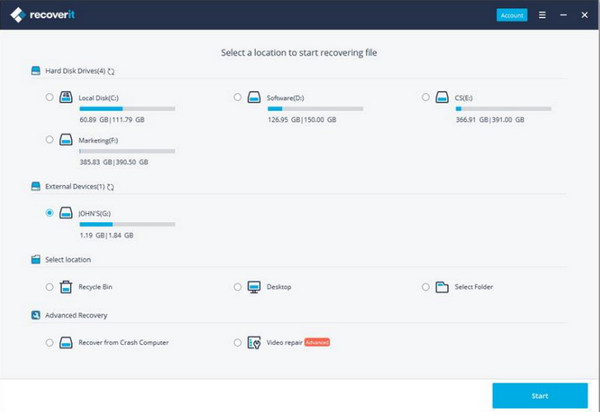
Step 1Go to the website of the software and click the Try It Free button. Then, install and open the tool on your computer.
Step 2Select the path where you lost the Mac files. After that, please select the location you want to scan. Then, click the Start option at the bottom right. Wait for the software to finish the mentioned process. The results will appear on the screen.
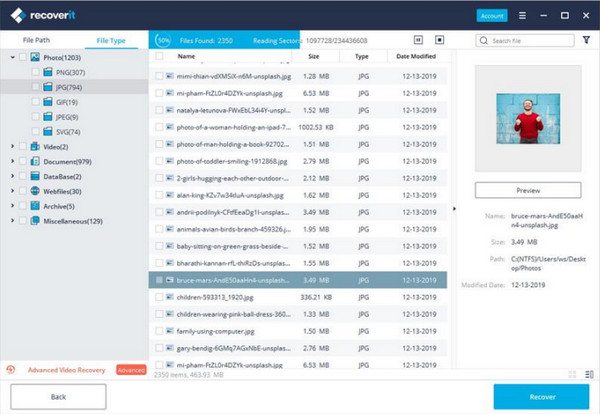
Step 3Select the data you want to retrieve from your Mac. Click the Recover button afterward to start the recovery.
Part 4. EaseUS Data Recovery Wizard
EaseUS Data Recovery Wizard is a tool available for the earlier and latest versions of Mac. It is commonly used due to the effective file recovery it offers. However, like the previous tool, it is also expensive for its full features. It has a Deep Scan feature, but the scanning procedure is slow.
Additionally, it has mixed user feedback on the support and refunds based on the community reports for the software. The steps below will teach you how to use the tool.
Step 1Open the website of EaseUS Data Recovery Wizard on your web browser. After that, click the Mac button on the first screen. Then, select the For Home or For Business option. The download will start immediately. Wait for the download process to be completed and set it up. Install the tool and open it afterward.

Step 2Click the location where you lost the files from your Mac. Then, the scan process will start. The results will appear on the next interface. Please select the data you need to retrieve to your Mac. Finally, please click the Recover option at the bottom right.
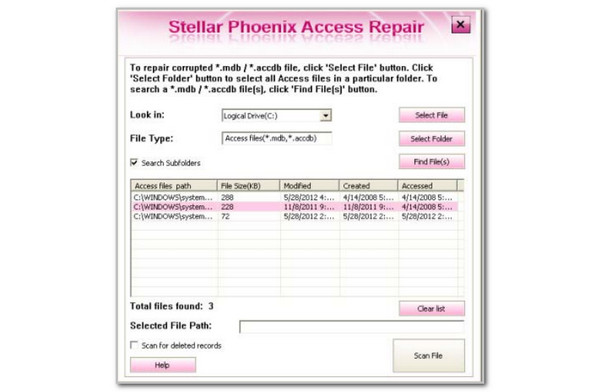
Part 5. Stellar Data Recovery
Stellar Data Recovery is commonly used on the latest versions of macOS. However, this tool has an advanced interface and tools. It has the most different procedures from the previous tools. Beginners will have difficulty using it. On the other hand, professionals will love to use it due to the recovery process it offers. Please use the steps below to operate the tool.
Step 1Click the Free Download option on the website of Stellar Data Recovery. After that, the tool will be downloaded in a few minutes or seconds, depending on the strength of your internet connection. Set up, install, and access the tool on your Mac to start recovery.
Step 2Go to the Look In section at the top left and select the location where you lost the Mac data. Then, enter the File Type section. After that, select the Scan File button at the bottom right corner. Next, select the folder at the bottom where you will locate the deleted files. Later, choose the files you want to restore. Finally, click the Start Repair button to start recovering the files.
Part 6. Comparison Table of Mac Data Recovery Software
| Tool | Recovery Speed | Preview | Best For | Interface |
| FoneLab Mac Data Retriever | Fast | Yes | Fast Mac data recovery, deeper scan process, and accuracy. | Simple |
| Time Machine | It depends on the file size of the backup. | No | Full backups and quick restore. | Simple |
| Recoverit Data Recovery Software | Fast | Yes | Recovering general and media files. | Complex |
| EaseUS Data Recovery Wizard | Moderate | Yes | Large files recovery. | Complex |
| Stellar Data Recovery | Moderate | Yes | Advanced interface and recovery. | Complex |
Part 7. FAQs about Mac Data Recovery
How much does it cost to recover data from a MacBook?
You need to pay professionals from $75 to $1200. It still depends on how large the file size or the quantity of the data loss is.
Who does Apple recommend for data recovery?
Apple does not directly offer any data recovery software. It does not advertise any data recovery tools, besides backups. Backups are the best option to recover your lost data via official ways without any charges.
The 5 top pick data recovery software for Mac are in this post. We hope we helped you determine the best one for you. FoneLab Mac Data Retriever can be considered! This third-party tool is one of the best ones. It can recover your Mac data in a few seconds or minutes only. It has a Deep Scan feature that allows you to dig deeper into your lost data. Download the tool now to know more about its features!