Recover the lost/deleted data from computer, hard drive, flash drive, memory card, digital camera and more.
Trustworthy Ways to Delete Files Using RM Command on Mac
 Updated by Lisa Ou / Dec 29, 2022 09:20
There are many possible ways to delete your files on Mac. Sometimes, when the file is on the main screen, you can drag it to the trash bin. Later, the file will vanish from the screen. The device will place the file or document in the trash bin.
Nevertheless, this delete function does not work every time. Are you familiar with the RM command? If not, this is the best article for you! It will explain the RM command well to you and show guides to recover RM files using the ultimate Mac data recovery tool. In this case, you will better understand it before deleting or retrieving your files.


Guide List
Part 1. What is The RM Command
If you know the codes on your Mac, you can utilize the RM command to delete your files. It is the quickest and most reliable command you can use on your device. For instance, you want to delete documents because you will no longer use them. You try to delete them using multiple techniques, but nothing happens. Using a trial-and-error method is not advisable because it will waste your time. You can utilize the RM command to delete files for only a few seconds. Scroll down to learn the steps of the RM command to delete your files.
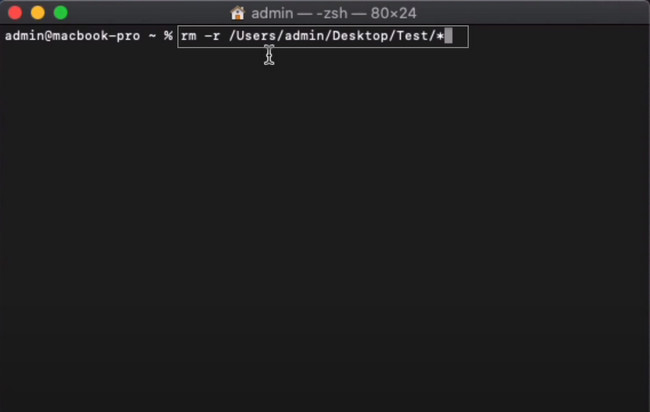
Step 1Launch the Terminal on Mac. It would help if you typed in rm -r /Users/admin/Desktop/Test/* codec on the main interface. Afterward, click the Enter key on your keyboard. You will notice a pop-up on the screen, then tick the OK button.
Note: To avoid errors, you must put all the codes on the tool. You need to include all the letters, especially the spaces. It is the critical step using the RM command.
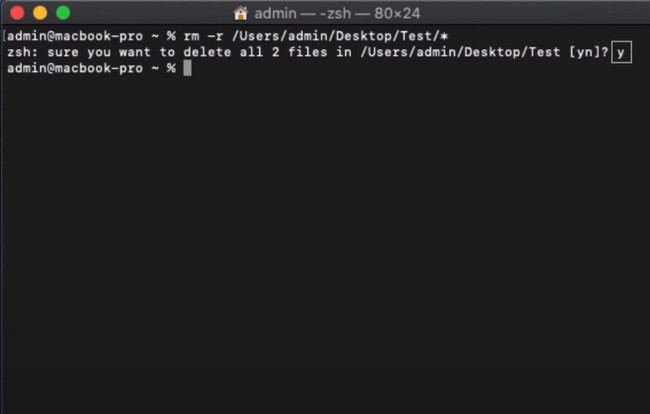
Step 2The device tool will ask you if you want to delete your files. Type in the y button if your answer is yes. On the other hand, type in the n button if your answer is no. Since you are deleting your files, type in the n button, then press the Enter key on your keyboard. Afterward, the files will disappear from the folder instantly.
Part 2. How to Restore Files Deleted with RM Command
After deleting files on Mac using the RM command, you probably lose some of your files. Please note that you could not undo the RM command. Once you finally perform this command, your files will disappear instantly and permanently. Fortunately, there are many ways to recover them on your Mac. You can use the built-in device tools available on it, or you can use third-party software. In this case, you can use the powerful recovery tool, which is the FoneLab Data Retriever. Do not stress yourself finding ways to return your files. The answers to your problem are available below.
FoneLab Data Retriever - recover the lost/deleted data from computer, hard drive, flash drive, memory card, digital camera and more.
- Recover photos, videos, documents and more data with ease.
- Preview data before recovery.
Method 1. FoneLab Data Retriever
Do not lose hope if you lose some of your files while using the RM command. Are you looking for a data recovery tool that can recover files in any scenario? Mac FoneLab Data Retriever is the answer! It supports almost all data types. Some of them are documents, videos, images, and more. Nothing to worry about if you cannot undo the RM command. Using this software is the best alternative to bring your files back. Its steps and features are the most straightforward quality you will ever use in a recovery tool.
Step 1To get the FoneLab Data Retriever, click the Free Download button on the left side of the main interface. Wait for the process, then set up the tool afterward. You need to Install > Launch > Run it on your computer once you finish.

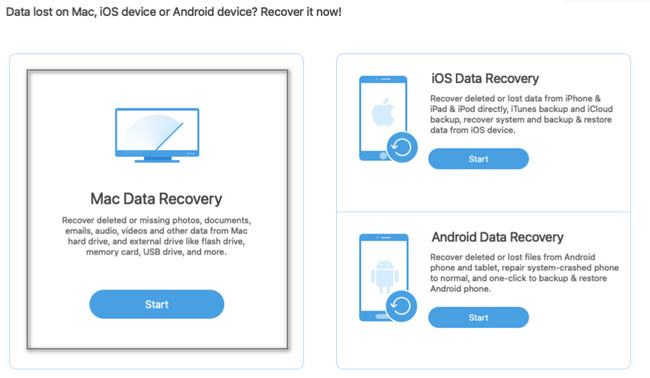
Step 2The software will ask you the type of recovery and device you will use. Since you are using Mac to recover your deleted files with the RM command, choose Mac Data Recovery. To perform that, you need to click the Start button on its below.
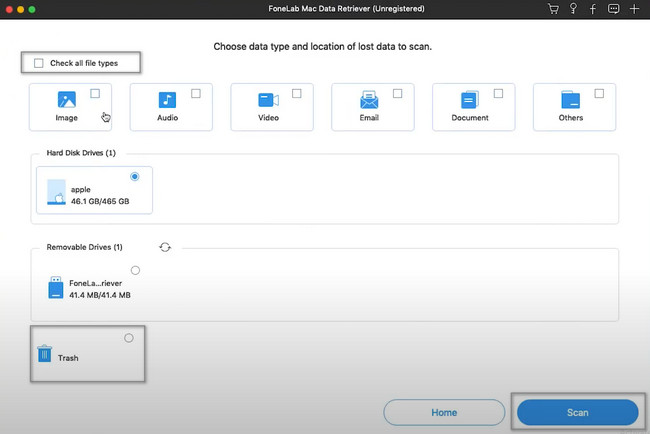
Step 3You do not know the exact files you lost in the process. If you want to see them again, check the box for all the data types this software supports. At the bottom of the main interface, you will see the Trash Bin icon. If you also want to check this location, tick its Circle button. If the data types and locations are enough and ready, click the Scan button.
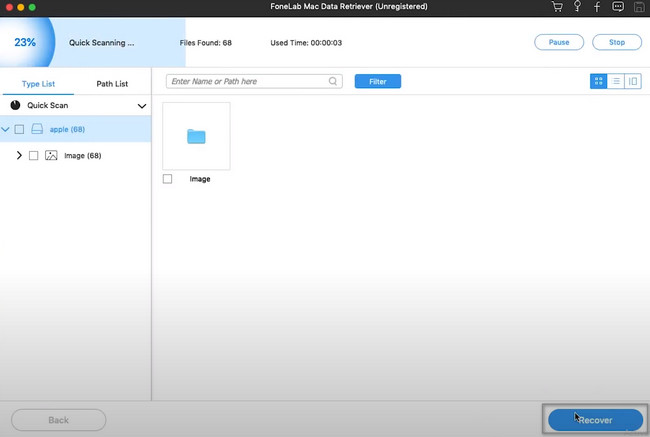
Step 4The process will let you know the files it found and their percentage. You will also see the time you used to scan your files. Once the quick scanning is finished, you can choose the Deep Scan button. It will consume more time and give you more results. If you change your mind, click the Pause and Stop buttons to interrupt the process.

Step 5The results of the deep scanning will be on the left side of the tool. You will also notice that their contents are on their right sides. To add them to the process, tick the Box buttons under them, and you can change the listing mode in the top right corner. Examples are Thumbnails, List, and Content modes.
Step 6To retrieve your files, you must click the Recover button of the software. It will process your files for only a few moments. It will not last for an hour. After that, you can see your files in their original location on your Mac.
Method 2. Using Terminal
Using the Terminal tool is a tricky procedure for recovering your files. If you want to avoid any errors in the process, follow the steps below.
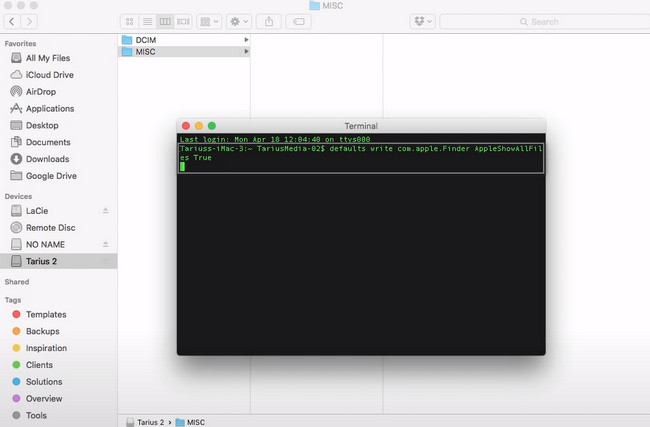
Step 1Look for the Terminal tool on the device, then launch it immediately. The device tool will ask you to type something related to recovery. Using your keyboard, type in the codec ‘defaults write com.apple.Finder AppleShowAllFiles True’. Later, press the Enter button to encode these codes on the tool.
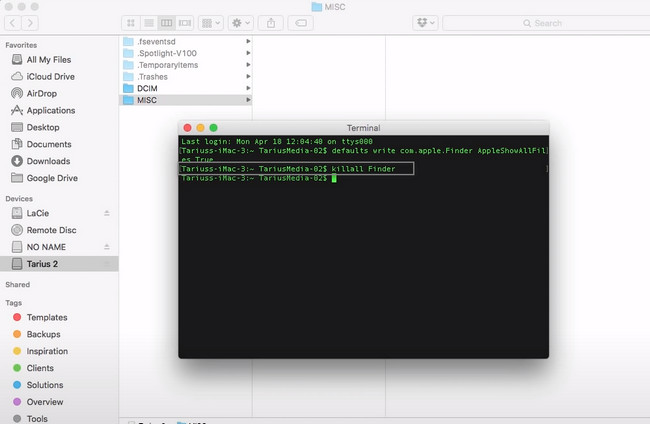
Step 2There will be another codec you need to encode. Type in the code ‘killall Finder’ code, then press the Enter button on your keyboard. In this case, the tool will receive the code you put in. The device tool will return your lost files to their original album locations. All you must do is check and locate them.
FoneLab Data Retriever - recover the lost/deleted data from computer, hard drive, flash drive, memory card, digital camera and more.
- Recover photos, videos, documents and more data with ease.
- Preview data before recovery.
Part 3. FAQs How to Recover Deleted Files with the RM Command
1. How to restore deleted files using the RM command in Linux?
Launch the Terminal tool on your device. Afterward, you will see the tool requiring you to type the needed codec. Later, type the codec rm one.txt, then press the Enter key on the keyboard. It will delete one of your files. However, if you want to delete many files, type in rm one.txt two.txt three.txt, then press Enter.
2. Is it normal to accidentally delete essential files through the RM command?
Definitely, yes. It is normal to delete important files using the RM command. At times, you unintentionally input the wrong code. You can use proven and efficient tools like Mac FoneLab Data Retriever to return your files on your current device.
Mac FoneLab Data Retriever is the best tool after you delete files using the RM command. Its features are the most efficient and helpful tools. If you want to use this tool, do not hesitate to download it.
FoneLab Data Retriever - recover the lost/deleted data from computer, hard drive, flash drive, memory card, digital camera and more.
- Recover photos, videos, documents and more data with ease.
- Preview data before recovery.