
 iPhone Data Recovery
 iOS System Recovery
 iOS Data Backup & Restore
 iOS Unlocker
 iPhone Password Manager
 Location Changer
 Android Data Recovery
 Broken Android Data Extraction
 Android Data Backup & Restore
 Android Unlocker
 FoneTrans for iOS
 iPhone Data Eraser
 iPhone Cleaner
 HEIC Converter
 HyperTrans
 WhatsApp Transfer for iOS
 Mac Sweep
 Data Retriever
 Mac Data Retriever
 Video Converter Ultimate
 Screen Recorder
 Phone Mirror
 Recover PC Data Now
Recover the lost/deleted data from computer, hard drive, flash drive, memory card, digital camera and more.
[3 Proven Ways] How to Recover Mac Data After Factory Reset
 Updated by Valyn Hua / October 10, 2026 10:00
A factory reset wipes the Mac back to a clean state — usually done to sell it, fix a problem, or hand it to someone else. If you did it and then realized you forgot to copy something off, the panic is real. The good news: recovery after a reset is often possible, but it depends heavily on whether you had a backup.
I want to set honest expectations. On older Macs with a traditional hard drive, a reset leaves recoverable file fragments behind. On modern Apple Silicon Macs, the internal SSD is hardware-encrypted, which makes a post-reset disk scan much less reliable. So the two backup methods below are your real safety net, and the disk scan is best-effort. That order matters — try the backups first.
Below I walk through Time Machine, iCloud, and then the disk scan option. Act quickly and avoid writing new data to the Mac while you work, because anything saved now can overwrite what is left.


Guide List
Part 1. Restore from Time Machine Backup
If you ever used Time Machine with an external drive, this is the most complete recovery — it restores your whole user folder, settings, and apps. This is the first place to look after a reset.
Restore during setup or from the menu bar
Step 1Connect your Time Machine drive to the Mac. On the setup assistant, choose Restore from Time Machine; if macOS is already set up, open System Settings > General > Time Machine.
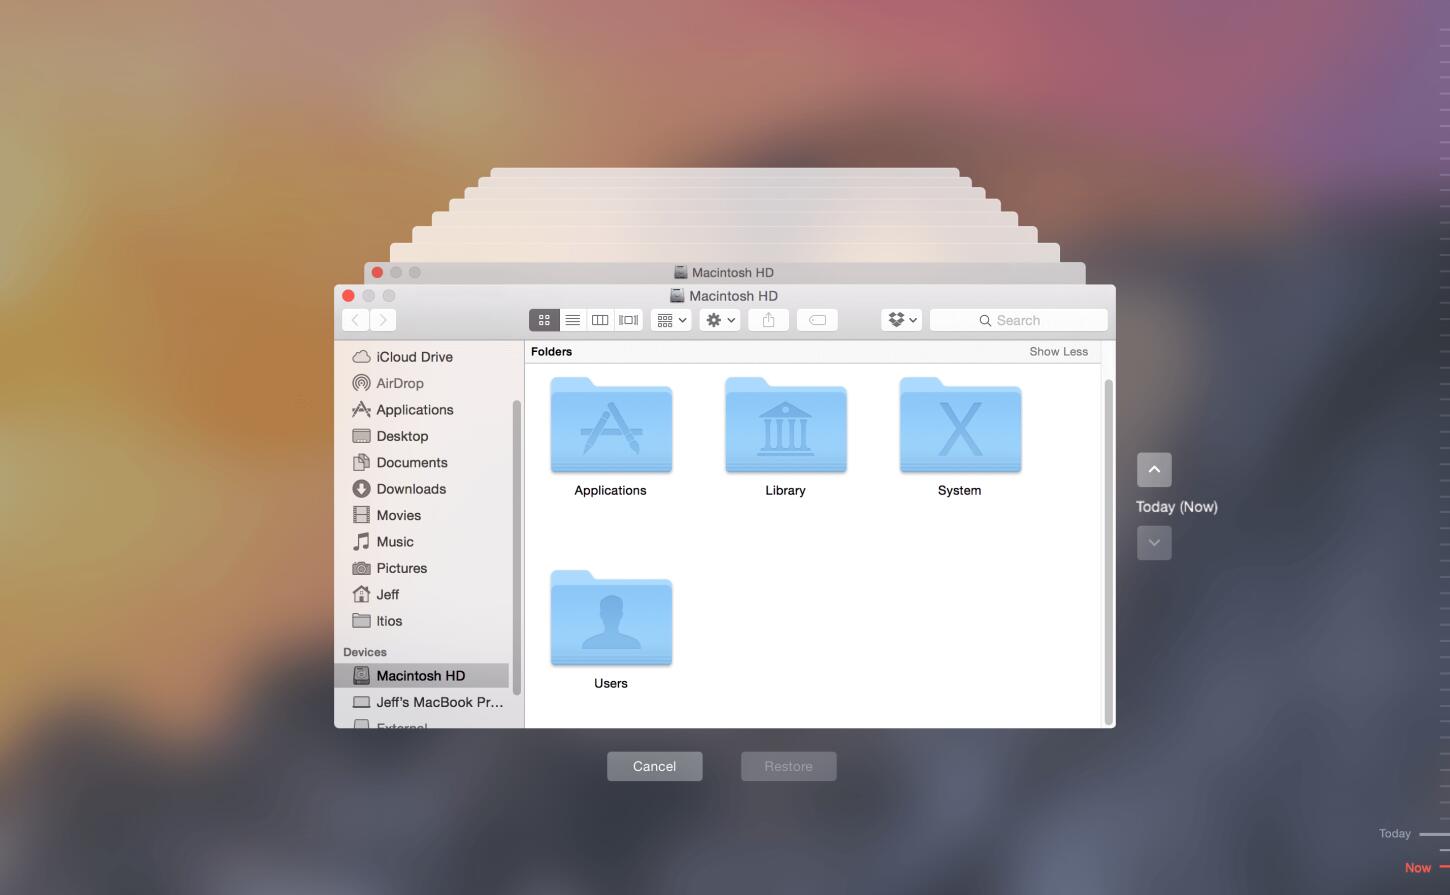
Step 2Browse the timeline to pick the backup taken before the reset.
Step 3Select what to restore — your user folder is the important part — and let the restore finish without interrupting it.
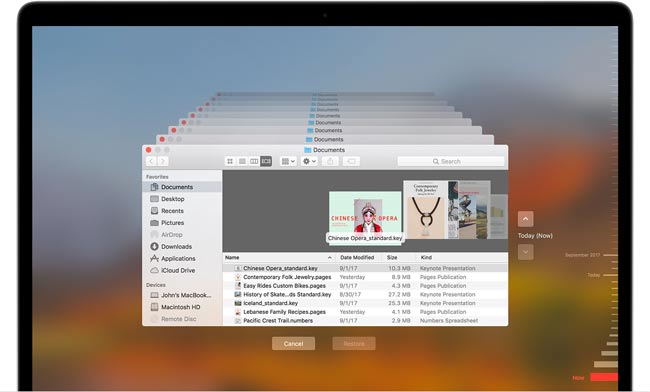
The catch: this only works if you actually had Time Machine running. If you never plugged in a backup drive, there is nothing to restore from, and you move to the next options.
Part 2. Restore from iCloud
If you used iCloud sync, a surprising amount of your data already lives in the cloud and comes back automatically once you sign in. This covers photos, documents on the Desktop and Documents folders, contacts, and notes.
Sign in and let sync finish
Step 1During setup or in System Settings, sign in with the same Apple ID.
Step 2Open iCloud settings and confirm which categories are turned on — Photos, Documents, Desktop, Contacts, Notes.

Step 3Keep the Mac online and let the downloads complete; large photo libraries take time.
iCloud restores what was syncing, not what was only ever stored locally on the Mac. Files you kept on the internal drive with no iCloud backup will not reappear here — that is the gap the next part tries to fill.
Part 3. Recover Mac Data with FoneLab Data Retriever
When no backup exists, the last option is to scan the disk itself. FoneLab Data Retriever for Mac can look for deleted files still present on the internal or external drive. After you choose the drive and start, it runs an automatic deep scan — there is no separate Deep Scan button. One honest caveat: on modern Apple Silicon Macs the SSD is encrypted, so a scan after a full reset often finds limited data; it is most reliable on older Intel Macs and on external drives.
FoneLab Data Retriever - recover the lost/deleted data from computer, hard drive, flash drive, memory card, digital camera and more.
- Recover photos, videos, documents and more data with ease.
- Preview data before recovery.
Run the scan and preview
Step 1Launch the Mac build of FoneLab Data Retriever, tick the file types you lost (documents, images, video), and select the drive to scan.
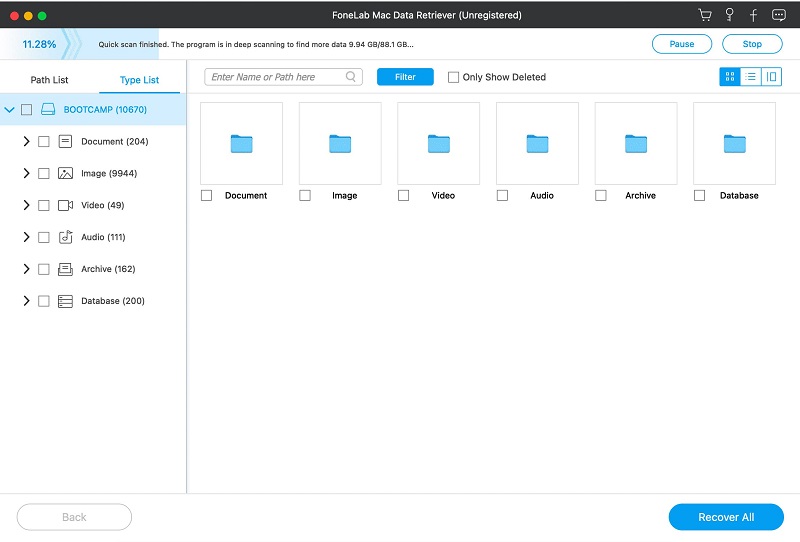
Step 2Click Start Scan. It performs an automatic deep scan and groups results by type.
Step 3Preview the files, use Filter by date, and tick what you want back.
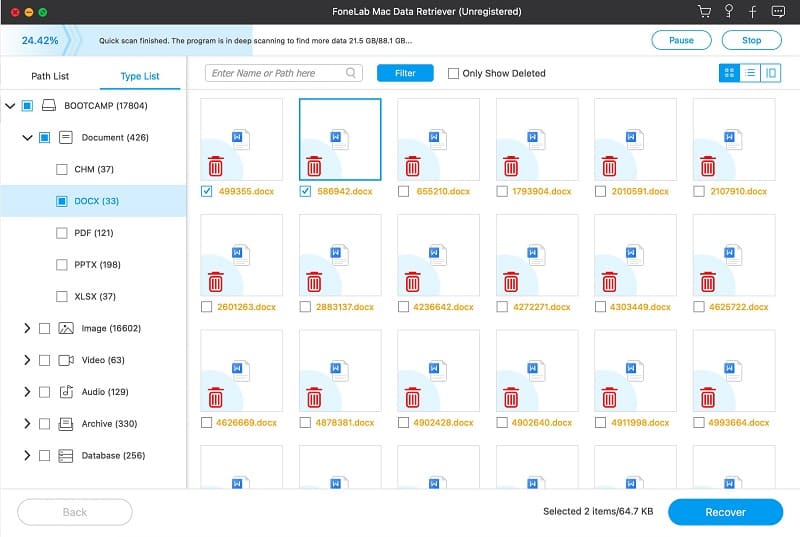
Step 4Click Recover and save to an external drive, never back to the same internal disk.
Manage expectations: if the reset also encrypted or secure-wiped the drive, some files simply will not reappear. Recover what the scan finds and lean on backups from now on. The same scan helps with other lost file types, such as recovering images from a hard drive.
FoneLab Data Retriever - recover the lost/deleted data from computer, hard drive, flash drive, memory card, digital camera and more.
- Recover photos, videos, documents and more data with ease.
- Preview data before recovery.
Part 4. Quick Comparison of the Methods
| Method | Free? | Full System Restore | Apple Silicon SSD | Best For |
|---|---|---|---|---|
| Time Machine | Yes (needs drive) | Yes | N/A (backup copy) | Complete recovery from backup |
| iCloud | Yes | Only synced data | N/A | Photos, documents, contacts |
| FoneLab Data Retriever | Free to preview | No | Limited by encryption | No backup, file fragments remain |
Part 5. Tips to Protect Your Mac Before a Reset
- Always run a Time Machine backup before erasing anything — it takes minutes and saves you days.
- Confirm your Desktop and Documents are syncing to iCloud so they survive a reset automatically.
- Copy anything irreplaceable to an external drive manually, even if you have iCloud.
- Sign out of your Apple ID and deauthorize licenses before selling or gifting the Mac.
- If you must scan for lost files afterward, save results to an external disk to avoid overwriting.
- Keep the recovery partition and a bootable installer handy so you do not rush a reset under stress.
Part 6. Frequently Asked Questions
Can data be recovered after a factory reset on Apple Silicon Macs?
It is harder, because the internal SSD is hardware-encrypted. Recovery after reset is most reliable from a Time Machine or iCloud backup; a disk scan alone may find only limited fragments.
Do I need a separate Deep Scan to find more files?
No. In FoneLab Data Retriever, clicking Start Scan already runs an automatic deep scan. There is no separate Deep Scan button to look for.
Will iCloud bring back files that were never synced?
No. iCloud only restores categories you turned on and that were syncing. Files stored only on the local drive need Time Machine or a disk scan.
Should I keep using the Mac while scanning?
No. Every new file saved to the internal drive can overwrite recoverable fragments. Save recovered data to an external drive and minimize new writes until done.
To wrap up: restore from Time Machine first, let iCloud bring back synced data, and only then try a disk scan with FoneLab Data Retriever. The backups are the real answer; the scan is best-effort, especially on encrypted Apple Silicon Macs.
The habit worth taking away is simple: never factory-reset a Mac without a current backup. A Time Machine drive and an iCloud account take almost no maintenance, and they turn a catastrophic reset into a half-hour restore instead of a recovery scramble.
You may not have fully erased the Mac
Before assuming the worst, consider what actually happened. If you only reinstalled macOS or upgraded, the old user folder may still sit in /Users, untouched. Browse that directory with an admin login and open the previous account's folders. People are often relieved to find the entire home directory still there, just not loaded as the active user. Copy what you need out before doing anything else.
Likewise, check iCloud more carefully than one glance. Open iCloud settings and confirm which categories are on; a disabled Photos or Documents toggle looks exactly like "my files are gone" until you flip it back on and wait for the download. Large libraries take a while to come down, so give it time on Wi-Fi.
Realistic expectations for the disk scan
On modern Apple Silicon Macs, the internal SSD is encrypted with a hardware key tied to the machine. After a reset, that key changes, so a later scan often cannot read the old data at all. This is by design — it protects your data from thieves. The honest takeaway: a post-reset disk scan is a long shot on new Macs and a reasonable bet on older Intel Macs with a traditional drive. Do not pay for the scan expecting miracles; use it as a last resort after the backups.
If the Mac will not even boot to the point of signing in, you may need to recover the drive externally: put it in an enclosure and scan it from another Mac. That is a job best left to someone comfortable opening the machine, but it is the only route when the original hardware will not start.
FoneLab Data Retriever - recover the lost/deleted data from computer, hard drive, flash drive, memory card, digital camera and more.
- Recover photos, videos, documents and more data with ease.
- Preview data before recovery.
Before you reset again, check these
If you are about to reset once more, pause. Open System Settings and note which volumes are mounted, and look in iCloud for what is syncing. Most people who reset a Mac a second time never needed to — a stuck update or a confusing startup disk is fixable without wiping everything. Try safe mode and a few repairs first, because every reset raises the chance of losing something you care about.
After you do recover, take half an hour to set up a real backup. Connect a drive and turn on Time Machine, choose to back up at least your user folder, and leave it plugged in weekly. Combined with iCloud for the small stuff, that means the next reset is a restore, not a rescue mission.
The through-line across all three methods is the same: backups beat scans. Time Machine and iCloud restored Mac data for almost everyone who had them switched on, and the disk scan only mattered for people who had neither. If this article helped you recover your files, spend the next ten minutes turning on a proper backup so the next reset is painless. For older Intel Macs where a scan is a realistic option, run it once and save the results off the machine.
And if a scan turns up old files you did not mean to delete, do not wipe the disk again thinking it is "clean." Preserve what you recovered and let Time Machine keep its snapshots. Patience here beats another wipe.
The summary is simple: restore Time Machine or iCloud first, because those are guaranteed when they were on, and only treat the disk scan as the fallback for machines with no backup at all. On modern encrypted Macs the scan is a long shot, so do not expect it to rescue everything.
When you are done recovering, spend ten minutes turning on Time Machine so this never becomes a crisis again.