iPhone Data Recovery
 iOS System Recovery
 iOS Data Backup & Restore
 iOS Unlocker
 iPhone Password Manager
 Location Changer
 Android Data Recovery
 Broken Android Data Extraction
 Android Data Backup & Restore
 Android Unlocker
 FoneTrans for iOS
 iPhone Data Eraser
 iPhone Cleaner
 HEIC Converter
 HyperTrans
 WhatsApp Transfer for iOS
 Mac Sweep
 Data Retriever
 Mac Data Retriever
 Video Converter Ultimate
 Screen Recorder
 Phone Mirror
- Part 1. Can You Really Recover Deleted Files from a USB Drive?
- Part 2. Check for Hidden Files
- Part 3. Check Previous Versions / File History
- Part 4. Check Time Machine
- Part 5. Use FoneLab Data Retriever
- Part 6. Comparison of Ways to Recover Files from USB Drive
- Part 7. Why Recovery May Not Work — Setting Realistic Expectations
- Part 8. Prevention — How to Avoid USB Data Loss
- Part 9. FAQs about Recovering Files from USB Drive
 Recover PC Data Now
Recover the lost/deleted data from computer, hard drive, flash drive, memory card, digital camera and more.
Eminent Methods to Recover USB Drive Data Properly
 Updated by
 Do you need to recover deleted files from USB drive? When you face a sudden data loss on a USB drive, the golden rule of USB recovery—stop using it immediately—is the first step you must remember before taking any other actions. This single rule is very important because every second the drive remains connected, new data can overwrite your lost files, making them permanently unrecoverable before you even have a chance to recover your data.
So, the safest step as soon as you lose data from your USB drive is to eject or disconnect it properly. Then, after setting it aside in a safe place, you can start looking for an effective way to retrieve the USB files. Now, if you are new to data recovery, we understand you may need confirmation that it is really possible. So, we prepared sufficient information in the following sections to guide you through the next right move. Step-by-step guides will be available throughout.


Guide List
- Part 1. Can You Really Recover Deleted Files from a USB Drive?
- Part 2. Check for Hidden Files
- Part 3. Check Previous Versions / File History
- Part 4. Check Time Machine
- Part 5. Use FoneLab Data Retriever
- Part 6. Comparison of Ways to Recover Files from USB Drive
- Part 7. Why Recovery May Not Work — Setting Realistic Expectations
- Part 8. Prevention — How to Avoid USB Data Loss
- Part 9. FAQs about Recovering Files from USB Drive
Part 1. Can You Really Recover Deleted Files from a USB Drive?
“Can you really recover files from USB?” This is a question frequently asked by beginners in data recovery. Well, the short answer is yes, but it depends on what happened after the deletion. As mentioned, the golden rule is a critical step, so if your files have been overwritten due to continuous usage after being lost or deleted, recovery might become unattainable.
But if you follow the rule, then yes, data recovery is often possible. Both dedicated tools and built-in recovery methods are available; so all you need to do is choose the most suitable one for your data loss situation. Besides, we have already prepared the leading recovery techniques in the following sections, so you no longer have to search the internet and waste time trying out uncertain solutions. You can proceed below for USB drive recovery immediately.
Part 2. Check for Hidden Files
Before you try any dedicated recovery solutions, it would be best to check for your computer’s hidden files. Sometimes, a USB drive does not actually lose data. The files only become invisible due to system settings or minor glitches. Hence, doing a quick check would be helpful before proceeding to the other methods. After all, the process is very simple, taking only a few seconds and not requiring special tools. It is done directly on File Explorer.
Follow the directions below about how to recover files from USB by checking for hidden files:
Step 1First, ensure your USB drive is linked to the computer. When ready, launch File Explorer and open the folder that formerly contained your lost or deleted file.
Step 2Next, click View from the top menu and click the Hidden items checkbox. Your hidden files will then be revealed, and you can try to find your lost data.
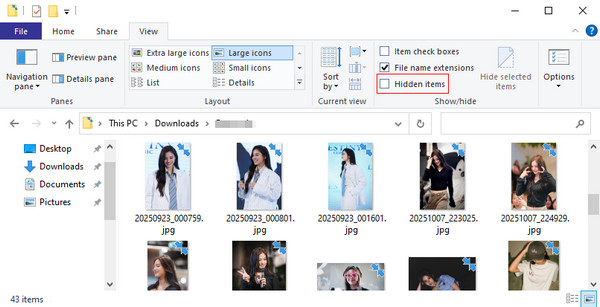
Note that this method will only work if the files were hidden and not actually deleted or overwritten. If the drive is corrupted or the files were deliberately erased, this method won't help with recovery. In this case, the following methods would be more suitable.
Part 3. Check Previous Versions / File History
In addition to allowing you to check for hidden files, Windows offers another built-in feature called File History that lets you access previous versions of your files. If you enable this feature, it will automatically save versions of your files or folders over time. Thus, when your current data gets deleted or overwritten, you will be able to view and restore it without a problem. However, if you haven't turned on the feature beforehand, backups for restoring a specific version of the file won't be available. Also, this only works on Windows.
Follow the operation below to recover data from USB by checking Previous Versions/File History:
Step 1Plug in your USB drive and view its content on your computer. Proceed to the folder where your deleted file or folder was saved before, then right-click it.
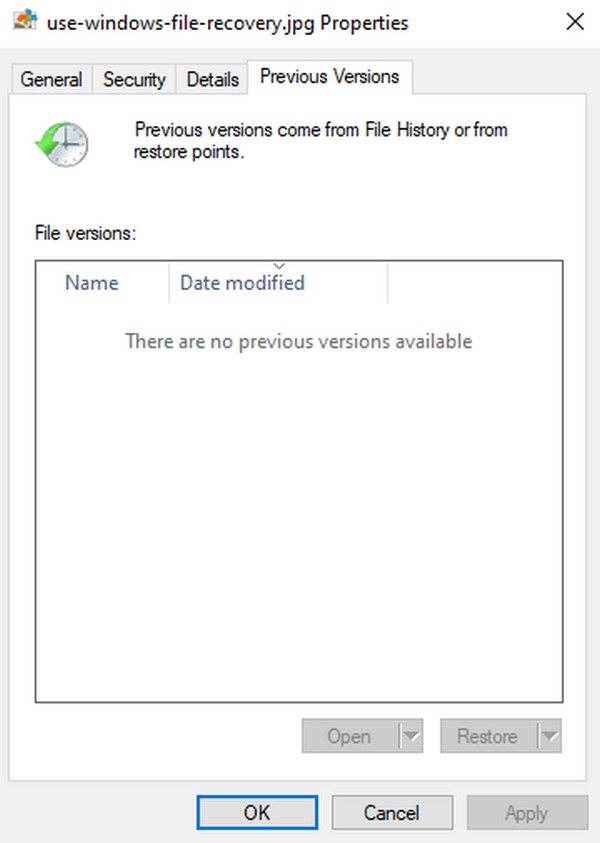
Step 2Choose Properties from the menu, and in the top options, tick Previous Versions. The versions of your file will then be presented, so pick your desired version and hit Restore.
Part 4. Check Time Machine
For Mac users, Time Machine is the built-in backup solution. Like the previous method, it automatically saves copies of your data at regular intervals, allowing you to recover your files using a Mac data recovery later. The main advantage of Time Machine is its integration with macOS, making it very accessible and easy to use, even without any technical knowledge. However, it has the same disadvantage as File History, as it must also be enabled beforehand. Additionally, it requires an external backup drive, or your files won’t be copied.
Follow the steps below to recover deleted files from USB by checking Time Machine:
Step 1Ensure your external drive backup and USB drive are attached, then enter the folder that contained your deleted file before. Then, launch Time Machine from the menu.
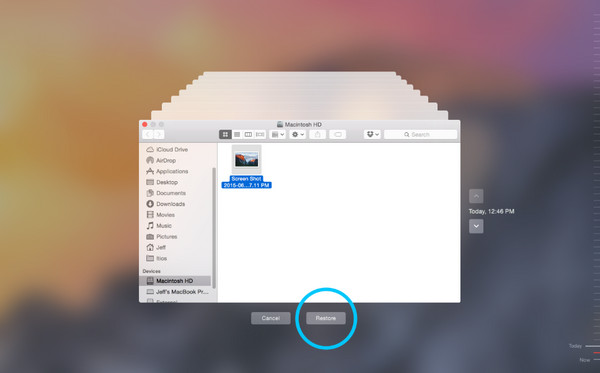
Step 2Simply browse the backups to find the files you intend to recover, and once found, select Restore on the lower part for recovery.
Part 5. Use FoneLab Data Retriever
If the built-in methods do not work, it is time to turn to a dedicated recovery tool, like FoneLab Data Retriever. Among the many choices, this program has proven to be the top choice for many users. Not only is it known for its high success rate, but it is also designed specifically to handle data loss situations that simpler methods cannot fix.
That’s right! FoneLab Data Retriever will let you restore deleted files from your USB drive , whether they were lost due to accidental deletion, update failure, disk damage, or other issues. It also offers in-depth support for major file systems, such as NTFS / FAT16 / FAT32, exFAT, and EXT. Moreover, the program doesn’t require advanced knowledge, making it suitable for any user, including beginners.
FoneLab Data Retriever - recover the lost/deleted data from computer, hard drive, flash drive, memory card, digital camera and more.
- Recover photos, videos, documents and more data with ease.
- Preview data before recovery.
Follow the simple steps below to learn the USB drive data recovery software, FoneLab Data Retriever:
Step 1Begin with the Free Download option to have the FoneLab Data Retriever file. Once downloaded, run the installer and launch the program. The main interface will show the available drives, so ensure your USB is connected to see and select it.
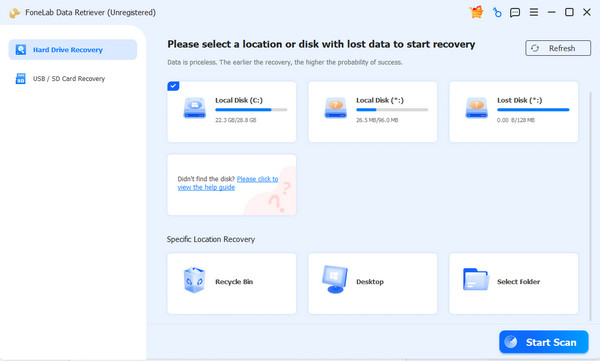
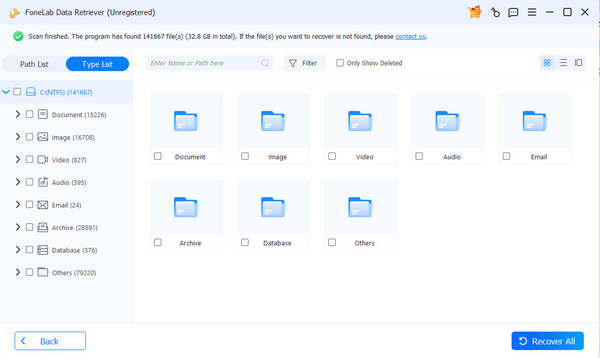
Step 2Following that, hit Start Scan for the tool to detect and present your USB drive’s lost or deleted data. Folders for each data type will be displayed, so browse them until you find the files you want. Afterward, check it and pick Recover All to restore the data.
Part 6. Comparison of Ways to Recover Files from USB Drive
| Method | Check for Hidden Files | Previous Versions | Time Machine | FoneLab Data Retriever |
| What It Can Recover | Files that are only hidden, not deleted | Older versions of your files that are backed up on the PC | Older versions of files backed up on Mac | Deleted, formatted, or corrupted files |
| Difficulty | Very Easy | Easy | Easy | Easy |
| Speed | Very Fast | Fast | Fast | Fast |
| File Preview | No | Yes | Yes | Yes |
| Supports All File Types | No | No | No | Yes |
Part 7. Why Recovery May Not Work — Setting Realistic Expectations
Even with the best tools and methods, sometimes, recovery is still not guaranteed. Your files may be permanently lost if they have been overwritten by new data, if the drive is physically damaged, or if the file system is severely corrupted. The longer you use the drive after deletion, the lower your chances of recovery become, so as mentioned, don't forget the golden rule. Staying hopeful is important, but so is being realistic—manage your expectations accordingly.
Part 8. Prevention — How to Avoid USB Data Loss
Although several recovery solutions are accessible, the best way to deal with data loss is still to prevent it from happening in the first place.
- • Properly eject the USB drive - Always use the Safely Remove Hardware option before unplugging to prevent corruption.
- • Maintain regular backups - Copy critical files to another device or cloud storage.
- • Avoid untrusted public computers - Refrain from plugging into unknown machines that may have viruses.
- • Keep the drive in a safe environment - Protect from physical damage, extreme temperatures, moisture, etc.
- • Use reliable antivirus software - Scan your USB regularly to detect and remove malware.
Part 9. FAQs about Recovering Files from USB Drive
How long does USB recovery usually take?
It depends on the size of your drive and the method used. Typically, USB drives containing larger amounts of data take more time to scan and recover.
Does recovering files damage my USB drive further?
No, it doesn’t. Recovery solutions only read your data and do not write or modify your drive.
For the best chance of successful USB recovery, stop using the drive immediately, start with the free built-in options, and if they fail, use a trusted tool like FoneLab Data Retriever to recover your files safely.