iPhone Data Recovery
 iOS System Recovery
 iOS Data Backup & Restore
 iOS Unlocker
 iPhone Password Manager
 Location Changer
 Android Data Recovery
 Broken Android Data Extraction
 Android Data Backup & Restore
 Android Unlocker
 FoneTrans for iOS
 iPhone Data Eraser
 iPhone Cleaner
 HEIC Converter
 HyperTrans
 WhatsApp Transfer for iOS
 Mac Sweep
 Data Retriever
 Mac Data Retriever
 Video Converter Ultimate
 Screen Recorder
 Phone Mirror
 Recover PC Data Now
Recover the lost/deleted data from computer, hard drive, flash drive, memory card, digital camera and more.
The Recycle Bin on C is Corrupted: Fixes and Recovery
 Updated by
 Is your Recycle Bin corrupted? Unfortunately, this is a common occurrence on Windows, and it often strikes without warning. One moment you're trying to restore deleted files, and the next, the screen displays an error message saying your Recycle Bin on the C: drive is corrupted. It can be frustrating, as it prevents you from managing your deleted items.
Additionally, this issue may even cause system glitches, affecting not only your files but also your computer performance. The good news is that it is almost always fixable, as Windows provides built-in tools to resolve the corruption, allowing you to restore normal functionality to your Recycle Bin. Thus, let’s walk you through the leading solutions and helpful information.

Guide List
Part 1. What Does This Error Mean?
To better understand the Recycle Bin is corrupted error, let's start with the typical causes of corruption: sudden system shutdowns, disk errors or bad sectors on your C: drive, file system corruption from improper drive ejection, or failing hardware. You may not know this, these issues can confuse Windows' Recycle Bin tracking system. As a result, it will be unable to read or write data correctly. When this happens, Windows displays an error message and temporarily disables the bin to prevent the issue from worsening.
Part 2. Read Before You Try Any Fix
Before diving into the fixes, one thing you must know is that repair processes can permanently overwrite or delete files that are currently in the corrupted Recycle Bin. This means that any recoverable data you haven't restored yet could be lost for good once you start running repair methods, such as commands and resets. So, if you still have important files in the bin, consider using a recovery solution before proceeding with any fix.
Part 3. Recover Files FIRST with FoneLab Data Retriever
You can recover files from Recycle Bin if you haven’t emptied it yet by right-clicking the item you want and picking Restore from the quick menu. However, corruption will likely prevent you from doing so; hence, here’s FoneLab Data Retriever to help you successfully recover despite a corrupted Recycle Bin.
FoneLab Data Retriever - recover the lost/deleted data from computer, hard drive, flash drive, memory card, digital camera and more.
- Recover photos, videos, documents and more data with ease.
- Preview data before recovery.
That’s right! It doesn’t matter whether your file location or drive is corrupted, or you have lost files due to accidental deletion, system failure, disk damage, formatting, etc., since this program supports a broad range of recoverable scenarios. Advanced knowledge is not required either, as FoneLab Data Retriever is designed for beginners and offers easy, helpful features.
Follow the directions below to first recover your files with FoneLab Data Retriever:
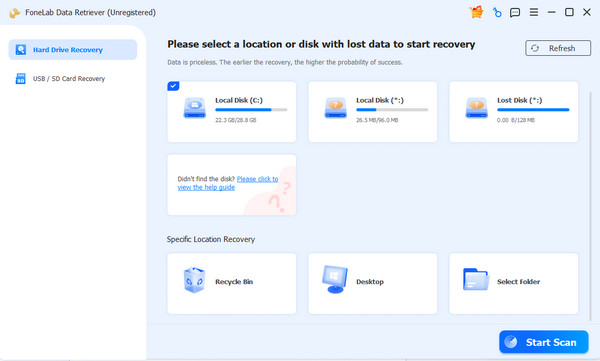
Step 1Download the installer for FoneLab Data Retriever via Free Download, then install and start the program. The available drives and data locations are displayed on the main interface, so choose the Recycle Bin from there. Afterward, proceed with the Start Scan option.
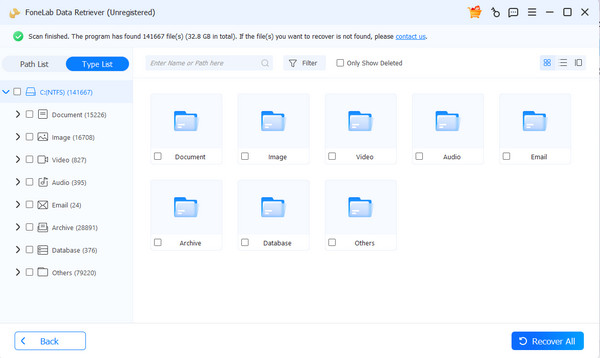
Step 2Following that, the designated folders for every data type will be presented. Double-click them to open, then browse the content for your deleted files. Once you locate the items you need, mark their checkboxes. Finally, select Recover All to return your chosen files.
Part 4. Fix the Corrupted Recycle Bin on C Drive
Once you have recovered your data, it’s time to fix corrupt files or the corrupted Recycle Bin on your C: drive. Below are the most effective solutions; use them accordingly.
Method 1. Reset the Recycle Bin via Command Prompt
Running the appropriate reset command in Command Prompt is the most direct fix when your Windows Recycle Bin is corrupted. It works by deleting the corrupted system folder that manages your Recycle Bin, forcing Windows to create a brand new one in its place. It's fast and effective, targeting only the C: drive without affecting your personal files or other drives.
Step 1Launch Command Prompt as administrator by entering cmd in the Start menu search bar, right-clicking the program from the results, and selecting Run as administrator.
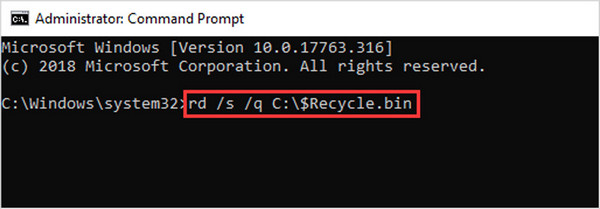
Step 2On the command-line interface, type rd /s /q C:\$Recycle.bin and hit Enter. This action will delete the corrupted folder; afterward, restart your computer to generate a new Recycle Bin.
Method 2. Use Disk Cleanup
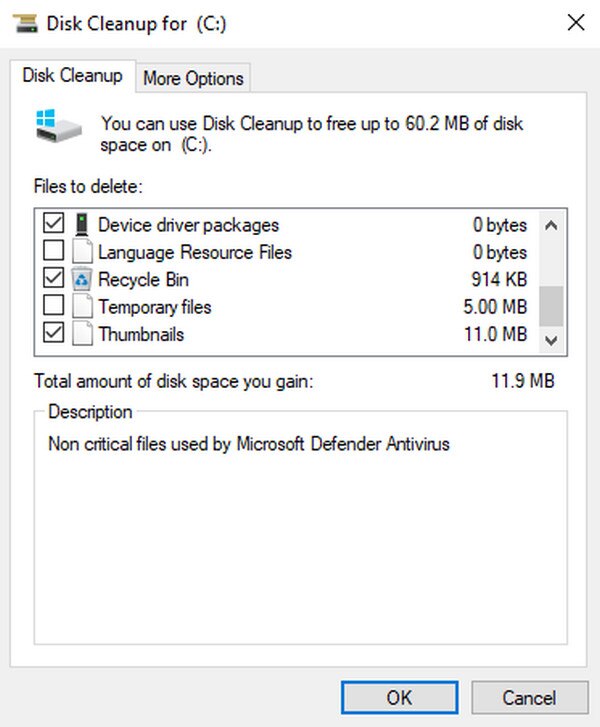
The built-in Disk Cleanup utility, on the other hand, removes temporary system files, including corrupted Recycle Bin data. It is a safe, beginner-friendly option that requires no commands to type or run; the process takes only a few clicks. While it may not be as thorough or effective as a full reset, it works well for milder cases of corruption and is suitable if the problem is minimal.
Step 1Using the Start menu search bar, open the Disk Cleanup utility by typing and selecting the tool. Following that, choose your C: drive when prompted.
Step 2The utility’s dialog box will appear shortly. Mark the box next to Recycle Bin in the Files to delete list, then click OK before the confirmation to clear your corrupted data.
Method 3. Run System File Checker
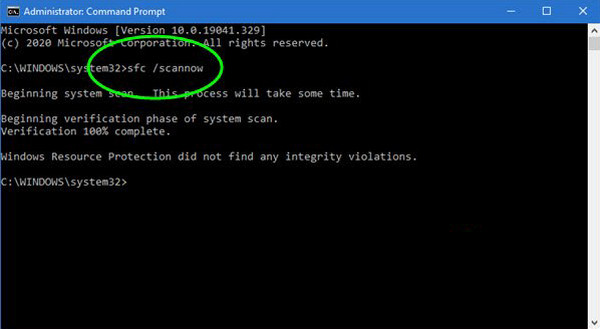
The System File Checker is another process you can run in Command Prompt. It scans and repairs corrupted or missing system files that may be causing the Recycle Bin error. Unlike previous methods that directly target the Recycle Bin, this command offers a broader approach by verifying the integrity of system files across the entire system. It is suitable when the corruption stems from deeper system issues rather than just the Recycle Bin folder itself.
Step 1As before, start Command Prompt as an administrator, then enter the designated command on the interface: sfc /scannow.
Step 2Afterward, wait for the scan and fix to complete, then restart your computer.
Method 4. Check Disk for Errors
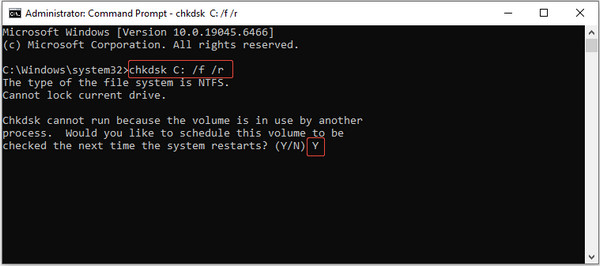
Additionally, the Check Disk (CHKDSK) utility is another command that scans your C: drive for bad sectors or file system errors that may be causing the corruption. It is especially helpful if the problem persists, even after trying other fixes.
Step 1Use Command Prompt as an administrator and run the chkdsk C: /f /r command.
Step 2When prompted, type Y to schedule the scan for the next system restart, then reboot your computer to run the scan.
Method 5. System Restore
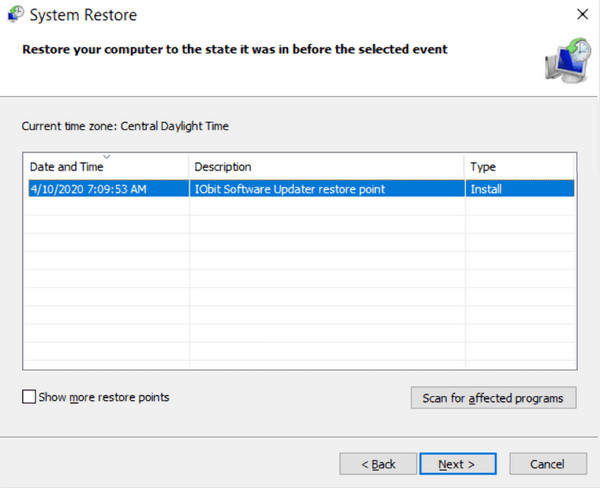
Lastly, a System Restore brings your system back to a previous restore point when the Recycle Bin was still working properly. It is another fix that reverts your system files and settings without affecting your personal data. However, this only works if you created a restore point beforehand.
Step 1Search for System Restore in the Start menu to open it, then click System Restore.
Step 2Pick a restore point from before the error, then follow the prompts to restart.
Part 5. How to Prevent Recycle Bin Corruption in the Future
To avoid encountering the same issue later, always shut down your computer properly, run regular disk checks, and keep Windows updated. Also, avoid interrupting file deletion processes and back up important files regularly so you don't rely too heavily on the Recycle Bin.
Part 6. FAQs about The Recycle Bin on C is Corrupted
Can I still delete regular files while the Recycle Bin is corrupted?
Yes, but Windows may skip the bin and permanently delete them instead.
Does resetting the Recycle Bin affect my other drives?
No, it doesn’t. Resetting the Recycle Bin in the Command Prompt only targets the C: drive.
By following the methods outlined above, whether for fixes or recovery with FoneLab Data Retriever, you can quickly resolve Recycle Bin corruption without losing your important files.