- Part 1. Why is My iPad Storage Full
- Part 2. How to Free Up iPad Storage with FoneEraser for iOS
- Part 3. How to Get More Storage on iPad via AssistiveTouch
- Part 4. How to Clear iPad Storage by Deleting Unwanted Files
- Part 5. How to Clean Up iPad Storage through Uninstalling Apps
- Part 6. FAQs about iPad Storage Full
Easily erase all contents and settings on iPhone, iPad or iPod completely and permanently.
- Clear iPhone Junk Files
- Clear iPad Cache
- Clear iPhone Safari Cookies
- Clear iPhone Cache
- Clear iPad Memory
- Clear iPhone Safari History
- Delete iPhone Contacts
- Delete iCloud Backup
- Delete iPhone Emails
- Delete iPhone WeChat
- Delete iPhone WhatsApp
- Delete iPhone Messages
- Delete iPhone Photos
- Delete iPhone Playlist
- Delete iPhone Restrctions Passcode
Ultimate Guide to Manage iPad Storage Effectively
 Updated by Boey Wong / August 24, 2022 10:10
Nowadays, iPad has become increasingly popular for people who prefer to use a mobile device with a larger screen to finish their work, listen to music, watch movies, and more. As time goes by, more and more different data or files have been saved on the iPad, and you will find that storage almost full on iPad. Even worst, your iPad runs slower, the app crashes, the device stops responding, etc.
At this moment, you should find solutions to clear iPad space and make your device normal as soon as possible.
Well, this post will show you the most recommended ways to manage your iPad storage and clear iPad storage for the above situations.


Guide List
- Part 1. Why is My iPad Storage Full
- Part 2. How to Free Up iPad Storage with FoneEraser for iOS
- Part 3. How to Get More Storage on iPad via AssistiveTouch
- Part 4. How to Clear iPad Storage by Deleting Unwanted Files
- Part 5. How to Clean Up iPad Storage through Uninstalling Apps
- Part 6. FAQs about iPad Storage Full
Part 1. Why is My iPad Storage Full
Before we dive into the detailed steps, you can check the possible reasons that may cause iPad storage full.
1. You have saved too many files on your iPad.
2. Data synced from other devices via iCloud takes space on iPad.
3. Install too many apps on iPad.
4. There are many junk files on iPad.
5. Some issues make iPad says storage is full, but it isn’t.
6. Others.
No matter your situation, you can move to the following parts and learn how to manage iPad storage when it is full. We are sure that one of them will meet your satisfaction.
Part 2. How to Free Up iPad Storage with FoneEraser for iOS
The first choice we want to introduce to you is FoneEraser for iOS. It is a powerful but simple program to help you free up iPad space or erase all data from iPad device within a few clicks.
If you want more storage on the iPad but don’t want to lose data on iPad, you can try the Free up Space mode to delete data without erasing data.
FoneEraser for iOS is the best iOS data cleaner which can easily erase all contents and settings on iPhone, iPad or iPod completely and permanently.
- Clean unwanted data from iPhone, iPad or iPod touch.
- Erase data quickly with one-time overwriting, which can save you time for plenty of data files.
- It is safe and easy to use.
Step 1Download and install the program on the computer, and then it will be launched automatically.
Step 2Plug iPad into the computer, tap Allow button on iPad screen for permission.
Step 3On the computer, select Free up Space > Erase Junk Files.
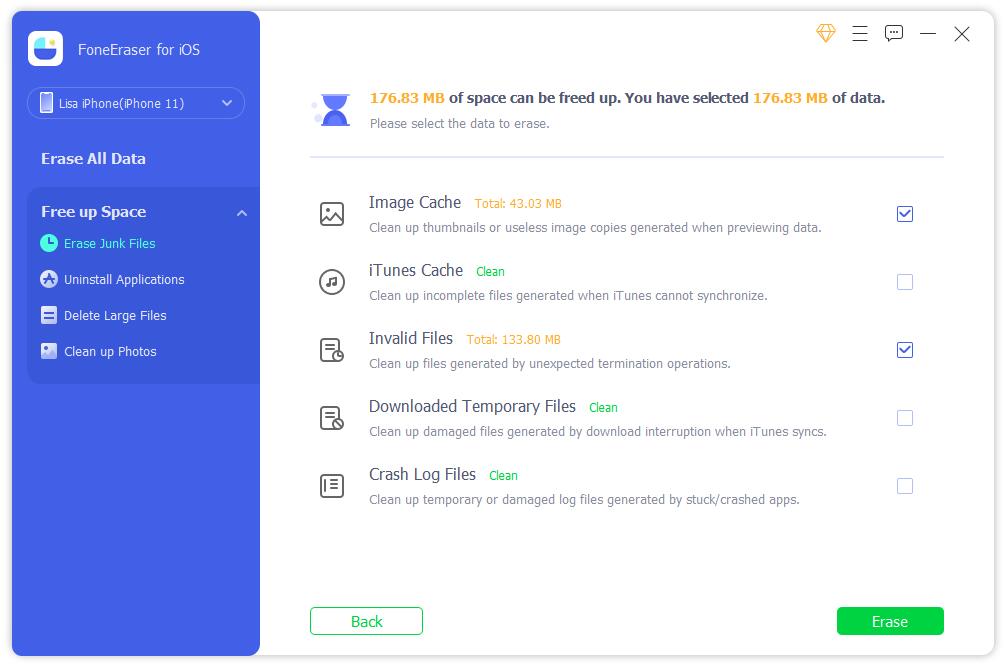
Step 4It will scan your device and show you the results after that.
Step 5Choose the items and click Erase button finally.
While you want to remove all data from iPad, the Erase All Data feature will be the perfect option for you.
It supports iPhone, iPad and iPod Touch, you can download and install it on either Windows or Mac and try it now.
FoneEraser for iOS is the best iOS data cleaner which can easily erase all contents and settings on iPhone, iPad or iPod completely and permanently.
- Clean unwanted data from iPhone, iPad or iPod touch.
- Erase data quickly with one-time overwriting, which can save you time for plenty of data files.
- It is safe and easy to use.
Step 1Select Erase All Data instead. You need to disable Find My iPad on your device.

Step 2You need to select an erasing level from Low, Middle, and High. Click Start button.
Step 3Enter 0000 button in the box and click the Start button to begin erasing your iPad.
Quite easy, right? And you can also move on to get more alternatives to clear iPad storage.
Part 3. How to Get More Storage on iPad via AssistiveTouch
If you have enabled AssistiveTouch on iPad, you should know that it is a convenient feature on iPad to help you access and do what you want quickly without additional operations. You can set it up on the Settings app freely. Moreover, you should also know that it has a hidden feature to clear iPad RAM and free up storage. You can do it by following the tutorials.
Step 1Enable AssistiveTouch through Settings > Accessibility > Touch > AssistiveTouch. Or simply ask Siri to turn on this feature directly.
Step 2Then go to Settings > General > Shut Down to turn it off. But don’t touch the slider.
Step 3Tap AssistiveTouch when you see the slider, and select the Home button.
Commonly, AssistiveTouch will clear a small part of the files from iPad. If you want to remove other files, you can try to do that manually.
Part 4. How to Clear iPad Storage by Deleting Unwanted Files
After checking your iPad storage through the Settings app, you can delete the large files manually if you find they take too much space on your device. For example, if you have countless photos and videos on your iPad, you can open the Photos or Videos app, choose them and tap the Delete button to remove them from the device.
Similarly, if you want to remove download songs, MVs, etc., you can open the related apps and delete them accordingly.
FoneEraser for iOS is the best iOS data cleaner which can easily erase all contents and settings on iPhone, iPad or iPod completely and permanently.
- Clean unwanted data from iPhone, iPad or iPod touch.
- Erase data quickly with one-time overwriting, which can save you time for plenty of data files.
- It is safe and easy to use.
Part 5. How to Clean Up iPad Storage through Uninstalling Apps
The final recommendation is to uninstall apps from your iPad. You can remove unused apps directly, releasing much space on iPad. Alternatively, you can also reinstall it on iPad, because this process will delete the cache and junk files from the device as well.
Here are the 3 methods to uninstall apps from iPad.
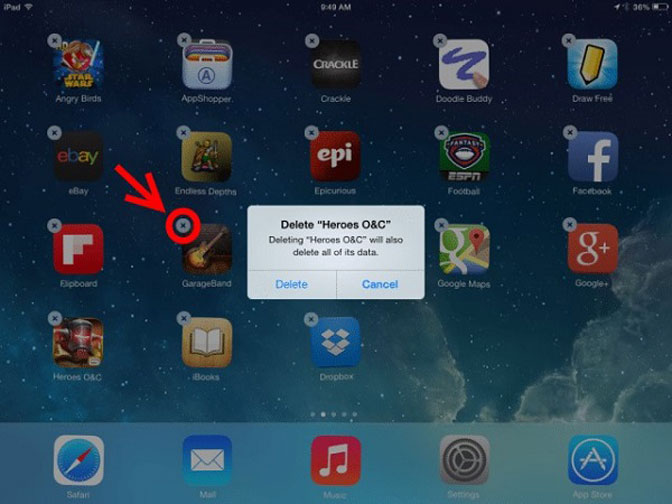
Option 1. Hold the app icon on the home screen until it jiggles, then you can tap the x delete icon to uninstall it from the iPad.
Option 2. Press the app icon on the home screen until a window pops up, select the Remove App button.
Option 3. Go to Settings app > General > iPad Storage. Find the app you want to uninstall, and select Uninstall App button.
If you encountered that iPad storage full after deleting apps, you should try FoneEraser for iOS on the computer to manage iPad storage when it is full. You can choose different modes to clear iPhone space.
Part 6. FAQs about iPad Storage Full
1. Why iPad storage full when it's not?
Your iPad storage is full, but not because something is wrong to cause your device to be abnormal. You can try to restart the iPad, reset the iPad or use FoneEraser for iOS to free up space or erase all data on the iPad to fix issues.
2. How much storage is sufficient for iPad?
If you don't need to install many apps or save a lot of files on iPad, you don't need large storage, 64GB or 128GB will be fine. But you will need 256GB, 512GB even more if you have to install tons of apps or save files on iPad.
3. Can you put more storage on an iPad?
Unfortunately Not. You can't put more storage on the iPad, you are not allowed to do this.
4. Why is my storage full if I have iCloud?
Because iCloud has a limited 5GB free storage only. If you want to save more data, you have to upgrade your storage plan accordingly.
FoneEraser for iOS is the best iOS data cleaner which can easily erase all contents and settings on iPhone, iPad or iPod completely and permanently.
- Clean unwanted data from iPhone, iPad or iPod touch.
- Erase data quickly with one-time overwriting, which can save you time for plenty of data files.
- It is safe and easy to use.
That's all about how to free up iPad storage when it is almost full, even if it is not. However, you can simply check the above methods in this post and solve your problems quickly. What's more, FoneEraser for iOS is highly recommended to you. You can download and install it on the computer, then begin to enjoy its benefits now!