Recover the lost/deleted data from computer, hard drive, flash drive, memory card, digital camera and more.
Best Methods to Recover Deleted Files with Mac Terminal
 Updated by Somei Liam / Dec 07, 2022 09:00
Have you experienced losing data on Mac? If you are a long-time Mac user, you surely know it has several ways to recover your data. Once you accidentally delete a file, especially if it was only recently, you have nothing to worry about. Mac provides you with a Trash where you can retrieve your files anytime. You could also use iCloud to restore your data if you have backup files. Another is the Time Machine, which we will further discuss later on. These Mac features are the most common methods to recover files on Mac. But note that there is one more you need to know-the Terminal.
Mac Terminal is a CLI or Command Line Interface that runs on macOS. Its interface and design are similar to the Command Prompt on Windows. You can do many things through it, such as install programs, access files, gather information, delete and restore files, and more. All these only by using commands. The main purpose of the Terminal is to let you operate your Mac system and data through the use of various commands in one place. Hence, if you want to delete multiple files at once, there is an appropriate command for that. Likewise, there is also one for restoring them.
This article will help you gain knowledge to recover deleted files with Mac Terminal. A step-by-step process will be provided for your convenience. But using Terminal might require a little bit of advanced knowledge, so we understand if you prefer to try other simpler methods. Therefore, we also included 2 proven and easier methods to give you more options. Read further below and decide which way is best for you.


Guide List
Part 1. Recover Deleted Files on Mac with Terminal
As mentioned above, it is better if you have knowledge of using a command-line interface. Basically, it is a text-based user interface where you type the commands to run or manage almost anything on your Mac. It is an effective way of recovering data once you grasp how to use it. However, it might take time before a beginner fully understands every aspect. If this is not the type of method you want to use, you may move on to the following part.
Comply with the following instructions below to recover deleted files on Mac with Terminal:
Step 1Go to the Applications folder on your Mac computer. Choose the Utility folder, then open the Terminal to run the program.
Step 2Type the command cd. Trash and press Return on the keyboard. Following that, type mv [name of the deleted file] ../. Then press the Return key again.
Step 3Once done, enter Quit to close the Terminal window. You can now type the name of the deleted file on Finder to see if it was successfully restored.
Part 2. Recover Deleted Files on Mac without Terminal
If you are here only to recover files and have no intention of learning the Terminal’s complex process, maybe you prefer a faster and easier method. Here are 2 of the best ways to recover your files without using the Terminal.
Method 1. FoneLab Mac Data Retriever
The first one is the FoneLab Mac Data Retriever. This program has one of the most user-friendly interfaces regarding recovery tools. It doesn’t matter if it is your first time using it. You can efficiently run the program by simply looking at its straightforward features. And unlike other recovery tools, this program is known for its additional functions, including the Preview, Filter and more. In many cases, you need to recover all your deleted data even if you don’t need them anymore to see them. But this Mac data recovery allows you to preview your files before recovering them. Thus you can save a great amount of time and storage.
FoneLab Data Retriever - recover the lost/deleted data from computer, hard drive, flash drive, memory card, digital camera and more.
- Recover photos, videos, documents and more data with ease.
- Preview data before recovery.
Comply with the following instructions below to recover deleted files on Mac without Terminal using FoneLab Mac Data Retriever:
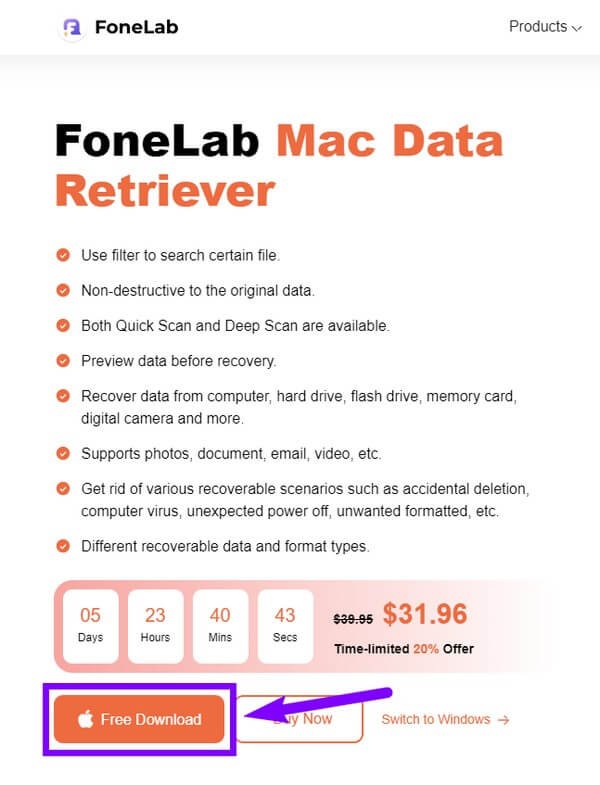
Step 1Head to FoneLab Mac Data Retriever’s official website. Download the file by clicking the Free Download tab with the Apple logo. Once the download is complete, move it to the Applications folder on your Mac. Then you can finally launch and run it.
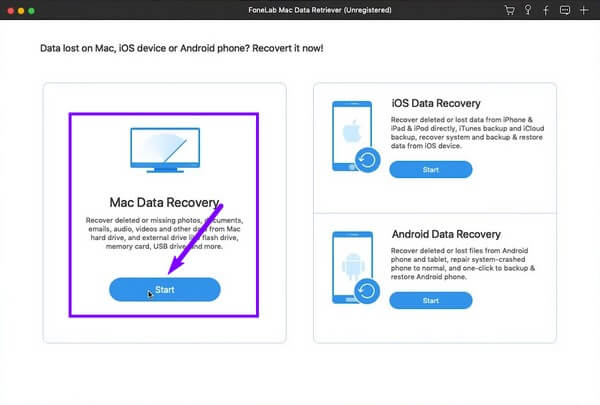
Step 2Click the Start button on the left of the main interface. It is the one below the Mac Data Recovery function to recover missing or deleted files on your Mac. Each feature has its own button, and you may use it anytime you need it.
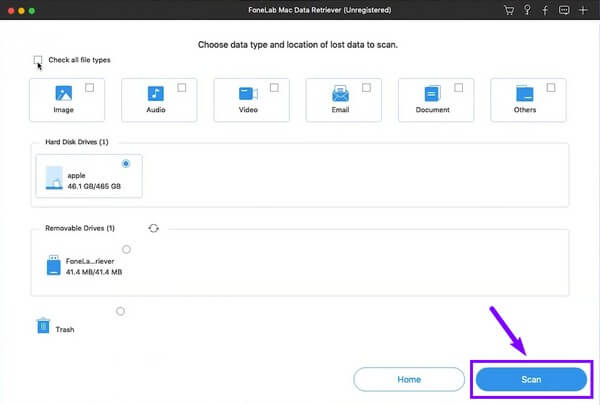
Step 3The available data types will be displayed on the following interface. Check the ones you want to recover, such as images, documents, audio, emails, videos, and others. Afterward, select the location of your missing files on the hard disk drives section. Then click the Scan tab to move on.
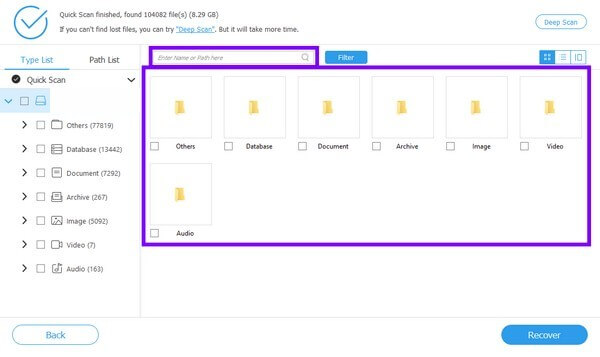
Step 4Open the folders of the data types to find the files you need. If you have too many files, it will be easier to find them using the program’s additional functions. An example is the search bar. It is advantageous when trying to find a specific file, as you only need to type its name to locate it.
Step 5Finally, select every deleted or lost file you want to restore. Then hit the Restore button afterward to retrieve your data.

Method 2. Time Machine
Installing a third-party tool may not be included in your options. If that’s the case, you can try using one of Mac’s built-in features, Time Machine. It allows you to restore your files, including photos, music, notes, apps, documents, and more, from the backup. It is a good option for recovery, as it automatically backs up your data. However, the risk of losing your backups never leaves, as they can easily disappear once an issue happens in your Mac system. Hence, the third-party tool mentioned above is the recommended method in this situation.
Comply with the following instructions below to recover deleted files on Mac without Terminal using Time Machine:
Step 1Launch the Time Machine by clicking its icon on the menu bar of your Mac desktop. Select Browse Time Machine backups from the options.
Step 2Select the items you want to restore, such as files, folders, disks, etc. After that, click Restore to bring the files back to your Mac.
FoneLab Data Retriever - recover the lost/deleted data from computer, hard drive, flash drive, memory card, digital camera and more.
- Recover photos, videos, documents and more data with ease.
- Preview data before recovery.
Part 3. FAQs about Recovering Deleted Files on Mac with and without Terminal
1. How can I recover files from Trash?
Open your Trash folder from the Dock. You only need to select the data you want to recover, right-click, then select Put Back. They will automatically go back to their original folders.
2. Is using the Terminal on Mac safe?
The Terminal on Mac itself is a safe program. But if you are inexperienced and try to use it, that's when it becomes dangerous. Make sure you familiarize yourself first with the command line before exploring it. Or else, one wrong move might cause damage to your Mac system.
3. Can FoneLab Mac Data Retriever work even without backup?
Yes, it absolutely can. FoneLab Mac Data Retriever doesn't require a backup when recovering your files. Whether you were able to save a backup or not, this program never loses its capability in data recovery. Hence, it is perfect in any recoverable scenario.
FoneLab Data Retriever - recover the lost/deleted data from computer, hard drive, flash drive, memory card, digital camera and more.
- Recover photos, videos, documents and more data with ease.
- Preview data before recovery.
Recovering files is actually easy if you pick the method perfect for your situation. But overall, the FoneLab Mac Data Retriever is the tool that fits in every recoverable scenario. Install it now.