
 iPhone Data Recovery
 iOS System Recovery
 iOS Data Backup & Restore
 iOS Unlocker
 iPhone Password Manager
 Location Changer
 Android Data Recovery
 Broken Android Data Extraction
 Android Data Backup & Restore
 Android Unlocker
 FoneTrans for iOS
 iPhone Data Eraser
 iPhone Cleaner
 HEIC Converter
 HyperTrans
 WhatsApp Transfer for iOS
 Mac Sweep
 Data Retriever
 Mac Data Retriever
 Video Converter Ultimate
 Screen Recorder
 Phone Mirror
 Recover PC Data Now
Recover the lost/deleted data from computer, hard drive, flash drive, memory card, digital camera and more.
Learn Mac Safe Mode Easily with A Walkthrough Guide
 Updated by
Do you need to learn how to start Mac in Safe Mode? If your Mac is running slowly, freezing, or showing errors you don’t understand, booting into Safe Mode can help. But before that, what is it actually all about? You may have already heard about this specific mode while browsing online, from friends, or from other Mac users who have experienced issues with it.
But today, this article will help you explore Safe Mode's purpose, functions, and how to use it to resolve your Mac issues. Aside from that, other methods and information will also be covered, including the right actions to take if it doesn’t work and a recovery tool in case you experience data loss along the way. That said, start learning with the sections below.


Guide List
Part 1. What is Safe Mode?
If you want to start Mac in Safe Mode, let us first determine what it does and why it’s needed. Basically, Safe Mode is a special way to start your Mac with only the essential software it needs to run. This way, the computer will skip most startup programs, remove temporary files, and check your startup disk for problems, helping you determine whether the issue is caused by a program or by your Mac's system. If your Mac works well in Safe Mode, the problem likely comes from something you installed. On the other hand, if the issue—such as lagging or freezing—persists, it may be caused by your Mac's hardware or system files.
Part 2. Core Differentiation: Which Mac Do You Have?
Now that you have an idea of what Safe Mode is, it's time to boot your Mac into it. Just note that the method will depend on your Mac model. Use the appropriate guide below depending on whether your Mac has Apple Silicon (M-series chip) or an Intel processor.
Method 1: Apple Silicon (M1, M2, M3, M4 chips)
Newer Macs that use Apple Silicon chips, such as the M1, M2, M3, or M4, can enter Safe Mode by using the power button and the startup options screen. Unlike older models, this method presents various options first rather than booting directly into the mode. Just shut down your Mac completely, then press and hold the power button until you see “Loading startup options.” From the screen, select your startup disk, long-press Shift, then click Continue in Safe Mode.
Method 2: Intel-based Macs
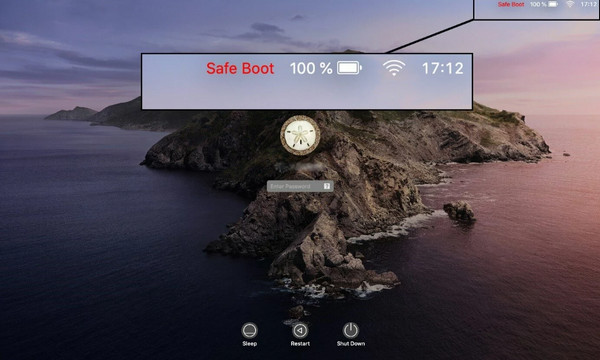
Meanwhile, this method is for older Macs that use Intel processors. It is more straightforward since you only need to turn on or restart the computer, then quickly press and hold the Shift key as soon as you see the Apple logo. From there, simply keep holding it until the login window appears. You can release it afterward to log in to your Mac. You will know you successfully booted into the mode for both methods if you see Safe Boot in the upper-right corner.
Part 3. What to Do While in Safe Mode
Once you boot Mac in Safe mode, use this time to find and fix the problem that's been delaying your work. Below are three common actions you can take while in Safe Mode.
Option 1. Isolating Software Conflicts
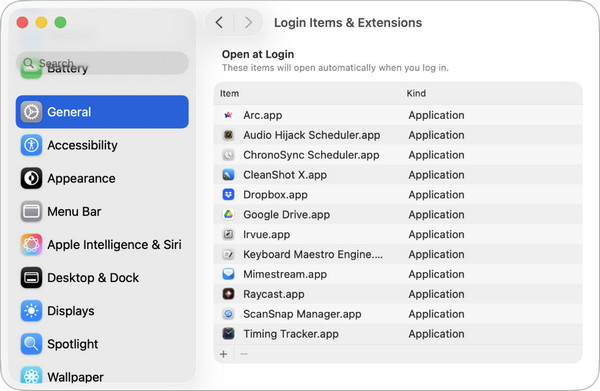
Sometimes, login items or programs that automatically open when you turn on the Mac cause the problem. But in Safe Mode, these automatic programs don’t immediately open. So, if the computer works fine, it likely means at least one of them is the problem. In this case, simply check the list of programs that start on your Mac and turn off any that may be causing the issue. You may also disable others you don't use or need.
Step 1While in Safe Mode, launch your Mac’s System Settings and select General. From there, click Login Items & Extensions to view your login items and programs.
Step 2Review the list and turn off any programs you don't need or that you suspect might be causing the problem.
Option 2. Clearing System Caches
As with other computers or devices, the system caches are part of your Mac's data, helping tasks or processes load faster. However, these can accumulate and become corrupted over time, causing the Mac to run slowly. Don’t worry, though. You can clear system data storage on Mac. In fact, simply booting into macOS Safe Mode already clears certain caches. But to clean more thoroughly, clear your other user caches in Finder..
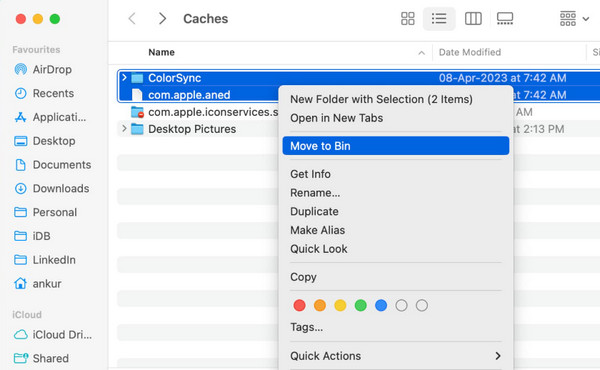
Step 1Open Finder and press Shift + Command + G to open the Go to Folder window. Next, type ~/Library/Caches and press Enter to open your user cache folder.
Step 2Simply select the files inside the folder and move them to the Trash. You should also remember to empty the Trash afterward to permanently clear them before restarting the Mac.
Option 3. Disk Utility
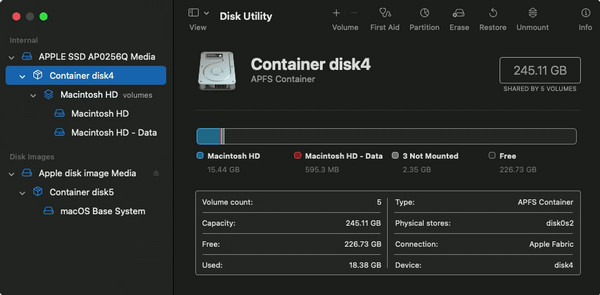
Safe Mode also lets you open Disk Utility, a built-in tool on Mac that checks for storage errors. You can run the First Aid feature to scan your startup disk for errors and repair them if possible. It is a suitable solution if your Mac’s storage is the cause of the problem.
Step 1Launch Finder to open Applications and start Disk Utility. After that, select your startup disk from the list on the left side of the window.
Step 2At the top of the window, select the First Aid button and hit Run to confirm.
Part 4. How to Recover Lost Files with FoneLab Data Retriever
Sometimes, while troubleshooting your Mac or using Safe Mode, you may accidentally lose important files, whether by deleting something by mistake or encountering a problem during the process. If that happens, don’t be too alarmed because Mac data recovery is possible.
That’s right! All you need is a reliable tool like FoneLab Data Retriever to recover deleted Mac files, regardless of how they were deleted. It is also beginner-friendly, so you can restore your photos, emails, documents, and more with ease. Besides, other drives are also supported.
FoneLab Data Retriever - recover the lost/deleted data from computer, hard drive, flash drive, memory card, digital camera and more.
- Recover photos, videos, documents and more data with ease.
- Preview data before recovery.
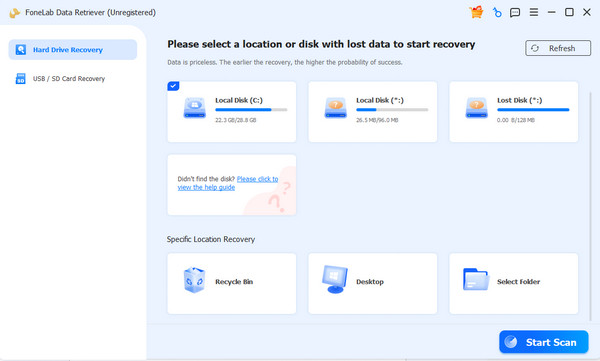
Step 1Click Free Download. You will find the FoneLab Data Retriever file in Downloads; open it to begin the installation. Let it finish, and after a few moments, you can start the program. Once you’re in the interface, click your disk drive, then Start Scan.
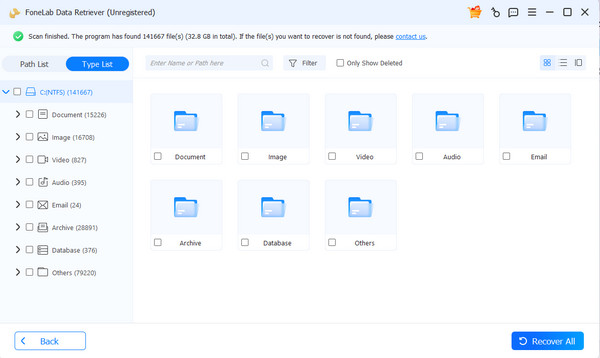
Step 2Once your deleted or lost data has been scanned, open the folders designated for each data type. Find the files you want by exploring the content, then select them, and finally select Recover All.
Part 5. FAQs about Mac Safe Mode
How do I know if my Mac is Apple Silicon or Intel?
Choose the Apple menu and click About This Mac. If you see Chip followed by M1, M2, M3, or M4, it's Apple Silicon. If you see Processor followed by an Intel name, it's Intel-based.
What if Mac Safe Mode fails?
If Safe Mode does not work, first make sure your Mac is completely shut down before trying again, as an incomplete shutdown can prevent it from loading.
With this guide, you can now enter Safe Mode on your Mac and use it to fix common problems on your own. You also don’t have to worry if data loss occurs since FoneLab Data Retriever is available at any time.


