
 iPhone Data Recovery
 iOS System Recovery
 iOS Data Backup & Restore
 iOS Unlocker
 iPhone Password Manager
 Location Changer
 Android Data Recovery
 Broken Android Data Extraction
 Android Data Backup & Restore
 Android Unlocker
 FoneTrans for iOS
 iPhone Data Eraser
 iPhone Cleaner
 HEIC Converter
 HyperTrans
 WhatsApp Transfer for iOS
 Mac Sweep
 Data Retriever
 Mac Data Retriever
 Video Converter Ultimate
 Screen Recorder
 Phone Mirror
 Get Mac Data Recovery Now
Recover the lost/deleted data from computer, hard drive, flash drive, memory card, digital camera and more.
Mac OS X Data Recovery: 4 Ways to Recover Deleted Files on Mac
 Updated by Somei Liam / October 29, 2026 09:00
Whether you are on an older OS X version or a modern macOS, losing files on a Mac is still a frustrating surprise. A deleted document, a wiped photo library, or a drive that will not mount can bring your work to a halt. The good news is that Mac data recovery is very achievable, and you often do not need to pay for a technician to do it.
This guide focuses on the practical methods that actually work: the Trash, Time Machine backups, and a dedicated recovery tool for when you have no backup. We will cover each one step by step so you can choose the route that matches your situation.

Guide List
Part 1. Why You Lose Data on Mac OS X
Macs are reliable, but data loss still happens. Knowing the cause tells you which recovery method to reach for first.
- Accidental deletion. You dragged the wrong folder to the Trash and then emptied it.
- Emptied Trash. The automatic 30-day cleanup or a manual empty removed the files.
- Drive corruption. An external drive or partition will not mount after a bad ejection.
- macOS update. A major upgrade or reinstall can sometimes wipe user files.
- rm in Terminal. Command-line deletions skip the Trash entirely.
When files disappear, stop writing to the drive. New downloads, app installs, and even the system cache can overwrite the deleted data. Save new work to an external drive and leave the Mac as idle as possible until you recover. On APFS drives, local snapshots sometimes keep recent versions around, so acting quickly matters.
Before you assume the worst, do a quick sanity check in Finder. Click the Recents smart folder in the Finder sidebar to see recently touched files, and use the search bar to type part of the filename. It is surprisingly common for a file to be "missing" simply because it was saved into a folder you do not normally open. Also check whether the drive in question is an external disk that has simply unmounted: open Disk Utility and see if it appears there, because a drive that will not mount is a different problem than deleted files, and it is often fixable without recovery software.
One Mac-specific advantage to check first: macOS keeps local snapshots on APFS before system updates. If you lost files right after a macOS upgrade, open the folder where the files used to live, choose File > Revert To > Browse All Versions, and you may be able to roll the folder back to a version from before the update for free. If that option is greyed out, you have no Time Machine backup, and Finder search turns up nothing, then the dedicated scan in Part 4 is your remaining option. The key is to work through these free checks in order rather than paying for software first.
FoneLab Data Retriever - recover the lost/deleted data from computer, hard drive, flash drive, memory card, digital camera and more.
- Recover photos, videos, documents and more data with ease.
- Preview data before recovery.
Part 2. Method 1: Restore from Trash
The fastest recovery is also the easiest. If you have not emptied the Trash yet, the files are sitting right there.

Step 1 Click the Trash icon in the Dock to open it in Finder.
Step 2 Search by filename, or sort by date to find the missing files.
Step 3 Right-click the selected items and choose Put Back to restore them to their original folders.
If the Trash is already empty, check the Recently Deleted album in the Photos app and the Recently Deleted section of the Files app. Both keep deleted items for about 30 days, which can save your photos even when the Trash is cleared. Also look inside any app you created the files in: Pages, Keynote, Numbers, and Notes each keep their own recent-deleted history under the File menu, and Mail downloads can reappear if you re-sync the mailbox. People sometimes spend hours scanning the whole disk for a document that was sitting in an app's own trash the whole time, so clear these app-level spots out before you assume the file is truly gone.
Part 3. Method 2: Recover with Time Machine
If you use Time Machine, recovering deleted Mac files is free and reliable. It keeps hourly, daily, and weekly backups so you can roll back to before the deletion.

Step 1 Connect your Time Machine backup drive.
Step 2 Open the folder where the deleted files lived in Finder.
Step 3 Click the Time Machine menu bar icon and choose Enter Time Machine.
Step 4 Travel back along the timeline, select the files, and click Restore.
Time Machine is the best method when it is available, because the restored files are intact. If you never set it up, or the backup drive is not available, move on to the recovery tool below. One thing worth trying even without a Time Machine drive: APFS keeps local snapshots before major macOS updates. Open the folder the files used to be in, choose File > Revert To > Browse All Versions, and a timeline of saved versions may appear. If the files vanished right after a system upgrade, this is often the free undo you are looking for.
Part 4. Method 3: Recover with FoneLab Data Retriever
When the Trash is empty and you have no Time Machine backup, a dedicated tool scans the Mac drive and rebuilds the missing files. FoneLab Data Retriever recovers documents, photos, videos, and archives from the internal drive, external disks, and connected devices, and it runs on macOS.
FoneLab Data Retriever - recover the lost/deleted data from computer, hard drive, flash drive, memory card, digital camera and more.
- Recover photos, videos, documents and more data with ease.
- Preview data before recovery.
Step 1 Install and launch FoneLab Data Retriever, installing it on a different drive than the one you are recovering from.
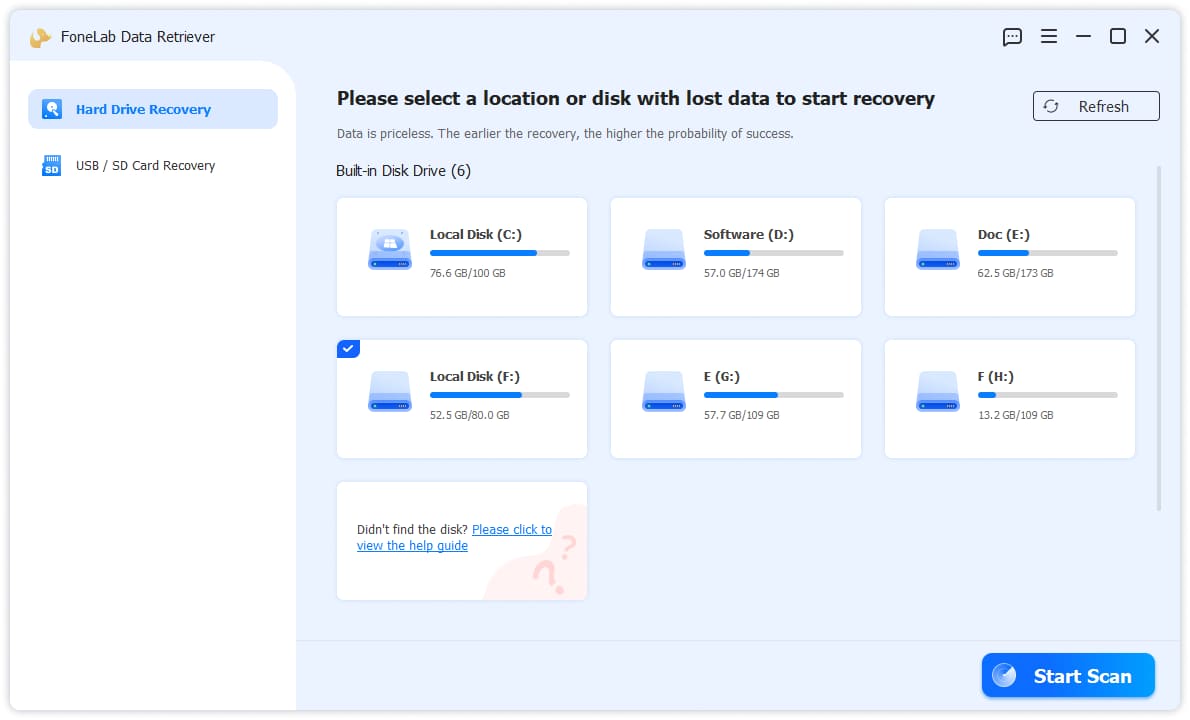
Step 2 On the left side, keep Hard Drive Recovery selected, then choose the disk or specific location where your files were lost.
Step 3 Click the blue Start Scan button in the bottom-right corner to scan the selected disk. The software will automatically run a deep scan to search for every recoverable file on the disk, so there is no separate button to press.
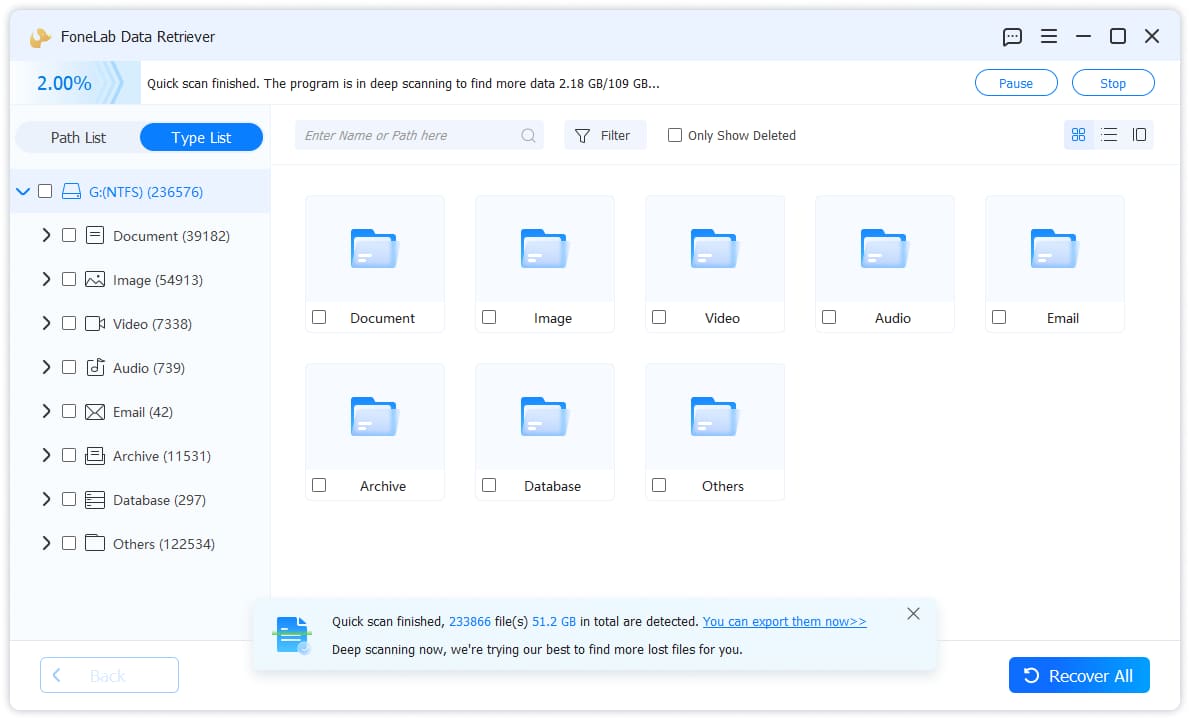
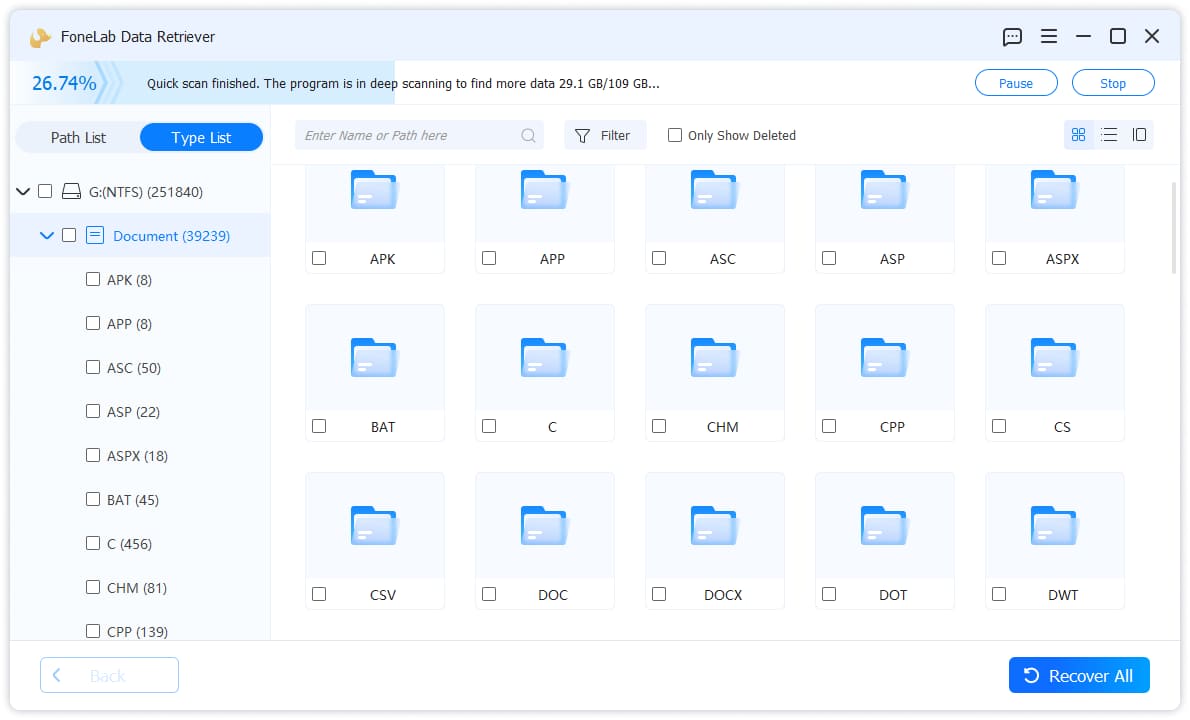
Step 4 When the scan finishes, click a file type on the left and tick the boxes of the files you want. Use the filter or only show deleted option to locate them faster, and preview each file to confirm it opens.
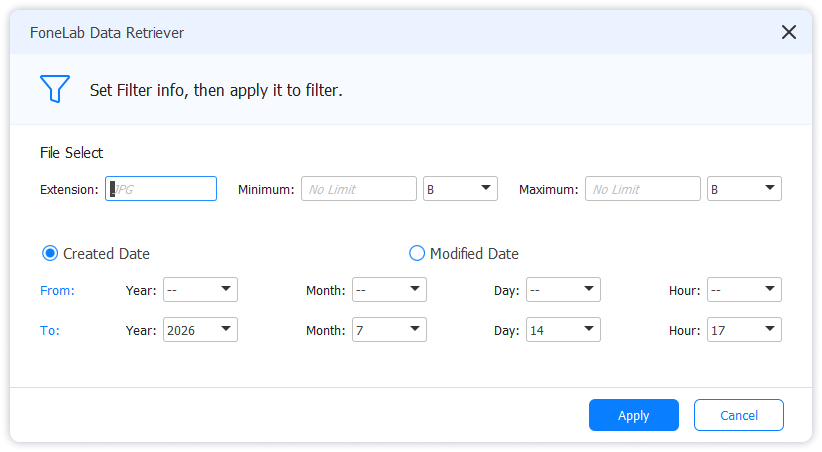
Step 5 Click the blue Recover button in the bottom-right corner and save the recovered files to a different drive.
Honest limits: this recovers files that existed on the drive. It cannot bring back data that was never saved, and a physically dead drive may need professional repair. For most accidental deletions on a healthy Mac, it works well.
Because macOS protects the system drive, the first scan may ask for permission. Open System Settings > Privacy & Security > Full Disk Access and enable the recovery app, then restart it so it can read the whole volume. Once the scan starts, leave the Mac plugged in and awake. The quick scan is fast, but the deep scan on a full startup disk can take a while. In the results, the path view mirrors your original folders, while the type view groups every document, photo, and movie together. Preview each file to confirm it is intact, then recover the whole folders rather than cherry-picking files one by one, so your directory structure comes back with them.
| Trash Put Back | Time Machine | FoneLab Data Retriever | |
|---|---|---|---|
| Best for | Trash not emptied | Backup was on | Trash emptied, no backup |
| Needs backup | No | Yes | No |
| Recovers after update/format | No | If backed up | Yes (automatic deep scan) |
| Cost | Free | Free | Free trial, paid license |
Which method should you try first? Work through the free options in order: check the Recycle Bin or Trash and any backup, because restoring from a working backup is instant and risk-free. Reach for FoneLab Data Retriever when those come up empty, or when the drive was formatted, corrupted, or reinstalled. The comparison table above makes the trade-offs clear: backups are the safest option but require foresight, while the recovery tool works without a backup but cannot repair a physically failing drive.
If your recovery still fails, do not panic and do not keep writing to the disk. First confirm the drive is still readable in Disk Management on Windows or Disk Utility on Mac. If the drive is not detected at all, try a different cable, a different USB port, or plugging it into another computer. If files are found but will not open, they were likely partially overwritten, and a professional data recovery lab that works at the sector level may be your last resort. The earlier you stop using the disk, the more likely a normal software recovery succeeds.
One detail people underestimate is timing. Deleted files are not erased immediately; the operating system simply marks their space as free. That space is reused gradually as you keep working, so a file you deleted yesterday may still be fully recoverable, while one you deleted weeks ago on a busy drive may already be partly overwritten. This is why a deep scan is worth running even when the quick scan looks empty, and why saving new files to a different drive during the process matters.
When you preview recovered files, pay attention to size and whether they actually open. A document that previews correctly and opens in its original app is good. A file that previews as garbage or reports zero bytes means its clusters were already reused. Recover in batches and verify your most important files first, so if the scan is interrupted you have already secured what matters most.
On file types, the recovery tool covers far more than documents. It restores photos in JPG, PNG, and RAW camera formats, videos in MP4 and MOV, compressed archives in ZIP and RAR, spreadsheets, and even email databases. If you are scanning a drive after a reinstall or a reset, run the deep scan and let it finish, because it rebuilds the file names and folder structure that the quick scan skips. Save recovered data to an external drive rather than the internal disk, and double-check that every file you needed actually opens before you reformat or reuse the original drive.
FoneLab Data Retriever - recover the lost/deleted data from computer, hard drive, flash drive, memory card, digital camera and more.
- Recover photos, videos, documents and more data with ease.
- Preview data before recovery.
Part 5. Keep Mac Data Safe
- Turn on Time Machine with an external drive.
- Do not empty the Trash blindly. Glance inside first.
- Use iCloud Drive for your most important documents.
- Avoid Terminal rm commands on files you care about.
- Back up recovered files immediately once they are restored.
The most reliable protection on a Mac is simply leaving Time Machine turned on with a drive that stays plugged in a few times a month. With it running, an emptied Trash, an accidental delete, or a botched macOS update is a few clicks away from being undone, and you never have to cross your fingers during a major system upgrade. Beyond that, keep your most important documents in iCloud Drive so a dead Mac still leaves you a copy, and resist the habit of deleting files from the Downloads folder on a whim without checking what is inside. After a recovery session, open the recovered folders to confirm the files actually open before you erase the original drive.
Part 6. Frequently Asked Questions
Can I recover deleted files on Mac without any software?
Yes. Check the Trash and Put Back, and restore from Time Machine if you used it. Cloud services like iCloud and the Recently Deleted folders also restore files without any extra tool.
Where do deleted Mac files go if they don't go to the Trash?
Files deleted in Terminal or by some apps are marked as free on the drive rather than moved to Trash. They can still be found with a deep scan, and iCloud files may sit in the Recently Deleted folder.
Does this work on the latest macOS versions?
Yes. The recovery tool supports recent macOS releases and APFS drives. On Apple Silicon Macs you may need to allow the app full disk access in System Settings > Privacy & Security.
How long does a Mac data recovery take?
A quick scan takes a few minutes. A deep scan on a busy startup drive can take 15 minutes to over an hour. Saving the recovered files is fast once the scan is done.
Mac data loss is worrying, but the Trash, Time Machine, and a recovery tool give you solid options. Start with the free methods, then let FoneLab Data Retriever deep-scan the drive if those fail. For more, see recovering Mac data after a factory reset.
FoneLab Data Retriever - recover the lost/deleted data from computer, hard drive, flash drive, memory card, digital camera and more.
- Recover photos, videos, documents and more data with ease.
- Preview data before recovery.