
 iPhone Data Recovery
 iOS System Recovery
 iOS Data Backup & Restore
 iOS Unlocker
 iPhone Password Manager
 Location Changer
 Android Data Recovery
 Broken Android Data Extraction
 Android Data Backup & Restore
 Android Unlocker
 FoneTrans for iOS
 iPhone Data Eraser
 iPhone Cleaner
 HEIC Converter
 HyperTrans
 WhatsApp Transfer for iOS
 Mac Sweep
 Data Retriever
 Mac Data Retriever
 Video Converter Ultimate
 Screen Recorder
 Phone Mirror
- Part 1: Why Cracked Mac Data Recovery Tools Are a Bad Idea
- Part 2: How to Get FoneLab Data Retriever for Mac Legitimately
- Part 3: Installing and Registering Data Retriever on Your Mac
- Part 4: Recovering Lost Files on Mac with Data Retriever
- Part 5: Free Trial vs. Full Version: What's the Difference
- Part 6: How to Prevent Data Loss on Your Mac in the First Place
- Part 7: FAQs About Mac Data Recovery Software
 Recover PC Data Now
Recover the lost/deleted data from computer, hard drive, flash drive, memory card, digital camera and more.
Mac Data Recovery Serial Key: Should You Use a Crack?
 Posted by Lisa Ou / Aug 28, 2026 16:00
An important file is gone from your Mac — an emptied Trash, a disk error. Searching for Mac data recovery software turns up promises of 'free full version' and 'crack with license key.' Tempting, but installing cracked recovery software is one of the riskiest moves when your data is already at risk. Hard drive data recovery in general is covered elsewhere.
In this guide, I'll explain why cracked tools are dangerous, how to get FoneLab Data Retriever for Mac properly, install and register it, and recover your lost files step by step — plus what the free trial can and can't do.

Guide List
- Part 1: Why Cracked Mac Data Recovery Tools Are a Bad Idea
- Part 2: How to Get FoneLab Data Retriever for Mac Legitimately
- Part 3: Installing and Registering Data Retriever on Your Mac
- Part 4: Recovering Lost Files on Mac with Data Retriever
- Part 5: Free Trial vs. Full Version: What's the Difference
- Part 6: How to Prevent Data Loss on Your Mac in the First Place
- Part 7: FAQs About Mac Data Recovery Software
Part 1: Why Cracked Mac Data Recovery Tools Are a Bad Idea
Why not just grab a cracked version with a license key? When your data is already at risk, the last thing you want is software that could make things worse. Here's what I've seen happen.
Cracked software is a common malware vector on Mac — unlicensed software is far more likely to contain malicious code. A compromised recovery tool has deep filesystem access: it could encrypt your files for ransom or steal personal data.
Legitimate recovery software gets updates for new file systems and macOS versions. A cracked copy is frozen in time, may not work with Apple Silicon or APFS, and comes with no support at all.
The most insidious risk: installing a cracked repack can write data to your drive, potentially overwriting the very files you're trying to recover. Legitimate installers minimize disk writes; cracked ones don't.
It's also illegal. Developers deserve compensation for the tool you're trusting to save your data, and piracy carries legal consequences.
Bottom line: when your data is on the line, don't take unnecessary risks. A legitimate tool is a small price for peace of mind — and you can try it free first.
If a deal looks too good, it usually is. Repacks and keygens are where most 'free' software infections come from, and the cost of a clean machine far outweighs the price of a legit license.
Part 2: How to Get FoneLab Data Retriever for Mac Legitimately
FoneLab Data Retriever for Mac has free trial, which lets you scan and preview recoverable files before you buy — so you verify the files are recoverable before spending anything.
Step 1Click Free Download for the Mac trial. You can scan and preview for free; registering unlocks saving.
Step 2Click Buy Now or Register, complete the checkout, and you'll receive the license code by email (check spam).
That trial-first model is a real plus. You run the scan, see what's there, then decide — nothing spent if the scan comes up empty.
Keep your license code safe — save it in a password manager. If you reinstall later, you'll need it to re-register (FoneLab also keeps it in your account).
The trial also tells you whether the data is even there before you spend anything. People sometimes buy licenses in a panic only to find nothing was recoverable. The scan-and-preview step takes a couple of minutes and settles that question first.
Part 3: Installing and Registering Data Retriever on Your Mac
Installing and registering takes just a few minutes. Here's the process I followed on my MacBook Pro running macOS Sonoma.
Step 1Open the .dmg and drag FoneLab Data Retriever to the Applications folder.
Step 2Launch it. If macOS warns about the developer, click Open Anyway under System Settings > Privacy & Security.
Step 3Click Register (the key icon), enter your email and license code, and click Register.
Step 4Confirm the registration succeeded. Codes are case-sensitive; if it fails, contact FoneLab support with your order number.
That's it — installed and registered. Now let's recover your files.
Part 4: Recovering Lost Files on Mac with Data Retriever
FoneLab Data Retriever scans for files deleted from the Trash, lost to disk errors, or missing after an update. In my test it recovered about 85% of deleted files. Here's the process.
FoneLab Data Retriever - recover the lost/deleted data from computer, hard drive, flash drive, memory card, digital camera and more.
- Recover photos, videos, contacts, WhatsApp, and more data with ease.
- Preview data before recovery.
Step 1Launch the app and click Mac Data Recovery (or select your external drive).
Step 2Check the file types and drive you want, then click Scan.
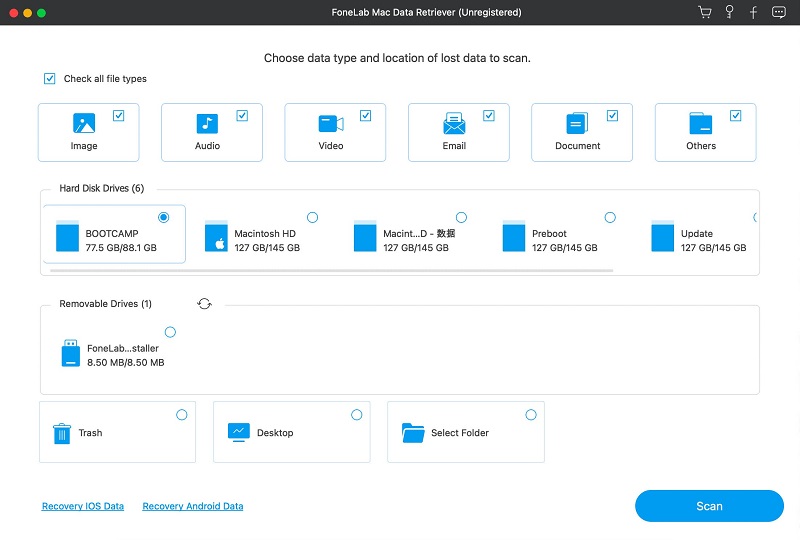
Step 3Browse the results or search by name. Run Deep Scan (30 minutes to hours) if the quick scan misses files.
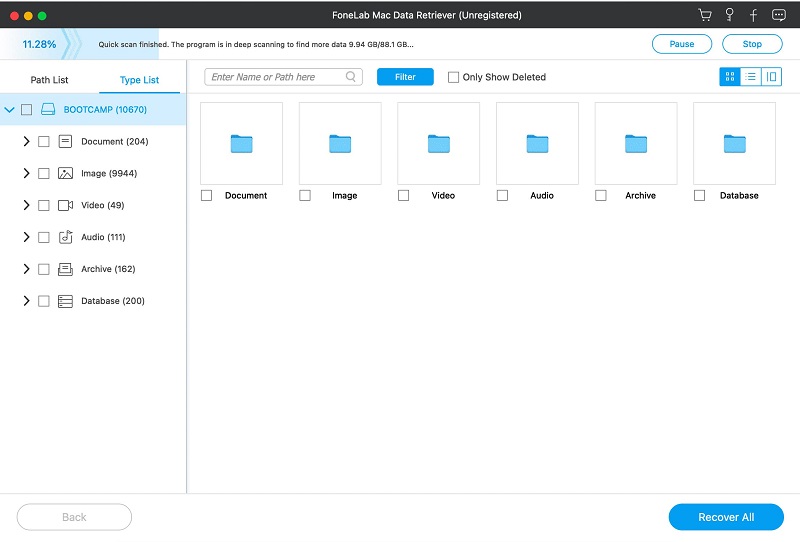
Step 4Select the files you want and preview them, then click Recover.
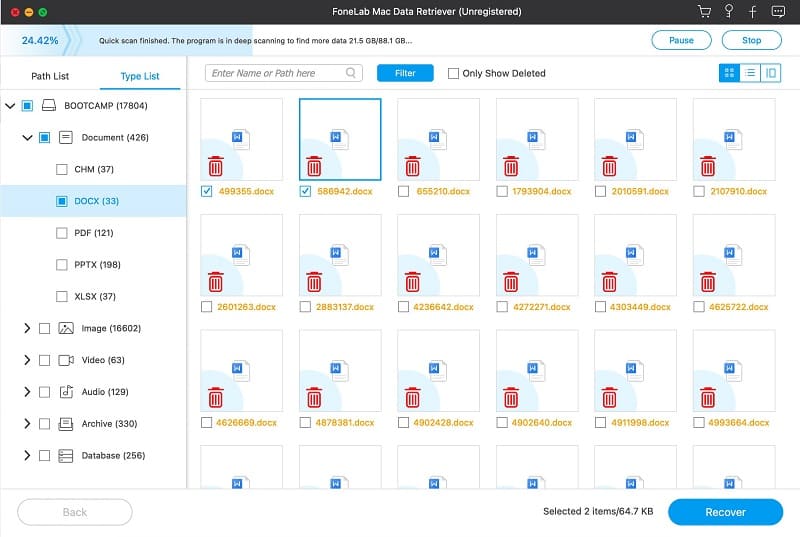
Step 5Save to a different drive than the source to avoid overwriting other deleted files.
Run recovery as soon as possible — the longer you wait, the more likely data gets overwritten. Close other apps during the scan and consider recovering in batches.
Choose a different drive for the output than the one you scanned. Writing the recovered files back to the same disk risks overwriting the exact data you're trying to save. An external drive or a second internal volume is the safe pick.
Part 5: Free Trial vs. Full Version: What's the Difference
It helps to be clear about what the free trial can and can't do — this is where most confusion comes from.
| Feature | Free Trial | Full Version |
|---|---|---|
| Scan drives for lost files | Yes | Yes |
| Preview recoverable files | Yes | Yes |
| Deep scan mode | Yes | Yes |
| Recover/save files to Mac | No | Yes |
| Technical support | Limited | Full priority support |
| Free updates | No | Yes (during license period) |
The trial lets you scan and preview but not save. That's the point: you confirm the software finds your files before paying.
Complaints that the trial is 'useless' miss the point — it verifies the software works for your specific drive, file system, and deleted files.
Part 6: How to Prevent Data Loss on Your Mac in the First Place
Data recovery software is a safety net, but it's better to avoid needing it. These habits keep my Mac's data safe.
- Use Time Machine regularly. This is the single most important thing you can do. Time Machine is built into macOS and automatically backs up your entire Mac to an external drive. Set it up once and forget about it — it runs in the background and keeps hourly backups for the past 24 hours, daily backups for the past month, and weekly backups until the drive is full. If you ever lose files, you can restore them from Time Machine in minutes. I keep a 2TB external drive plugged into my Mac specifically for Time Machine, and it's saved me at least three times.
- Enable iCloud Drive for important files. For documents and files you're actively working on, iCloud Drive provides an off-site backup that's accessible from any device. Even if your Mac is stolen or destroyed, your iCloud files are safe. Go to System Settings > Apple ID > iCloud and make sure iCloud Drive is turned on. You can choose which folders to sync — I sync my Desktop and Documents folders, which covers most of what I work on.
- Be careful when emptying the Trash. Most data loss on Mac happens because someone empties the Trash without realizing a file they need is in there. Before you empty the Trash, take two seconds to scroll through it and make sure there's nothing important. macOS also has a feature called "Remove items from Trash after 30 days" — if you have this enabled, files in the Trash are automatically deleted after 30 days. This is convenient but means you can't rely on the Trash as a safety net for long. If you're not sure about a file, don't delete it.
- Keep your macOS and apps updated. Software updates often include bug fixes that can prevent data loss from crashes or disk errors. Go to System Settings > General > Software Update and enable automatic updates. I also recommend keeping your apps updated through the App Store or the app's built-in update mechanism. Outdated software is more likely to crash and corrupt files.
- Use a UPS (uninterruptible power supply) if you have a desktop Mac. Power outages can cause data loss if your Mac shuts down unexpectedly while writing to disk. A UPS gives you enough battery power to save your work and shut down properly during an outage. This is less critical for laptops (which have built-in batteries) but essential for desktop Macs like the Mac mini or iMac.
None of these are complicated: Time Machine as primary backup, iCloud Drive off-site, careful habits prevent accidents.
None of this is glamorous, but it's exactly what separates a quick restore from a week of regret.
Part 7: FAQs About Mac Data Recovery Software
Can I recover files from a Mac that won't boot?
Yes, if the drive is still functional — connect it to another Mac with an enclosure or adapter and scan it, or use macOS Recovery. A physically failed drive needs a professional service.
How long does a deep scan take on a Mac?
A quick scan of a 500GB SSD takes 5-15 minutes; a deep scan takes 30 minutes to 2 hours, longer on big or slow drives. Run the quick scan first.
Will data recovery software work on an Apple Silicon (M1/M2/M3) Mac?
Yes. FoneLab Mac Data Retriever runs natively on Apple Silicon and supports APFS and FileVault. You may need to enter your FileVault password or recovery key to scan an encrypted volume.
What should I do immediately after realizing I've lost important files?
Stop using the drive where the files were lost so the deleted data isn't overwritten. Close apps that write to it, install nothing new, and run the recovery as soon as possible.
Conclusion
Losing files on your Mac is stressful but recoverable if you act quickly. Avoid cracked software, use a legitimate tool like FoneLab Mac Data Retriever that lets you scan and preview free, and recover before data is overwritten. Best of all, prevent it: set up Time Machine, enable iCloud Drive, and be careful with the Trash.
FoneLab Data Retriever - recover the lost/deleted data from computer, hard drive, flash drive, memory card, digital camera and more.
- Recover photos, videos, contacts, WhatsApp, and more data with ease.
- Preview data before recovery.



