iPhone Data Recovery
 iOS System Recovery
 iOS Data Backup & Restore
 iOS Unlocker
 iPhone Password Manager
 Location Changer
 Android Data Recovery
 Broken Android Data Extraction
 Android Data Backup & Restore
 Android Unlocker
 FoneTrans for iOS
 iPhone Data Eraser
 iPhone Cleaner
 HEIC Converter
 HyperTrans
 WhatsApp Transfer for iOS
 Mac Sweep
 Data Retriever
 Mac Data Retriever
 Video Converter Ultimate
 Screen Recorder
 Phone Mirror
- Part 1. Understand How Google Photos Deletion Works
- Part 2. How to Empty Trash in Google Photos on a Computer
- Part 3. How to Empty Trash in Google Photos on a Mobile Device
- Part 4. Google Photos Auto-Delete (The 60-Day Rule)
- Part 5. How to Recover Permanently Deleted Google Photos with FoneLab Data Retriever
- Part 6. What Happens When You Delete from a Shared Album
- Part 7. FAQs about How to Empty Trash in Google Photos
 Recover PC Data Now
Recover the lost/deleted data from computer, hard drive, flash drive, memory card, digital camera and more.
The Complete Guide on How to Empty Trash in Google Photos
 Updated by
 Greetings! Can anybody help me with the Empty Trash Google Photos process? My account storage is nearly full, and I have already deleted everything I no longer need. However, they remained in the Trash, having no effect in my storage cleanup. So, I need someone who is knowledgeable enough to guide me in emptying my Google Photos Trash. Thanks in advance!
Emptying the Trash section in Google Photos is a crucial step for actually freeing up storage space. As mentioned above, simply deleting photos is not enough, they continue to occupy your account storage until they are permanently removed. This article provides the proper techniques for emptying your Google Photos Trash, whether you're using a computer or a mobile device. Both information and steps are included, so continue browsing to proceed.

Guide List
- Part 1. Understand How Google Photos Deletion Works
- Part 2. How to Empty Trash in Google Photos on a Computer
- Part 3. How to Empty Trash in Google Photos on a Mobile Device
- Part 4. Google Photos Auto-Delete (The 60-Day Rule)
- Part 5. How to Recover Permanently Deleted Google Photos with FoneLab Data Retriever
- Part 6. What Happens When You Delete from a Shared Album
- Part 7. FAQs about How to Empty Trash in Google Photos
Part 1. Understand How Google Photos Deletion Works
Before anything else, it's important to understand how Google Photos deletion works to empty Google Trash properly. First, and as you now probably know, deleting photos on the platform doesn't free up space right away. Instead, it uses a two-step process to prevent accidental loss.
Basically, when you delete a file, it simply moves to the Trash folder, giving you a second chance to decide whether to permanently delete the photos from your Google Photos account. However, this also means that the files still count against your storage quota, making your available space unchanged until the Trash is actually emptied.
Meanwhile, Google automatically empties the Trash after 60 days, but if you need storage immediately, it also provides an option to do it manually. Just note that emptying the Trash is permanent, so once gone, recovery will no longer be an option. TWith that in mind, follow the steps below to empty your Google Photos Trash easily.
Part 2. How to Empty Trash in Google Photos on a Computer
Emptying your Google Photos Trash on a computer is the most straightforward method. The web version provides a full-screen view, making it easy to see all your deleted items at once. Hence, it is an ideal approach, especially for those who prefer deleting on a larger screen or need to manage bulk deletions quickly. Besides, the Google Photos site can be accessed on almost any website, regardless of whether you use macOS or Windows-preferred browsers.
Follow the instructions below to understand how to empty Google Trash in Photos on a computer:
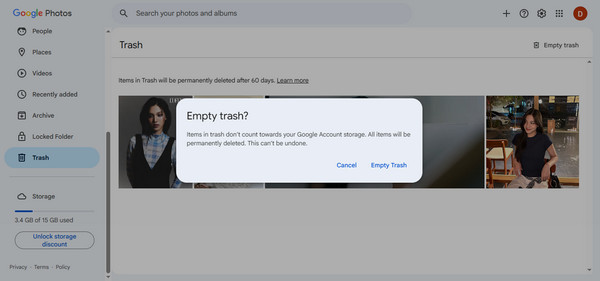
Step 1Launch your trusted browser and navigate to the photos.google.com site. Log in to your account from there, then click the Trash option on the left-hand menu.
Step 2When the Trash interface page opens, choose Empty trash at the top right, then confirm by selecting Empty Trash again on the pop-up message.
Part 3. How to Empty Trash in Google Photos on a Mobile Device
If you're using a mobile device, the Google Photos app is the way to go. It has its own Trash folder that stores deleted items for 60 days before the automatic and permanent deletion. Meanwhile, note that there is a distinct difference between deleting in the Google Photos app and your device's Gallery app. Many users get confused, so to clarify, deleting from the Google Photos app syncs across all your devices, while the Gallery app only removes the local copy from your phone, which doesn't affect your account storage.
Follow the guidance below to learn how to empty trash in Google Photos on a mobile device:
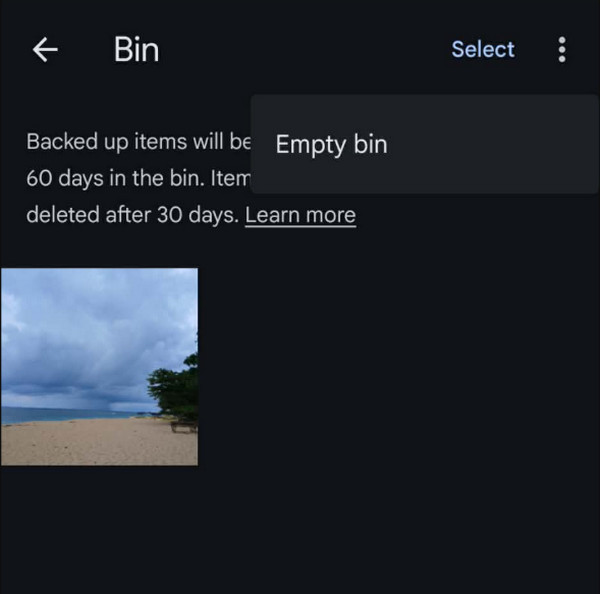
Step 1Start on the Google Photos app on your iPhone or Android, then tap Collections.
Step 2Next, select Trash or Bin from the sections to view the photos or media files deleted within the past 60 days. Then, tap the three-dot menu at the top right, followed by Empty bin.
Part 4. Google Photos Auto-Delete (The 60-Day Rule)
Now that you are aware of how you can empty your Trash folder in Google Photos manually, it would also be helpful to understand the platform's auto-delete feature. You may have already caught this information, but to elaborate further, Google Photos has an automatic emptying feature that removes items from the Trash after 60 days.
It is a built-in safety net designed to give you enough time to recover accidentally deleted files. It is also twice as long as Gmail's 30-day rule. Google intentionally gives Photos users more time because photos and videos are often more personal and irreplaceable than emails. During these 60 days, your deleted items still remain in your storage, and the auto-delete only happens after this period ends. Until then, your available space will not change, unless you empty it manually.
Part 5. How to Recover Permanently Deleted Google Photos with FoneLab Data Retriever
Even though Google Photos offers a 60-day grace period for a chance for recovering data fromTrash, many users regularly empty it to free up storage space immediately. So, when accidental deletion occurs, photo recovery becomes impossible in the platform itself. Fortunately, dedicated tools like FoneLab Data Retriever offer another solution.
This program is designed to scan your storage drives, including your computer and mobile phone, for lost or deleted data. Hence, if you want to recover a deleted Google Photos image that was previously saved on your device, this is an effective solution. It supports all image formats and other data types, and even allows you to recover files from Recycle Bin.
FoneLab Data Retriever - recover the lost/deleted data from computer, hard drive, flash drive, memory card, digital camera and more.
- Recover photos, videos, documents and more data with ease.
- Preview data before recovery.
Determine the simple steps below as a model to recover permanently deleted Google Photos with FoneLab Data Retriever:
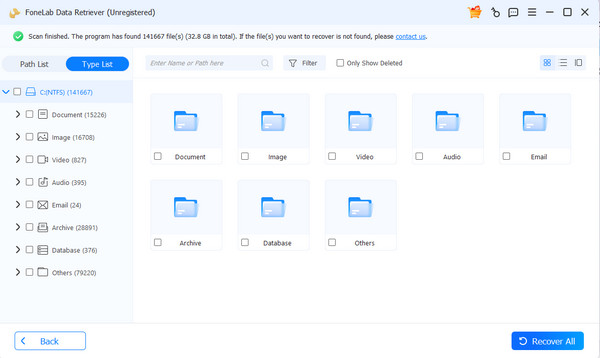
Step 1Click Free Download to get the FoneLab Data Retriever installer file.. Use it for installing the program, then choose Start when it's presented. Afterward, select the hard drive that previously contained your photo before. When ready, select Start Scan.
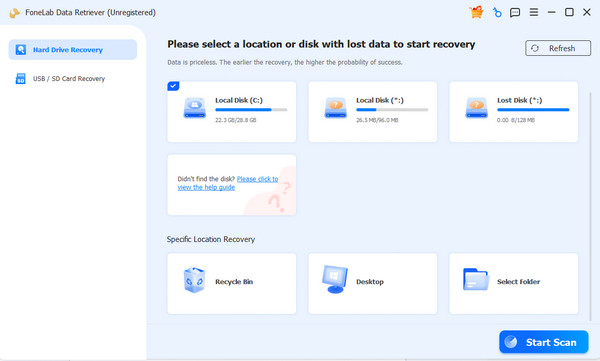
Step 2The scanned results include various data type folders that store your deleted files. From there, open the Image folder to find the one you hope to recover. Simply mark it, and then choose the Recover All option.
Part 6. What Happens When You Delete from a Shared Album
What happens when you delete from a shared album depends on who owns the photo. If you delete your own photo, it is removed for everyone but remains in your personal library and Trash. If you delete someone else's photo, it is only removed from your view; others can still see it. If you delete your own photo, it is removed for everyone but stays in your personal library and Trash. Meanwhile, if you delete someone else's photo, it only disappears from your view, and others will still be able to see it.
Part 7. FAQs about How to Empty Trash in Google Photos
Is it possible to empty the Trash on multiple devices at once?
Yes, it is. Emptying the Trash syncs across all devices connected to your Google account.
Can I erase only a few photos instead of emptying the Trash?
Yes, you can. Simply open the Trash, select individual photos, and delete them one by one.
Emptying your Google Photos Trash is a simple but essential step to instantly free up storage. But if you accidentally delete an important image, don't worry — FoneLab Data Retriever can help you recover it.