iPhone Data Recovery
 iOS System Recovery
 iOS Data Backup & Restore
 iOS Unlocker
 iPhone Password Manager
 Location Changer
 Android Data Recovery
 Broken Android Data Extraction
 Android Data Backup & Restore
 Android Unlocker
 FoneTrans for iOS
 iPhone Data Eraser
 iPhone Cleaner
 HEIC Converter
 HyperTrans
 WhatsApp Transfer for iOS
 Mac Sweep
 Data Retriever
 Mac Data Retriever
 Video Converter Ultimate
 Screen Recorder
 Phone Mirror
 Recover PC Data Now
Recover the lost/deleted data from computer, hard drive, flash drive, memory card, digital camera and more.
Leading Techniques for Windows Backup and Restore
 Updated by
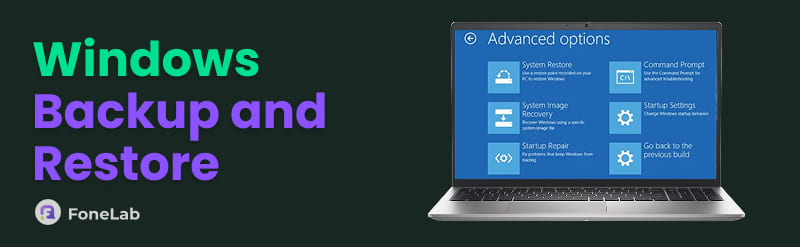
 Need to backup and restore in Windows? Data loss has been a constant problem for many computer and device users. Whether it happens due to a virus, a hardware failure, or an unintentional deletion, losing important files can be stressful. That’s why many developers created various tools designed to save copies of your data and restore them later if something goes wrong. The question is, what is backup and restore all about?
Well, sit back and relax, as this article presents all the necessary information regarding backing up and restoring your Windows. From the causes of data loss to the best tools and processes, the following sections will cover everything you need to safeguard your data. You just need to choose the right approach based on your situation or preference. Then, you no longer have to worry about losing or accidentally deleting your files as long as you follow the steps correctly.

Guide List
Part 1. Why Most People Lose Their Data and How to Fix It
Most people lose their data for various reasons. A virus may infect your system and corrupt files, a hard drive may suddenly fail after years of use, or you may simply click delete by mistake. Aside from that, other common causes include power outages, software crashes, and damaged devices. More often than not, these issues occur without warning, leaving you with no chance to save your data. So, the question is: how do you fix these data-loss problems? Simple—prepare in advance through Windows backup restore tools, features, or services. This way, you can safely keep a copy of your files for recovery when issues occur later.
Part 2. Windows Backup 101: Which Tool Should You Use?
Now, you may wonder. Which tool offers the best backup and restore function for your situation? To answer that, browse these scenarios and choose the one that suits you best.
Scenario A: Personal Files (Photos/Docs)
If your main concern is keeping your personal files safe, such as family photos, school documents, or work files, File History will be a suitable solution. It is designed to continuously save snapshots of your files so you can recover them if they are later lost, deleted, or damaged. This built-in feature is especially helpful when you want to restore an older version of your document. Just note that it requires external storage or a network location to save the backup.
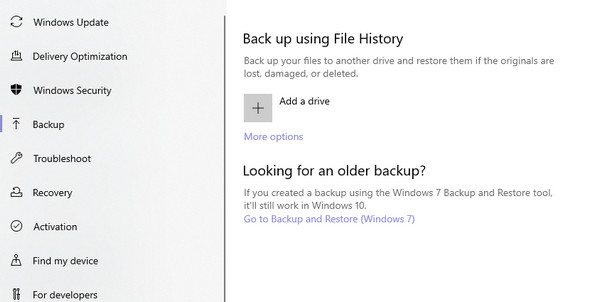
Setting Up File History: Attach an external drive or set up a network location as your backup storage. Next, on Settings, go to Update & Security, then select Backup. Under Back up using File History, select Add a drive to activate the backup.
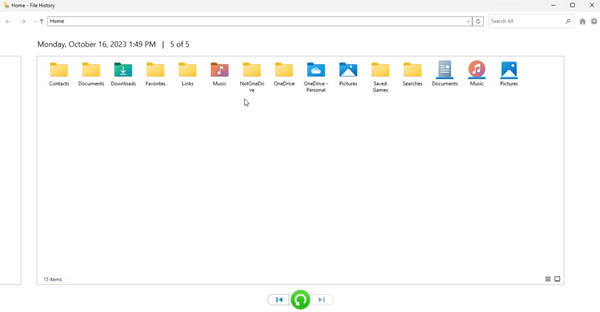
Restoring Personal Files: Type File History in the Start menu and select Restore your files with File History. Once the window appears, browse the files and folders to select the versions you need. Then, choose Restore to return them.
Scenario B: Full System Recovery
Sometimes, the damage is too severe for a simple file recovery. Your computer may refuse to boot, it may crash repeatedly, or it may display errors that are difficult to fix. In this regard, you can use the Windows system image for a full system recovery. It captures a complete copy of your PC, including Windows, your settings, and installed programs, allowing you to recover everything at once when you encounter complex system issues. However, ensure you have sufficient storage, as it requires a large amount of space for easy backup and restore Windows.
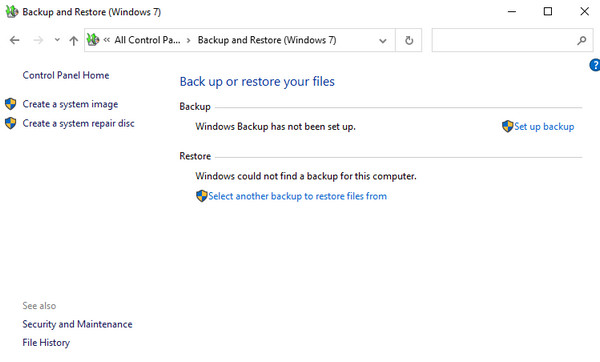
Setting Up Windows System Image: Start on the Control Panel window. From there, choose Backup and Restore (Windows 7), then click Create a system image.
Perform Full System Recovery: When you need to restore, restart your PC and press the appropriate key (such as F8, F11, or Esc) during startup. When you reach the recovery screen, select Repair your computer > System Image Recovery.

Scenario C: Critical Work Data
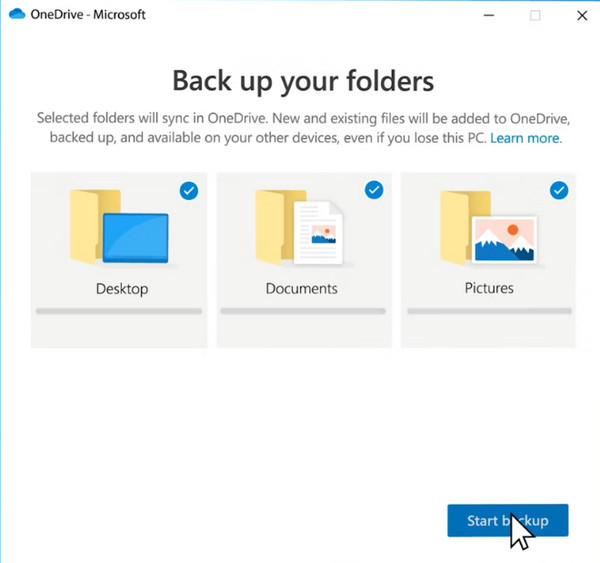
Meanwhile, for professionals who depend on their computer for work, losing important files is not an option. Thankfully, cloud services like OneDrive are available. It keeps your critical files stored safely online, so even if you lose them on your computer, copies will remain protected and accessible on your OneDrive account whenever needed, such as when your device is lost, stolen, or damaged, since your data stays safe no matter what happens to the computer.
Setting Up OneDrive: Sign in to OneDrive via your Microsoft account, then choose the folders you want to back up. OneDrive will then upload your files to the cloud.
Restore Critical Work Data: Later, open OneDrive on your computer and sign in. Your files will be synced or restored automatically, or you can download them directly from its website.
Part 3. Common Backup Pitfalls (Expert Advice)
Even with the right tools, you may still run into some pitfalls that could undermine your preparation for such problems. Browse these common ones to avoid them later.
- • Untested backup - a backup you have never tried to restore is less reliable than a tested one. It’s best to check it from time to time.
- • Backup on the same drive - Saving your backup on the same drive as your original files defeats the purpose because if the drive fails, both will be gone.
- • Infrequent backups - If you don’t back up regularly, your recent files are still at risk.
- • Cloud storage limits - Cloud services, especially free versions, offer only limited storage space. Ensure you monitor your limit.
Part 4. Recover Lost Data Using FoneLab Data Retriever
Unfortunately, even backups can fail in the most unexpected situations. Don’t worry, though. Backup failures aren't common, but it doesn’t hurt to have another safety net in addition to your backup. So, we are pleased to introduce FoneLab Data Retriever, which can recover deleted files on PC.
FoneLab Data Retriever - recover the lost/deleted data from computer, hard drive, flash drive, memory card, digital camera and more.
- Recover photos, videos, documents and more data with ease.
- Preview data before recovery.
This program helps you scan your computer or other storage devices and recover files that were lost or deleted, or that were on a formatted drive. Its Windows data recovery function supports most data types, such as documents, emails, photos, and more. It is also designed to cater to all types of users.
Follow the intuitive steps below to recover data if your Windows backup and restore method fails with FoneLab Data Retriever:
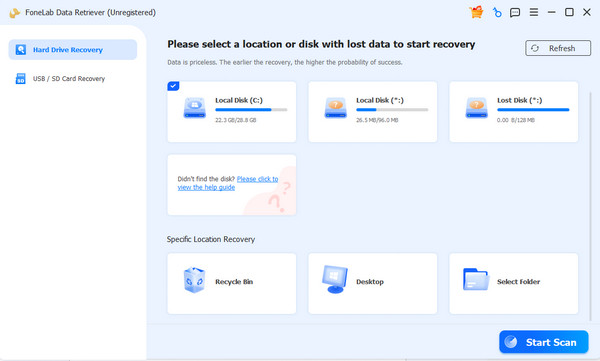
Step 1Save the FoneLab Data Retriever file copy via Free Download for the installation, then start the program. On the primary interface, select your lost file’s former drive location and click Start Scan to proceed.
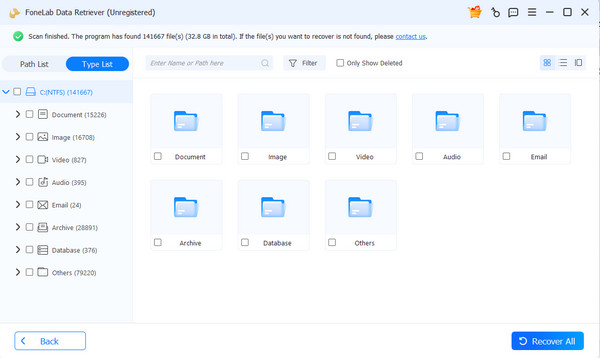
Step 2Once the results appear on the next interface, open the folders and browse your lost or erased files. When you find the items you need, mark them for selection, then hit Recover All.
Part 5. FAQs about Windows Backup and Restore
How often should I back up my files?
It depends on how often your files change. For important work data, daily backups are best, while weekly or monthly backups for personal files may be enough.
Do I need an internet connection to restore files?
It depends. For the most part, it is only required for cloud services like OneDrive. For File History and System Image, no internet connection is required because your backup is stored on a physical drive.
With the right backup tools and a little preparation, you can protect your files and recover them with confidence, no matter what happens to your computer, especially with FoneLab Data Retriever.