
 iPhone Data Recovery
 iOS System Recovery
 iOS Data Backup & Restore
 iOS Unlocker
 iPhone Password Manager
 Location Changer
 Android Data Recovery
 Broken Android Data Extraction
 Android Data Backup & Restore
 Android Unlocker
 FoneTrans for iOS
 iPhone Data Eraser
 iPhone Cleaner
 HEIC Converter
 HyperTrans
 WhatsApp Transfer for iOS
 Mac Sweep
 Data Retriever
 Mac Data Retriever
 Video Converter Ultimate
 Screen Recorder
 Phone Mirror
- Unlock Apple ID
- Bypass iCloud Activation Lock
- Doulci iCloud Unlocking Tool
- Factory Unlock iPhone
- Bypass iPhone Passcode
- Reset iPhone Passcode
- Unlock Apple ID
- Unlock iPhone 8/8Plus
- iCloud Lock Removal
- iCloud Unlock Deluxe
- iPhone Lock Screen
- Unlock iPad
- Unlock iPhone SE
- Unlock Tmobile iPhone
- Remove Apple ID Password
How to Activate a New iPhone: Complete Step Guide
 Updated by
 Unboxing a brand-new iPhone is a highly anticipated user experience, but configuring the device for active service can quickly turn into a frustrating technical puzzle. Between coordinating carrier plan transfers, organizing cloud accounts, and moving massive personal data vaults, the activation process requires a clear, organized approach. This is especially true given the major architectural changes in modern mobile networks and computer utility software.
When searching for reliable activation workflows, users frequently run into outdated advice. Many old guides still tell users to "insert a physical SIM card" or "plug your phone into iTunes." However, mobile hardware has shifted decisively toward digital eSIM profiles, and Apple has completely restructured its desktop software lineup.

During my years auditing mobile operating system storage structures and managing enterprise device deployments, my diagnostic team has monitored these software changes closely. If you prefer to manage or activate your device using a desktop computer, you must navigate a completely restructured set of apps:
- On macOS: iTunes has been completely phased out. Core device management, operating system restores, and local backups are now handled directly inside the native macOS Finder sidebar, while media files are managed through separate Apple Music and Apple TV applications.
- On Windows: The classic, bulky iTunes application has been replaced on modern Microsoft Store platforms by the streamlined Apple Devices app, which isolates device management and activation routines from media playback.
Simply turning on a new phone and hoping it syncs seamlessly can lead to setup freezes, network drops, or data-wiping warnings. This guide provides an in-depth, tested breakdown of modern iPhone activation. It covers wireless Quick Start setups, desktop activations using Finder and Apple Devices, and a reliable fallback data pipeline using FoneTrans for iOS to prevent common migration errors.

Guide List
Part 1. How to Activate New iPhone
As you might know, iOS Assistant Setup enables you to set up and activate your iPhone quickly with or without backup files. Move on to check details.
Turn On Your New iPhone
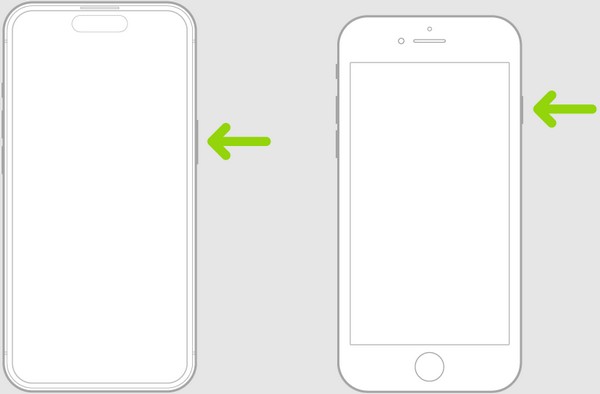
Turning the device on is the initial action when buying a new iPhone or other devices. Meanwhile, you must know that turning it off has different instructions, depending on the device model, but not when starting your iPhone. Switching on an iPhone only requires one button, regardless of its model or iOS version, and you can do it within 5 seconds.
Follow the trouble-free guide below to turn your new iPhone on:
Step 1Simply long-press the Power, also known as the Sleep/Wake key, until the Apple logo materializes on your new iPhone screen. Note that the Power button is on either the top or side of the device, so finding it won’t be difficult.
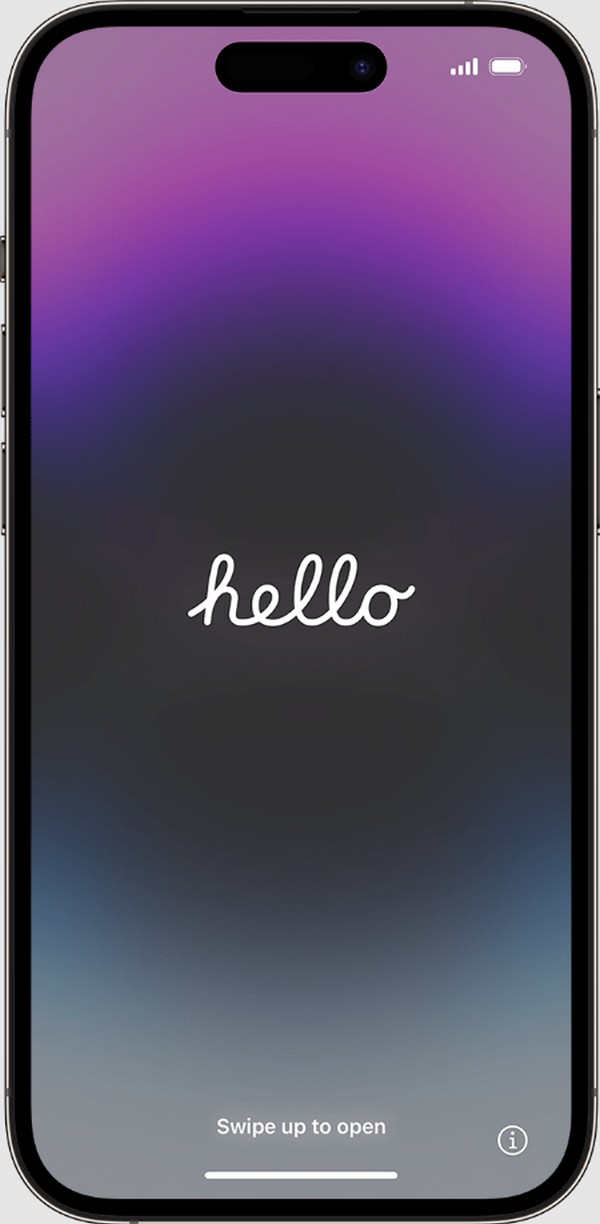
Step 2Your iPhone will start after around 5 seconds; thus, wait until the new iPhone’s initial screen appears. You will see a “Hello” message and be prompted to swipe up the screen to open. So, follow the on-screen directions to proceed.

With FoneTrans for iOS, you will enjoy freedom to transfer your data from iPhone to computer. You can not only transfer iPhone text messages to computer, but also photos, videos and contacts can be moved to PC easily.
- Transfer photos, videos, contacts, WhatsApp, and more data with ease.
- Preview data before transferring.
- iPhone, iPad and iPod touch are available.
Choose Its Appearance
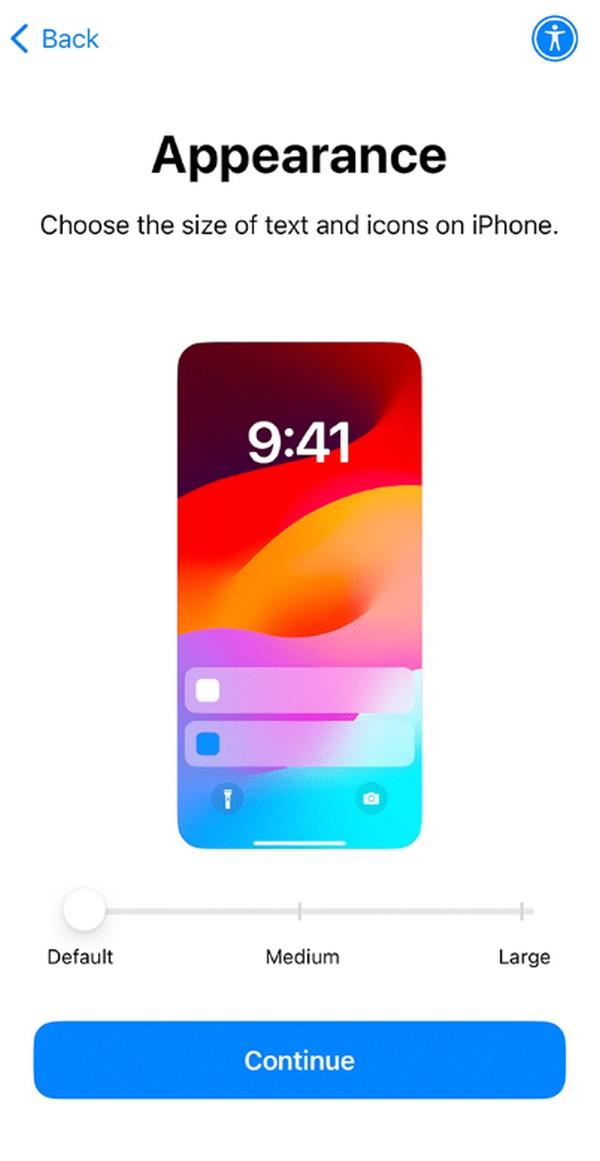
Once the new iPhone starts, the first option you must set up is its appearance. The screen will present the selections of text and icon sizes, and as you tap each option, the preview will display at the center. Hence, choose based on your preference or where you’re most comfortable, as it is how the text and icons on the iPhone will appear throughout.
Go along with the user-oriented directions underneath to choose your new iPhone’s appearance:
Step 1As mentioned, the preview display is at the center of the screen. Thus, the slider beneath it will be the one you will use to choose the default, medium, or large display.
Step 2Once you have chosen, hit the Continue button underneath. This way, you can proceed to the following step, containing set-up options, which will be discussed next.
Set Up The New iPhone
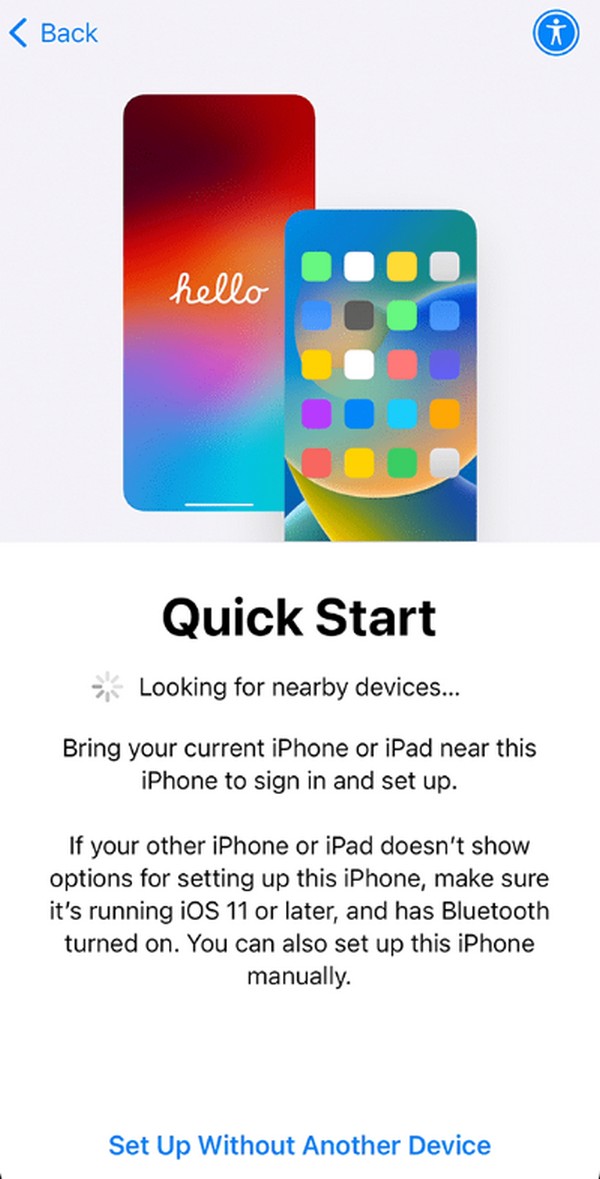
Meanwhile, before you activate a new iPhone, the device will allow you to use Quick Start or set it up manually. The Quick Start lets you automatically set up the iPhone through another iOS device. It will then copy your information, settings, and preferences to the new iPhone. On the other hand, you may also manually set it up to update your new preferences instead. Also, it will prevent copying of some settings or data you no longer use.
Abide by the straightforward procedure below to set up your new iPhone:
Quick Start new iPhone: Ensure your older device is connected to WiFi and the Bluetooth feature is on. Then, put it near your new iPhone for it to be detected. Once the screen prompts you to set up the new device, follow the instructions accordingly.
Set up new iPhone manually: If you have chosen to set up the new iPhone manually or don’t have another device, simply tap the Set Up Without Another Device tab at the bottom.
Activate Your New iPhone
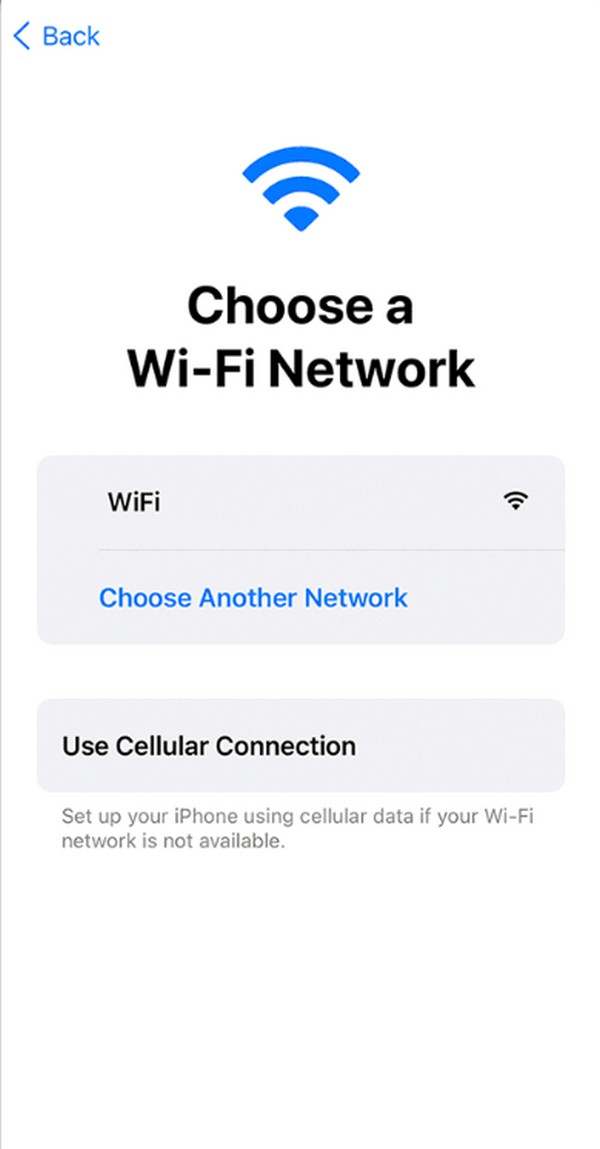
Afterward, activate your new iPhone by operating the necessary features, such as WiFi or cellular network. You might also need to insert your SIM card for the cellular network, especially if a WiFi network is unavailable.
Stick to the unchallenging process below to master how to activate a new iPhone:
Step 1When the available WiFi networks are shown on the screen, select the one you wish to connect to, then enter its password in the designated field.
Step 2On the other hand, select Use Cellular Connection if you’d like to use your cellular data instead. But ensure you have a SIM card inserted to choose this.
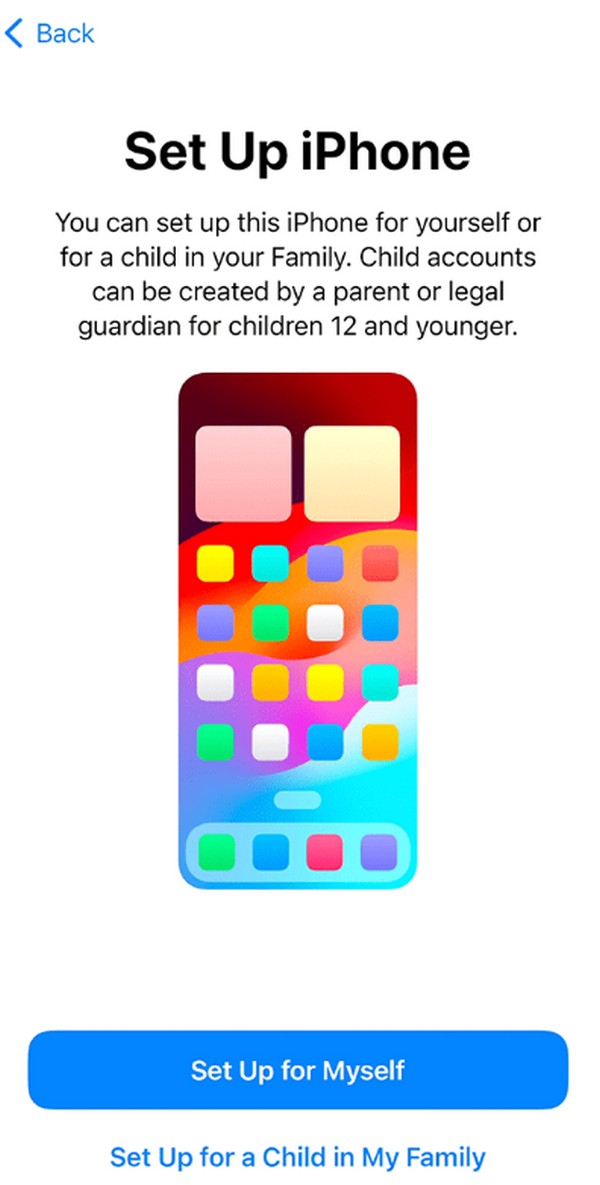
Once activated, you may set up the new iPhone for your child, offering Family Sharing, parental controls, and more features to customize for the child. But if the iPhone is for personal use, select the Set Up for Myself on the screen.
With FoneTrans for iOS, you will enjoy freedom to transfer your data from iPhone to computer. You can not only transfer iPhone text messages to computer, but also photos, videos and contacts can be moved to PC easily.
- Transfer photos, videos, contacts, WhatsApp, and more data with ease.
- Preview data before transferring.
- iPhone, iPad and iPod touch are available.
Set Up Locks and A Passcode
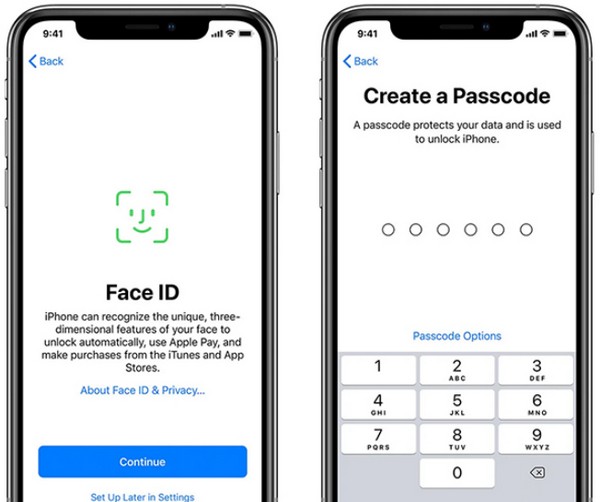
Next, it’s time to set up a Touch or Face ID and create your passcode. Depending on your iPhone model, the device will use face recognition or fingerprint to help you set up. Also, the passcode you will set must be a six-digit number to strengthen your data protection later.
Use the convenient guidelines below to set up locks and a passcode on a new iPhone:
Step 1When prompted to add a Face or Touch ID, tap Continue. Then, register your face in front of the camera or your fingerprint on the Power button, whichever is available.
Step 2Next, enter your desired 6-digit passcode on the Create a Passcode screen. Later, you can use these to access your iPhone and its features safely and conveniently.
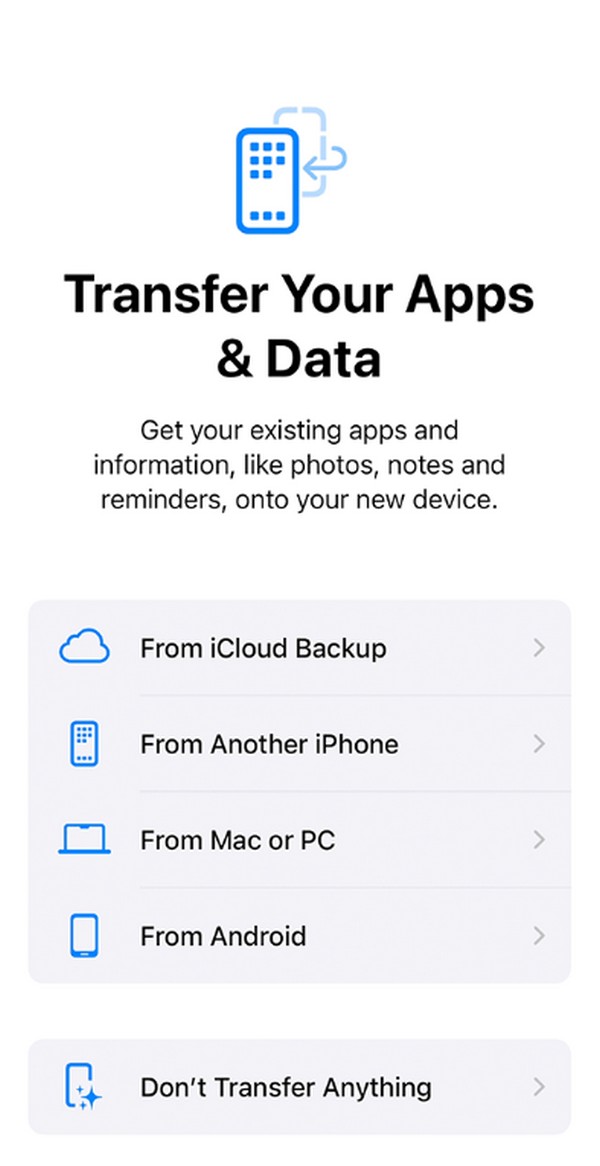
After that, the following screen will let you choose to transfer your data from your iCloud backup, iPhone, Mac, PC, or Android. Tap the backup or device you wish to transfer or restore from the selections. Then, follow the designated instructions it will provide. But if you want to skip it, select the Don’t Transfer Anything tab instead. After all, this post will present a transfer program later that provides convenience and smoother performance.
Sign In with Your Apple ID
Note: Skip this part if you have already used QuickStart or iCloud Backup to restore data.
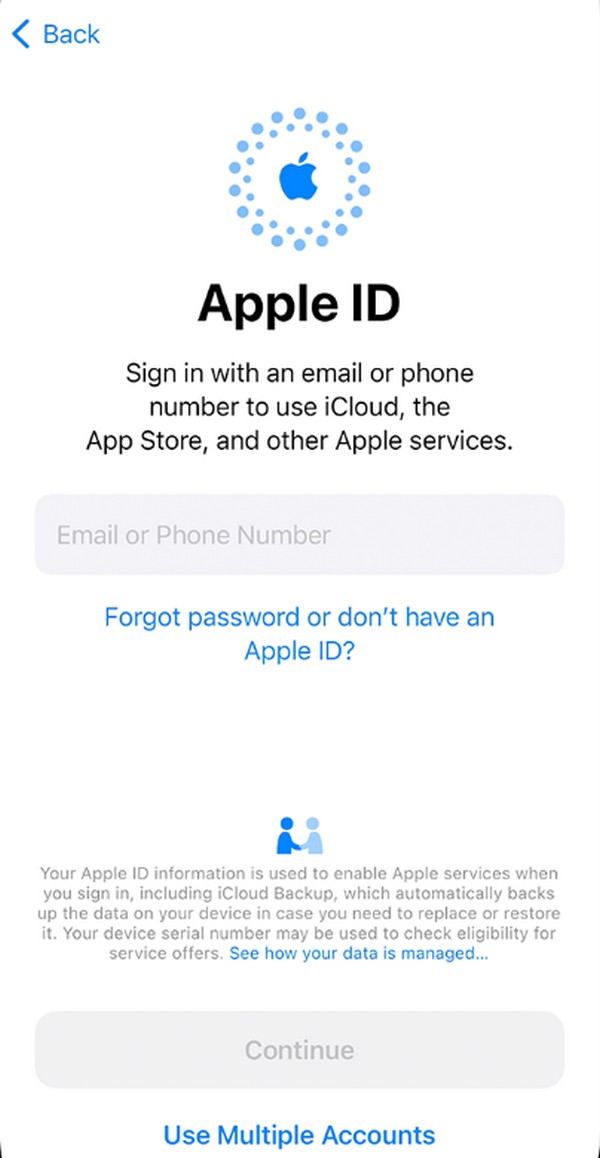
In the following part, you should sign in using your Apple ID. You can use Apple services, including iCloud, App Store, and more. But don’t worry; this part is optional since you can set it up later or create a new Apple ID if you don’t have it yet.
Obey the secure instructions underneath to sign in with your Apple ID:
Step 1Tap the Email or Phone Number field, then, as it indicates, type your email or number associated with your Apple ID. After that, hit Continue on the lowest area to enter its password and sign in.
Step 2Meanwhile, select Forgot password or don’t have an Apple ID? underneath the text field if you wish to choose the other sign-in options.
Once you set everything up, your new iPhone will officially start and display the Home screen. However, it won’t have any data if you haven’t transferred anything from your old device. If so, please proceed below to start your data transfer.
Part 3: Overcoming Migration Failure Vectors via FoneTrans for iOS
While native wireless migrations and desktop backup tools work well under ideal conditions, they frequently run into issues during complex real-world transfers. To bypass system constraints, you can route your data through a dedicated desktop utility like FoneTrans for iOS. This software acts as an independent, two-way data bridge, letting you set up your new phone as a clean device first, and then selectively inject your media and documents later without risking system crashes.
Why FoneTrans for iOS Offers a Superior Setup Alternative
- Selective Data Control: Avoid the "all-or-nothing" storage trap. Choose exact photo albums, music folders, or contact lists to move instead of cloning entire system caches.
- Cross-Account Flexibilities: Move essential data files freely between different Apple Accounts without running into ecosystem restrictions or locks.
- Zero Loss Data Merging: Inject your media files directly into your new device's storage without erasing any items you've already saved during activation.
With FoneTrans for iOS, you will enjoy freedom to transfer your data from iPhone to computer. You can not only transfer iPhone text messages to computer, but also photos, videos and contacts can be moved to PC easily.
- Transfer photos, videos, contacts, WhatsApp, and more data with ease.
- Preview data before transferring.
- iPhone, iPad and iPod touch are available.
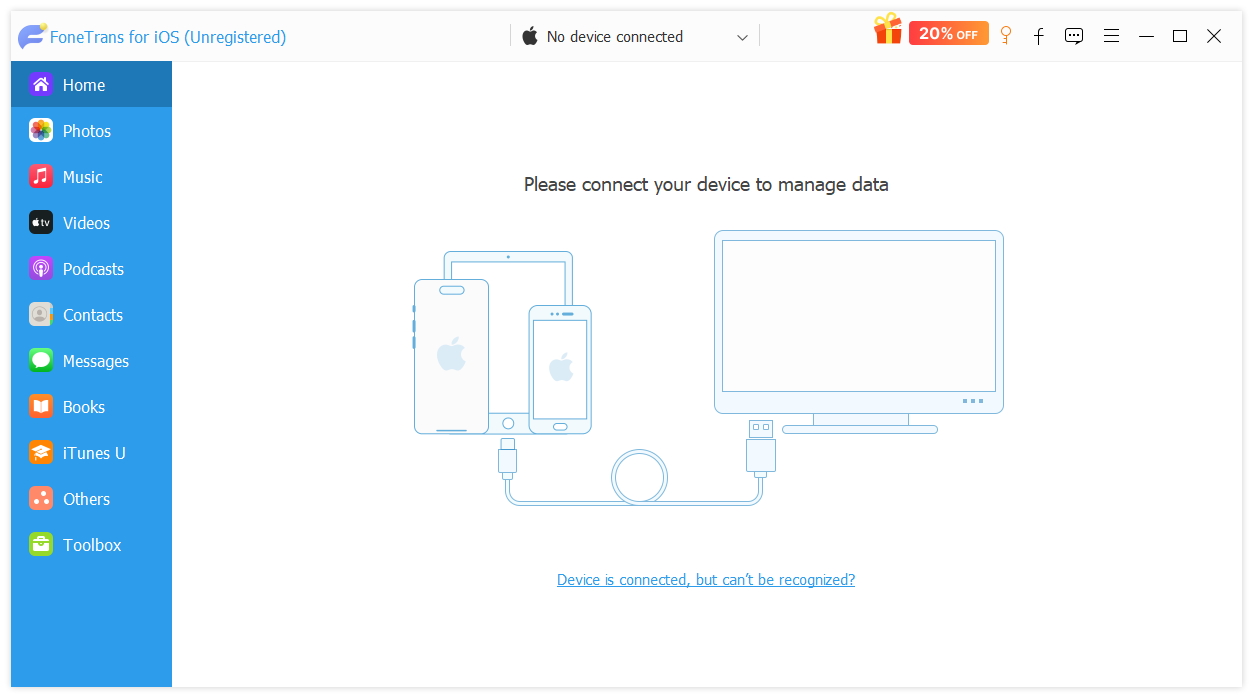
Step 1Save a Local Backup Copy of Your Old Phone: Isolating your data files. Connect your old iPhone to your computer using a USB cable and launch FoneTrans for iOS. Select your desired media categories (such as Music, Photos, or Contacts) from the left sidebar pane, click the Export icon at the top, and save a local copy to your computer's hard drive.
Step 2Activate Your New iPhone as a Clean Device: Initializing a clean environment. Turn on your new iPhone, choose Set Up Manually, select "Don't Transfer Apps & Data," and complete your basic carrier eSIM activation over Wi-Fi to reach a clean home screen.
Step 3Import Your Saved Content onto Your New Phone: Targeted asset injection. Disconnect your old phone and plug your newly activated iPhone into the computer. In the FoneTrans interface, navigate to your target media categories, click the Add/Import icon, and select the backup files stored on your computer to inject them directly onto your new device.
Part 4: Troubleshooting & Best Practices
Activation Server Issues
If you receive an "Activation Server Cannot Be Reached" error, first check Apple's System Status page. If services are operational, toggle your Wi-Fi router, or connect your iPhone to a computer and use the Finder or Apple Devices app to complete the activation over a wired internet connection.
Software Update Loops
If your old phone runs a newer version of iOS than your brand-new one, Quick Start will force an update. If this freezes, cancel the wireless transfer, set up the phone as a clean device to reach the home screen, update the operating system via Settings, and then factory reset the phone to restart the Quick Start transfer.
Long-Term Media Management
- Authorization Management: Regularly deauthorize old computers to stay within Apple's 5-machine limit.
- Hardware Stability: Always use official or MFi-certified USB cables connected directly to your computer's primary ports to prevent data corruption during transfers.
Part 6: What to Do If You Encounter Activation Lock
One of the most frustrating obstacles during iPhone activation is encountering the Activation Lock screen. This is Apple's anti-theft feature that ties a device to the original owner's Apple Account. If you see "Activation Lock" or "This iPhone is linked to an Apple Account" during setup, don't panic. Here are your options.
Official Apple Methods (Recommended)
Method 1: Enter the Apple Account Credentials
If you are the original owner, simply enter the Apple Account email and password associated with the device. This is the fastest and most straightforward way.
Method 2: Remove the Device from Your Apple Account Online
Step 1Go to appleid.apple.com on any browser and sign in with your Apple Account.
Step 2Navigate to the Devices section and find the iPhone that is locked.
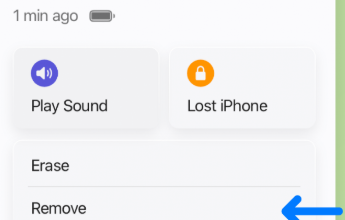
Step 3Click the device, then select Remove from Account. This will disable Activation Lock on that device.
With FoneTrans for iOS, you will enjoy freedom to transfer your data from iPhone to computer. You can not only transfer iPhone text messages to computer, but also photos, videos and contacts can be moved to PC easily.
- Transfer photos, videos, contacts, WhatsApp, and more data with ease.
- Preview data before transferring.
- iPhone, iPad and iPod touch are available.
Method 3: Request Activation Lock Removal from Apple Support
If you cannot remember your Apple Account credentials but have proof of ownership, Apple may help you unlock the device. You will need:
- Original Proof of Purchase (receipt or invoice with the device serial number and purchase date).
- A valid government-issued ID.
Submit a request through Apple's official support portal (al-support.apple.com). Apple's team will review your documentation and remove the lock if everything checks out. This process typically takes 3-5 business days.
Important Note for MDM or Corporate Devices: If this is a work or school device, contact your IT administrator. They can unlock the device remotely through Apple Business Manager or Apple School Manager without requiring your personal credentials.
Alternative Solution: FoneLab iFoneWiz (Bypass Activation Lock)
For users who cannot access the original Apple Account and do not have proof of purchase, third-party tools like FoneLab iFoneWiz offer a way to bypass the Activation Lock screen. However, this approach has significant limitations and should be used with caution.

FoneLab Helps you unlock iPhone screen, Removes Apple ID or its password, Remove screen time or restriction passcode in seconds.
- Helps you unlock iPhone screen.
- Removes Apple ID or its password.
- Remove screen time or restriction passcode in seconds.
How FoneLab iFoneWiz Works
The tool bypasses the Activation Lock interface by exploiting system vulnerabilities on jailbroken devices. It does not remove the lock permanently from Apple's servers — it simply allows you to access the device's home screen.
Compatibility & Limitations (Direct from Official Documentation):
- Supported Models: iPhone 6 through iPhone X. Also supports iPad 4th gen to iPad 7th gen, and iPod touch 6th/7th gen.
- Supported iOS Versions: iOS 12.0 to iOS 17.7.10. Does NOT support iOS 18 or later.
- Jailbreak Required: The process requires you to jailbreak the device first. The software provides step-by-step jailbreak instructions for each model.
- Post-Bypass Limitations: After bypassing, you cannot reset, restart, or restore the device, as this will trigger the Activation Lock again. Some features (such as iCloud login, Find My, and certain carrier services) may be permanently disabled.
Step 1Download and Install: Download FoneLab iFoneWiz and install it on your Windows or Mac computer.
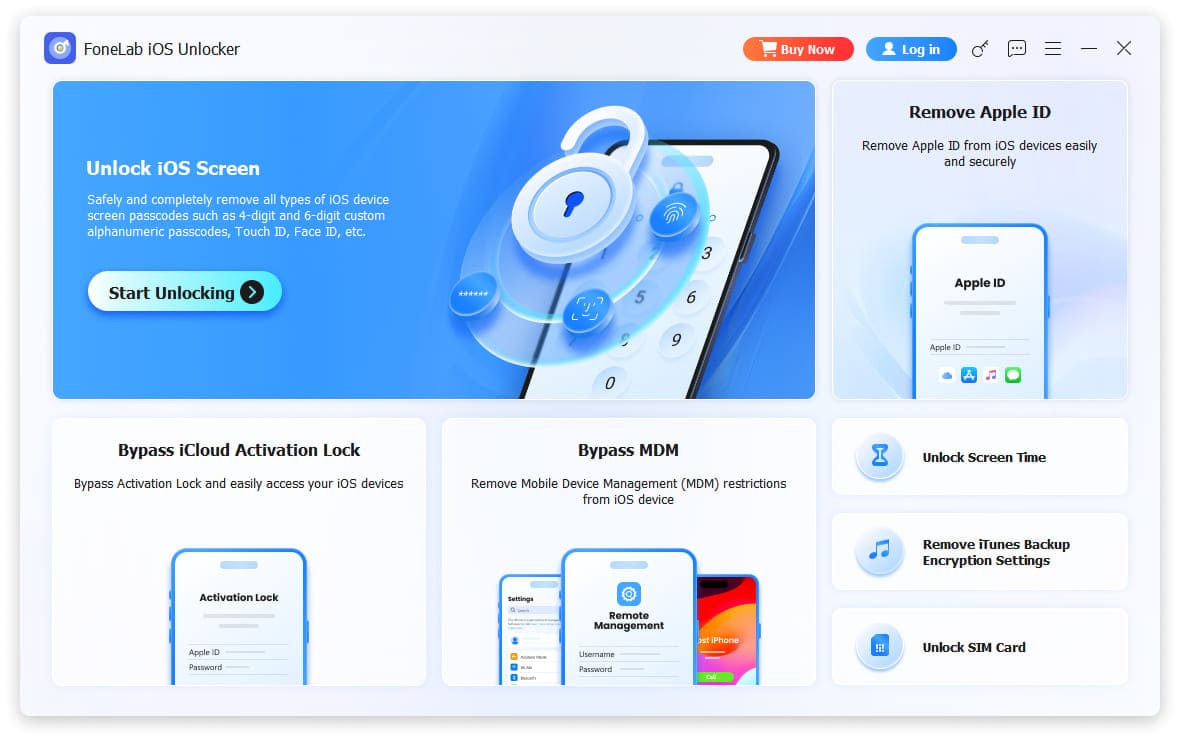
Step 2Connect Your Device: Launch the program and connect your iPhone (stuck on the Activation Lock screen) to the computer using a USB cable. Click Trust This Computer if prompted on the phone.
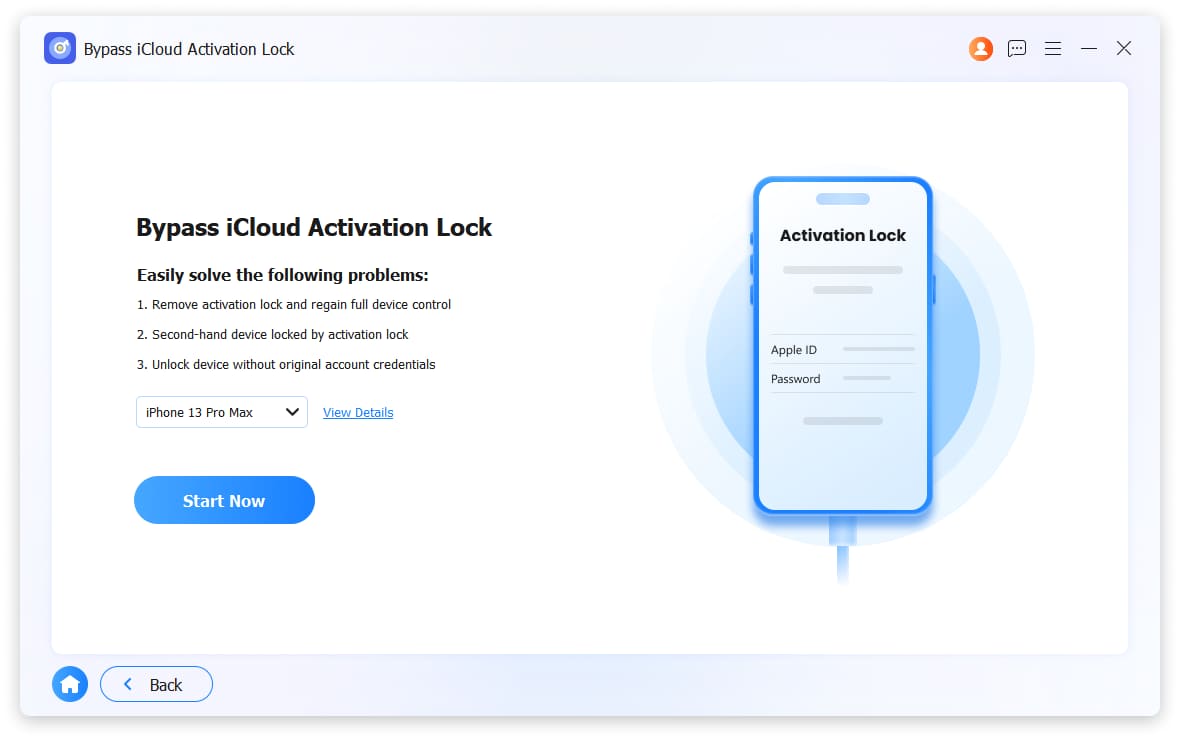
Step 3Select the Bypass Feature: On the main interface, click Bypass iCloud Activation Lock and then click Start Now.
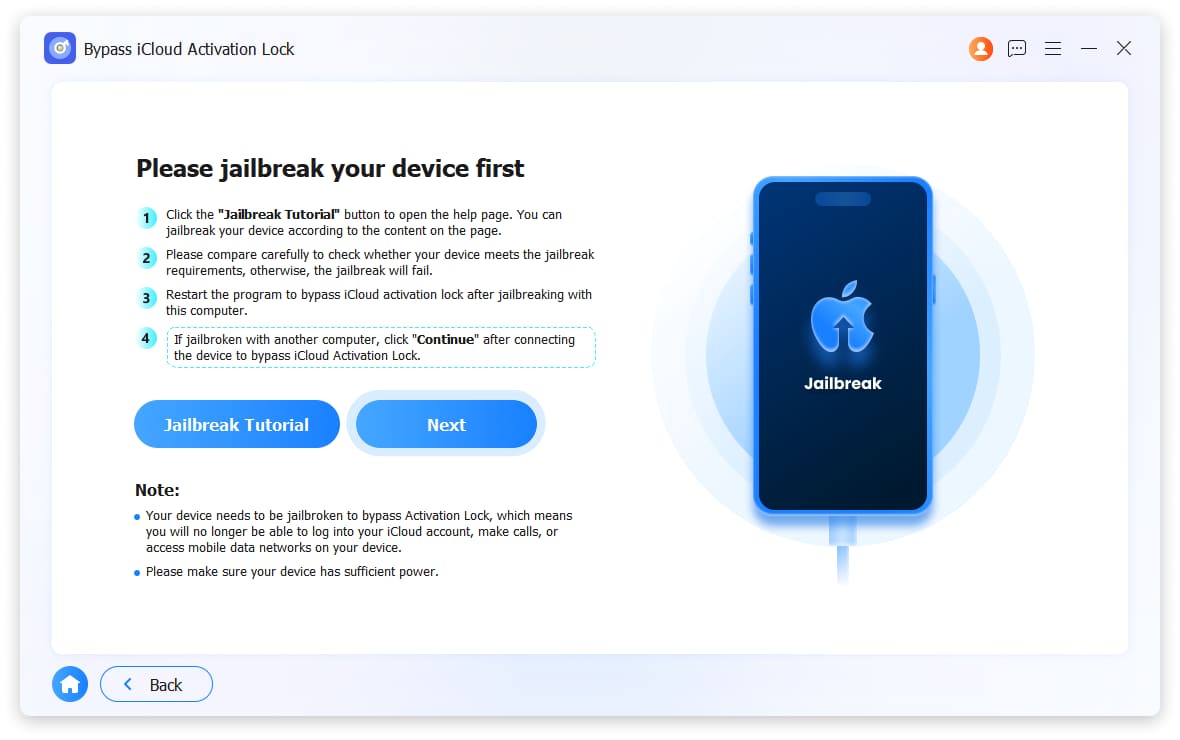
Step 4Follow the Jailbreak Instructions: The software will detect your device model and iOS version. It will display a Jailbreak Tutorial button — click it and follow the on-screen instructions carefully to jailbreak your device. Warning: Jailbreaking voids your warranty and carries risks if not done correctly.
Step 5Automatic Bypass: Once jailbroken, reconnect the device and click Bypass. The software will automatically process the bypass. This takes about 2-5 minutes.
Step 6Access Your Device: After the bypass is complete, the iPhone will reboot to the home screen. You can now use the device normally, but remember the limitations above.
FoneLab Helps you unlock iPhone screen, Removes Apple ID or its password, Remove screen time or restriction passcode in seconds.
- Helps you unlock iPhone screen.
- Removes Apple ID or its password.
- Remove screen time or restriction passcode in seconds.
Will FoneLab iFoneWiz remove the Activation Lock permanently?
No. It bypasses the lock temporarily. If you reset, restart, or update the device, the Activation Lock will reappear. For a permanent removal, you must use Apple's official methods with proof of ownership.
Is it legal to use iFoneWiz to bypass Activation Lock?
It depends. Using it on a device you own is legal. Using it on a stolen device is illegal and against Apple's terms of service. FoneLab iFoneWiz clearly states that users are responsible for complying with local laws.
What if my iPhone is newer than iPhone X?
FoneLab iFoneWiz currently does not support iPhone 11 or newer models for Activation Lock bypass. For these devices, your only options are Apple's official methods (using your own credentials or providing proof of purchase to Apple Support).
Which Activation Lock Solution Should You Choose?
| Method | Permanent Removal? | Requires Proof of Ownership? | Device Compatibility | Risk Level |
|---|---|---|---|---|
| Enter Apple Account Credentials | Yes | No | All iPhones | None |
| Apple Support (Proof of Purchase) | Yes | Yes | All iPhones | Low |
| FoneLab iFoneWiz (Bypass) | No (temporary) | No | iPhone 6 - X only | High (jailbreak required) |
Recommendation: Always try Apple's official methods first. Only consider third-party bypass tools if you have no other option and fully understand the risks and limitations.
Conclusion and Strategic Best Practices
Activating your new iPhone doesn't have to be a stressful experience. For basic setups, using modern wireless options like Quick Start or routing your connection through desktop apps like Finder on Mac or Apple Devices on Windows provides a reliable path to initialization.
However, when you need to migrate large, complex media libraries or want to avoid setup crashes related to storage capacity, using a dedicated desktop conduit offers the control and stability required for professional data management. Download FoneTrans for iOS onto your computer today to simplify your cross-platform device migrations and ensure your digital media assets remain protected and accessible.
And if you ever face the dreaded Activation Lock, remember: Apple's official methods should always be your first step. Use third-party bypass tools only as a last resort, and never on a device you don't rightfully own.
FoneLab Helps you unlock iPhone screen, Removes Apple ID or its password, Remove screen time or restriction passcode in seconds.
- Helps you unlock iPhone screen.
- Removes Apple ID or its password.
- Remove screen time or restriction passcode in seconds.



