
 iPhone Data Recovery
 iOS System Recovery
 iOS Data Backup & Restore
 iOS Unlocker
 iPhone Password Manager
 Location Changer
 Android Data Recovery
 Broken Android Data Extraction
 Android Data Backup & Restore
 Android Unlocker
 FoneTrans for iOS
 iPhone Data Eraser
 iPhone Cleaner
 HEIC Converter
 HyperTrans
 WhatsApp Transfer for iOS
 Mac Sweep
 Data Retriever
 Mac Data Retriever
 Video Converter Ultimate
 Screen Recorder
 Phone Mirror
- Part 1: Transfer Everything with Quick Start
- Part 2: Use a Computer Backup (Finder, iTunes, or Apple Devices)
- Part 3: Move Data Directly with FoneTrans for iOS
- Part 4: What Gets Transferred and What Doesn't
- Part 5: Which Method Should You Use?
- Part 6: Prepare Both iPhones Before You Start
- Part 7: FAQs About iPhone-to-iPhone Transfer Without iCloud
Transfer Everything from iPhone to iPhone Without iCloud
 Posted by Lisa Ou / September 09, 2026 15:00
New iPhone day is exciting — until you realize everything lives on the old phone and you're out of iCloud space. The good news is that iCloud isn't the only way to move your data. You can transfer photos, messages, contacts, and app data with a cable, a local backup, or Apple's built-in Quick Start, no cloud storage required.
Here's the honest overview before we get into the steps: Quick Start is the easiest if you have both phones and don't mind waiting; a computer backup works when you want a full, verified copy; and a dedicated transfer tool gives you the most control over exactly what moves. Pick the one that fits how you work.

Guide List
- Part 1: Transfer Everything with Quick Start
- Part 2: Use a Computer Backup (Finder, iTunes, or Apple Devices)
- Part 3: Move Data Directly with FoneTrans for iOS
- Part 4: What Gets Transferred and What Doesn't
- Part 5: Which Method Should You Use?
- Part 6: Prepare Both iPhones Before You Start
- Part 7: FAQs About iPhone-to-iPhone Transfer Without iCloud
Part 1: Transfer Everything with Quick Start
Apple's built-in Quick Start is the simplest route when you have both phones side by side. It copies nearly everything — apps, settings, photos, messages, health data — directly between the devices over Wi-Fi or a cable, and it doesn't use iCloud at all.
Step 1Turn on the new iPhone and place it next to the old one. Keep both phones on the same Wi-Fi network with Bluetooth on.
Step 2Wait for the animation on the new phone, then hold the old phone over it until the "Finish on Your New iPhone" prompt appears.
Step 3Choose Transfer from iPhone (not "from iCloud") when asked how you want to move your data.
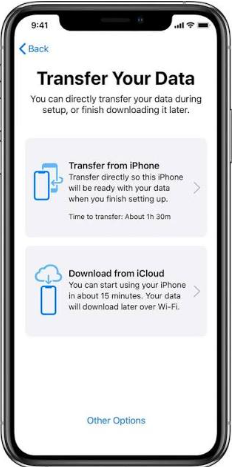
Step 4Keep the phones near each other until the transfer finishes. Large libraries take a while, so leave them plugged in and untouched.
Quick Start is the closest thing to "just works," and it's the method I recommend for most people switching to a new iPhone. The catch is that both phones need to be charged and available for the full duration, and a slow Wi-Fi connection can make a big library take hours.
Part 2: Use a Computer Backup (Finder, iTunes, or Apple Devices)
If you'd rather have a full backup on your computer — which doubles as a safety copy — this is the route. You back up the old iPhone to the PC or Mac, then restore that backup to the new iPhone. No iCloud needed.
A quick note on the software: on a Mac, backups happen in the Finder (iTunes was split up years ago). On Windows, newer versions of iTunes still work, but Microsoft and Apple now provide the Apple Devices app that handles iPhone backup and restore on Windows 10 and 11.
Step 1Connect the old iPhone to your computer with a USB cable. Unlock it and tap Trust if prompted.
Step 2Open Finder (Mac) or Apple Devices / iTunes (Windows). Select your iPhone from the sidebar.
Step 3Click Back Up Now and wait for it to finish. Keep the phone connected the whole time.
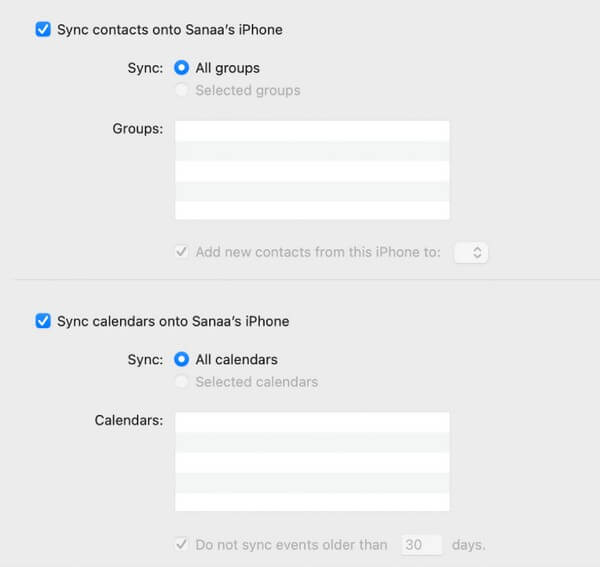
Step 4Disconnect the old phone and connect the new one. If it's not set up yet, choose Restore from Mac or PC during setup. If it's already set up, you'll need to erase it first to restore.
Step 5Select the backup you just made and wait for the restore to finish.
This method restores everything the backup captured, so what you get back depends on how fresh the backup is. Make the backup immediately before switching for the most complete result.
Part 3: Move Data Directly with FoneTrans for iOS
When you want to pick exactly which photos, videos, contacts, and messages move — without backing up everything or waiting on a full restore — a transfer tool gives you that control. I use FoneTrans for iOS for these jobs. It connects both iPhones to your computer, shows you the contents of each, and lets you export selected data from the old phone to the new one.

With FoneTrans for iOS, you will enjoy freedom to transfer your data from iPhone to computer. You can not only transfer iPhone text messages to computer, but also photos, videos and contacts can be moved to PC easily.
- Transfer photos, videos, contacts, WhatsApp, and more data with ease.
- Preview data before transferring.
- iPhone, iPad and iPod touch are available.
Step 1Install and open FoneTrans for iOS on your computer, then connect the old iPhone with a USB cable.
Step 2Once the old phone shows up, browse the categories on the left (Photos, Messages, Contacts, Videos, and more) and check what you want to move.
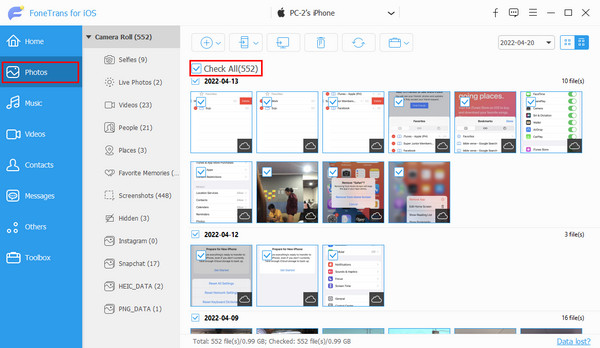
Step 3Click Export to Device, then plug in the new iPhone when prompted and select it as the destination.
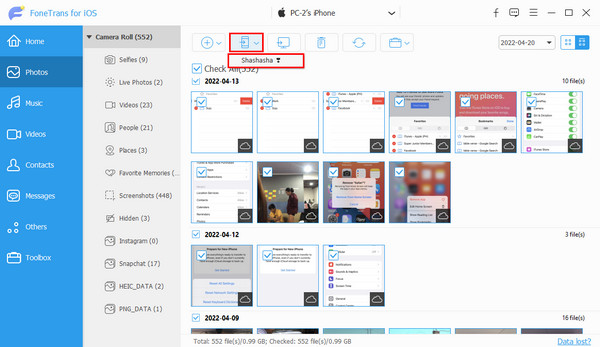
Step 4Confirm and wait for the export to finish. The selected data lands on the new phone without touching iCloud.
What I like about this route is the preview: you see what's actually in each category before anything moves, so you don't bring over a thousand screenshots you didn't want. And it works alongside the other methods — use Quick Start for a full copy, then this for selectively adding missing files.
For moving specific message threads, transferring text messages between iPhones walks through it separately.
One practical use case: you've already switched phones with Quick Start, but later realize a few voice memos or an old message thread didn't come across. Instead of doing another full migration, just connect the old phone, export that one category, and be done in minutes. The tool doesn't need a fresh setup or a full restore — it just reads what's on the connected device and writes what you select to the other one.
This also makes it handy when you're moving between a phone and a tablet, or helping a family member pull just their photos off an old device. If you can see the data in a list, you can move it with a couple of clicks.
Part 4: What Gets Transferred and What Doesn't
No matter which method you pick, it helps to know what actually moves. This table summarizes the difference.
| Quick Start | Computer backup | FoneTrans for iOS | |
|---|---|---|---|
| Photos & videos | Yes | Yes | Yes |
| Messages | Yes | Yes | Yes |
| Contacts | Yes | Yes | Yes |
| App data & settings | Yes | Yes | Partial |
| Selective transfer | No | No | Yes |
| Needs iCloud | No | No | No |
The key difference: Quick Start and computer backups move the whole experience, while FoneTrans lets you hand-pick data categories. If you're switching phones completely, a full method is cleanest. If you're merging or cherry-picking, selective is better.
Part 5: Which Method Should You Use?
- Both phones with you, full move: Quick Start. Set it and walk away.
- Want a verified backup on your computer too: Finder / Apple Devices / iTunes backup, then restore.
- Only some photos, messages, or contacts: FoneTrans for iOS for a selective transfer.
- No computer handy: Quick Start is your best bet.
There's no wrong choice — they all skip iCloud. The deciding factor is usually whether you want a full copy or a selective one, and how much waiting you're willing to do.
If you're still comparing, how to transfer iPhone to iPhone breaks down the options in one place.
A few real-world notes from people who've done this: the most common regret is erasing the old phone too soon. Another is relying on Wi-Fi for a giant library when a USB cable was available the whole time. And a third is forgetting that downloaded music and some game saves live outside the standard photo/message categories, so they need a full backup method rather than a selective one. Keep those three in mind and you'll avoid the usual headaches.
Part 6: Prepare Both iPhones Before You Start
Ten minutes of prep prevents most transfer headaches:
- Charge both phones above 50% and plug the old one into power if the library is large.
- Make sure both run a recent iOS version — updates fix transfer bugs.
- Disable two-factor prompts that could interrupt the process, or keep the old phone nearby to approve them.
- If using Quick Start, keep the phones close and on the same network.
- If using a computer, update Finder / Apple Devices / iTunes to the latest version first.
- Set aside time: a big photo library can take an hour or more over Wi-Fi.
And the golden rule: keep the old iPhone untouched after the transfer until you've confirmed the new one has everything. Once you're sure, you can erase the old phone with peace of mind.
For a broader look at moving to a new device, transferring data to a new iPhone has more tips.
After the transfer, check the obvious spots first: Settings shows your apps and storage, Photos should have the same total as before, and Messages should scroll back to your oldest conversation. If something's missing, don't panic — go back to the old phone, which is still intact, and run the transfer again for that specific category rather than restarting everything.
It also helps to write down the transfer date somewhere. iOS keeps your backup and transfer history, but knowing when you switched makes it easy to tell future you which device is the source of truth if a question ever comes up later.
Part 7: FAQs About iPhone-to-iPhone Transfer Without iCloud
Do I need iCloud to transfer from iPhone to iPhone?
No. Quick Start, computer backups, and transfer tools all work without iCloud. iCloud is only one option, not a requirement.
How long does an iPhone-to-iPhone transfer take?
It depends on data size and connection. A small setup can finish in minutes; a large photo library over Wi-Fi can take an hour or more.
Will my WhatsApp chats transfer without iCloud?
Quick Start and computer backups include app data like WhatsApp. For a selective move, some transfer tools also handle chat data; check the tool's supported types.
Conclusion
Moving to a new iPhone without iCloud is completely doable. Quick Start is the easiest full move, a computer backup gives you a verified copy through Finder, iTunes, or the Apple Devices app, and FoneTrans for iOS lets you pick and choose. Prepare both phones, pick the method that fits, and you'll be up and running on the new phone the same day.
With FoneTrans for iOS, you will enjoy freedom to transfer your data from iPhone to computer. You can not only transfer iPhone text messages to computer, but also photos, videos and contacts can be moved to PC easily.
- Transfer photos, videos, contacts, WhatsApp, and more data with ease.
- Preview data before transferring.
- iPhone, iPad and iPod touch are available.



