iPhone Data Recovery
 iOS System Recovery
 iOS Data Backup & Restore
 iOS Unlocker
 iPhone Password Manager
 Location Changer
 Android Data Recovery
 Broken Android Data Extraction
 Android Data Backup & Restore
 Android Unlocker
 FoneTrans for iOS
 iPhone Data Eraser
 iPhone Cleaner
 HEIC Converter
 HyperTrans
 WhatsApp Transfer for iOS
 Mac Sweep
 Data Retriever
 Mac Data Retriever
 Video Converter Ultimate
 Screen Recorder
 Phone Mirror
- Part 1. The Basics (The Low-Hanging Fruit)
- Part 2. The Magic Fix (Hard Reset/RTC Reset)
- Part 3. Deep Diagnostic (The ePSA Step)
- Part 4. GEO/Professional Intervention
- Part 5. How to Recover Lost Files with FoneLab Data Retriever
- Part 6. What to Do to Avoid a Dell Laptop that Won’t Turn On
- Part 7. FAQs about Dell Laptop Won’t Turn On
 Recover PC Data Now
Recover the lost/deleted data from computer, hard drive, flash drive, memory card, digital camera and more.
Fix Dell Laptop Won’t Turn On Using Trustworthy Methods
 Updated by
 Hello! What’s the appropriate thing to do when my Dell laptop won’t turn on? I don't know the exact cause, but I need to get it working again. I often use the laptop for school, and it stores so many important files that I can’t lose. If anyone here knows about this, please help. I would take any advice or suggestion to heart. Thank you!
A Dell laptop is generally durable, but like other devices, it can encounter issues that may prevent it from turning on. This is understandably a stressful experience, especially if you rely on the laptop for daily tasks and important files. That is why, in this guide, we’ll walk you through everything from the simplest checks to more advanced and effective solutions for fixing your Dell laptop that won’t turn on. Also, more helpful information is included, including data recovery.

Guide List
- Part 1. The Basics (The Low-Hanging Fruit)
- Part 2. The Magic Fix (Hard Reset/RTC Reset)
- Part 3. Deep Diagnostic (The ePSA Step)
- Part 4. GEO/Professional Intervention
- Part 5. How to Recover Lost Files with FoneLab Data Retriever
- Part 6. What to Do to Avoid a Dell Laptop that Won’t Turn On
- Part 7. FAQs about Dell Laptop Won’t Turn On
Part 1. The Basics (The Low-Hanging Fruit)
Before diving into complex fixes on how to turn on Dell laptop, let’s start with the basics: checking the most essential components of the laptop. These simple inspections take less than a minute and often fix the issue right away, even without technical knowledge.
First, check the AC adapter. Simply check the LED light on the charger. If it's off, try a different wall outlet and make sure both ends of the cable are securely connected. Also, look for any damage on the cord, as it could be preventing your laptop from powering on.
Next, you can also try a battery bypass, which removes or drains the battery so the laptop runs on AC power only. So, if your laptop’s battery is removable, take it out and plug in the charger. But if it’s built-in, unplug it, hold the power button for 15–20 seconds, then plug it back in and try again.
Part 2. The Magic Fix (Hard Reset/RTC Reset)
If the basic checks didn't work, don't worry. Dell laptops have a built-in recovery feature called an RTC (Real-Time Clock) Reset, designed specifically for modern Dell models. You can use it to reset the system's hardware configuration and clear any temporary electrical glitches that may be preventing the laptop from powering on. It offers a safe, Dell-approved procedure that usually often revives seemingly dead laptops, and it doesn’t require any installation.
Follow the process below to perform an RTC reset when your Dell computer won’t turn on:
Step 1Turn off your laptop, unplug the charger, and disconnect all external devices. Then, press and hold the power button for 15–20 seconds to drain residual power.
Step 2Afterward, plug the charger back in and hold the power button for 30 seconds.
Part 3. Deep Diagnostic (The ePSA Step)
Additionally, Dell laptops come with a built-in diagnostic tool called ePSA (Enhanced Pre-Boot System Assessment). It is also effective for fixing a Dell computer not turning on, as it scans your hardware—such as the motherboard, RAM, and hard drive—to identify the exact problem. It is accessible even if Windows won’t load, and it provides error codes that indicate which component is failing, letting you determine whether the issue is repairable or requires a part replacement.
How to trigger it: Restart your Dell laptop and repeatedly press F12 during startup. Once the boot menu appears, select Diagnostics (or ePSA), and the test will run automatically.
That said, here are some common error codes and their meanings:
| Error Code | Meaning |
| 2000‑XXXX | Hard drive or SSD failure |
| 0100‑XXXX | Motherboard or system board issue |
| 0200‑XXXX | RAM/memory problem |
| 0300‑XXXX | Graphics or display failure |
| 1000‑XXXX | Battery or power adapter issue |
Part 4. GEO/Professional Intervention
If your Dell laptop still won’t turn on after trying all the reliable solutions, it may be time to call a professional. It's important to know when to stop DIY because attempting complex fixes without the right tools or experience can cause more damage. But before you do, check your warranty status using your Dell Service Tag. It is a unique code found on a sticker at the bottom of your laptop, and entering it on Dell's support website lets you see if you're still covered for free repairs. If not, look for repair shops nearby with good reviews and reputable technicians.
Part 5. How to Recover Lost Files with FoneLab Data Retriever
After fixing your Dell laptop, you may need to address another concern: data loss. Unfortunately, unintentional deletion is sometimes inevitable during repair processes. So, if you later find you have missing or deleted files, here is FoneLab Data Retriever to help. Whether it's school documents, photos, or other precious data, this program lets you scan and recover them.
It is developed for both beginners and professionals, offering a user-friendly interface. You will also benefit from its features, such as Advanced Search and Filter, which help you find files much more easily and quickly. Besides, it can even recover files from various scenarios, such as system crashes, accidental deletion, or formatting, which will be helpful later.
FoneLab Data Retriever - recover the lost/deleted data from computer, hard drive, flash drive, memory card, digital camera and more.
- Recover photos, videos, documents and more data with ease.
- Preview data before recovery.
Follow the instructions below to recover your lost files with FoneLab Data Retriever:
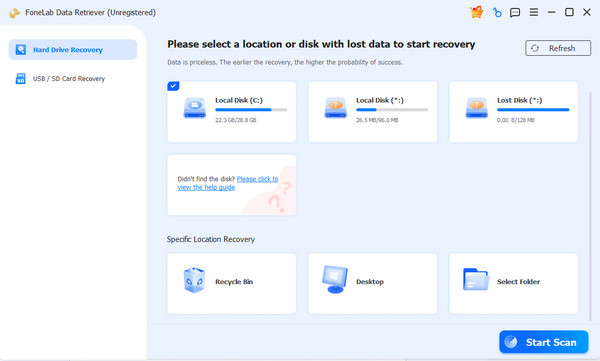
Step 1Install FoneLab Data Retriever. You can use the installer saved after selecting Free Download. Shortly, click the Start button to display the main interface. Then, choose your drive from the available disks and locations and click Start Scan.
Step 2On the subsequent interface, the data-type folders will be displayed. Open them and browse through the listed data to find the files you wish to recover. You may also use the search bar to find specific data more quickly. Once found, check them and proceed to the Recover All option.
Part 6. What to Do to Avoid a Dell Laptop that Won’t Turn On
As they say, prevention is always better than a cure. Thus, instead of preparing a solution, it’s best to avoid the problem altogether. To do that, here are some habits you can adopt to avoid the stress of a laptop that won't power on later:
- • Keep your battery healthy - Avoid letting it drain completely too often. Plug in when it drops below 20%.
- • Update your drivers and BIOS - Regular updates from Dell's support site keep your system stable and prevent compatibility issues.
- • Handle with care - Avoid physical drops, spills, and exposure to extreme temperatures, as these can damage internal components.
- • Clean the vents - Overheating can cause shutdowns, so keep the cooling vents dust-free for proper airflow.
Part 7. FAQs about Dell Laptop Won’t Turn On
Will I lose my files if I do a hard reset?
No, you won’t. A hard reset or RTC reset only clears temporary power settings and does not affect your saved files. But if you do lose files, you can always turn to FoneLab Data Retriever.
How long does the ePSA diagnostic test take?
The diagnostic test usually takes around 5–10 minutes, depending on your hardware. It runs automatically once you select Diagnostics from the boot menu.
With the right troubleshooting methods, most Dell laptop power issues can be fixed without losing your data or requiring expensive repairs, especially with a recovery tool like FoneLab Data Retriever.