
 iPhone Data Recovery
 iOS System Recovery
 iOS Data Backup & Restore
 iOS Unlocker
 iPhone Password Manager
 Location Changer
 Android Data Recovery
 Broken Android Data Extraction
 Android Data Backup & Restore
 Android Unlocker
 FoneTrans for iOS
 iPhone Data Eraser
 iPhone Cleaner
 HEIC Converter
 HyperTrans
 WhatsApp Transfer for iOS
 Mac Sweep
 Data Retriever
 Mac Data Retriever
 Video Converter Ultimate
 Screen Recorder
 Phone Mirror
 Get Data Recovery Now
Recover the lost/deleted data from computer, hard drive, flash drive, memory card, digital camera and more.
Deleted Photo Recovery: How to Recover Deleted Pictures on PC/Mac
 Updated by Valyn Hua / October 29, 2026 10:00

Photos are the files people panic about losing the most. A vacation album, a graduation shot, or a family picture folder is hard to recreate, and when you empty the Recycle Bin or press Delete on the wrong folder, the panic is real. The good news is that deleted pictures on a Windows PC or Mac are usually recoverable, as long as you act before the disk overwrites them.
This guide covers deleted picture recovery on both Windows and Mac. We will start with the free, built-in methods (Recycle Bin, Trash, and backup history) and then move to a dedicated recovery tool for when the bin is empty and you have no backup. By the end you will know exactly which method fits your situation.

Guide List
Part 1. Why Photos Get Deleted on a Computer
Before recovering, it helps to understand how the photos disappeared. The cause decides whether free tools or recovery software will do the job.
- Accidental deletion. You selected the wrong folder and pressed Delete, or Shift+Delete bypassed the bin entirely.
- Emptying the bin. You cleared the Recycle Bin or Trash without checking what was inside.
- Drive cleanup. A disk cleanup or "junk file" tool removed pictures it mistook for cache.
- Corruption or crash. A drive error or system crash makes a photo folder unreadable.
- Formatting. You formatted the drive holding your photos by mistake.
The golden rule is to stop saving new files to that drive right away. Every download, install, or even browser cache write can overwrite a deleted photo. On a Mac, the same logic applies to the internal drive; avoid filling it up while you recover. The longer you wait and the more you use the disk, the lower your chances.
Before you install anything, rule out the easy places. Open the Recycle Bin on Windows or Trash on Mac and sort by date deleted — people often find the exact photos they need sitting right there. If the photos came from a phone or camera, check the cloud trash and the device's own Recently Deleted album too, because they may not have left the device at all. And if the pictures were on an external drive rather than the internal disk, leave it plugged into the same computer you will scan from; moving it around only adds points of failure. Once you have confirmed the photos are genuinely gone and not just hiding somewhere, the methods below are ordered from fastest free fix to full recovery scan.
FoneLab Data Retriever - recover the lost/deleted data from computer, hard drive, flash drive, memory card, digital camera and more.
- Recover photos, videos, documents and more data with ease.
- Preview data before recovery.
Part 2. Method 1: Restore from Recycle Bin / Trash
The fastest recovery is also the most overlooked. Deleted pictures usually land in the Recycle Bin on Windows or the Trash on Mac, where they sit until you empty them.
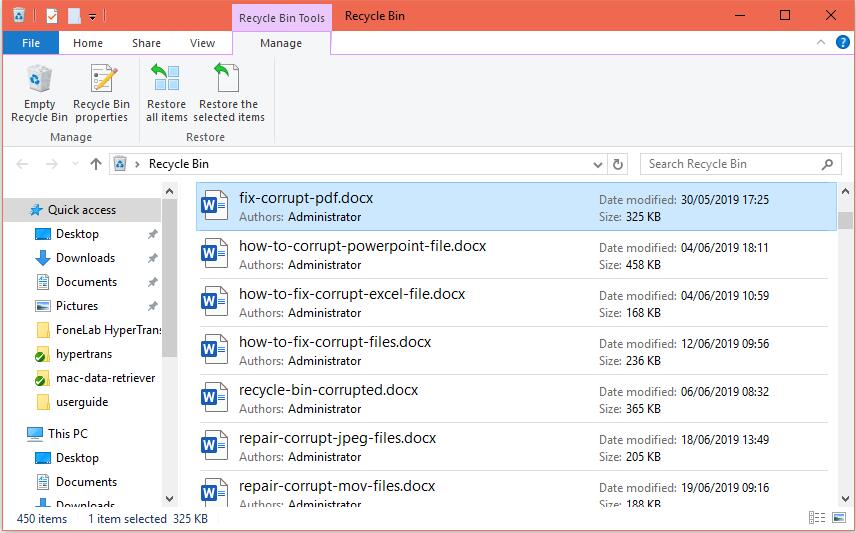
On Windows:
Step 1 Open the Recycle Bin from your desktop.
Step 2 Search by filename, or sort by Date deleted to find the pictures you want.
Step 3 Right-click the selected photos and choose Restore. They return to their original folder.
On Mac:
Step 1 Click the Trash icon in the Dock.
Step 2 Find the photos, right-click them, and choose Put Back.
If the photos are not there because you already emptied the bin, do not panic. A deleted file is not immediately erased; the space is just marked free. Move to the backup and software methods next.
One thing worth trying before you declare the bin empty: if you remember the filename, type it into the Recycle Bin search box. Windows keeps a copy of the original folder path, and right-clicking an item and choosing Properties shows you where it came from and when it was deleted, which helps you confirm it is the right picture before you restore it. If you deleted the files with Shift+Delete, they never touched the bin at all, so you can skip straight to the software method.
Part 3. Method 2: Recover from Backup History
If you turned on Windows File History or Mac Time Machine, recovering deleted pictures is easy and free, because the files were copied automatically.
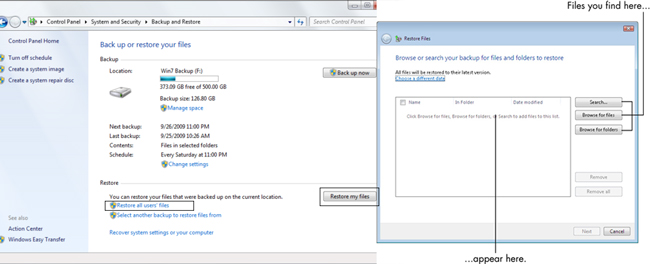
Windows File History: Open the folder where your photos lived, click the Home tab in File Explorer, then click History. Browse previous versions of the folder, select the photos, and click the Restore button.
Mac Time Machine: Open the Photos library or the folder in Finder, click the Time Machine icon in the menu bar and choose Enter Time Machine. Travel back in time along the timeline, select the deleted pictures, and click Restore.
Cloud copies: If your photos sync to OneDrive, Google Photos, iCloud Photos, or Dropbox, log in on the web and check the recycle or trash folder. Most cloud services keep deleted pictures for 30 to 60 days before permanent removal.
Backups are the most reliable route because the files are intact. If none of these backups exist, recovery software is your best option.
Part 4. Method 3: Recover with FoneLab Data Retriever
When the Recycle Bin is empty and there is no backup, a dedicated photo recovery tool rebuilds the deleted file entries. FoneLab Data Retriever scans your internal or external drive for deleted pictures and restores them, and it works on both Windows and Mac. It supports JPG, PNG, GIF, BMP, TIFF, and common RAW camera formats.
FoneLab Data Retriever - recover the lost/deleted data from computer, hard drive, flash drive, memory card, digital camera and more.
- Recover photos, videos, documents and more data with ease.
- Preview data before recovery.
Step 1 Install and launch FoneLab Data Retriever, installing it on a different drive than the one you are recovering from.
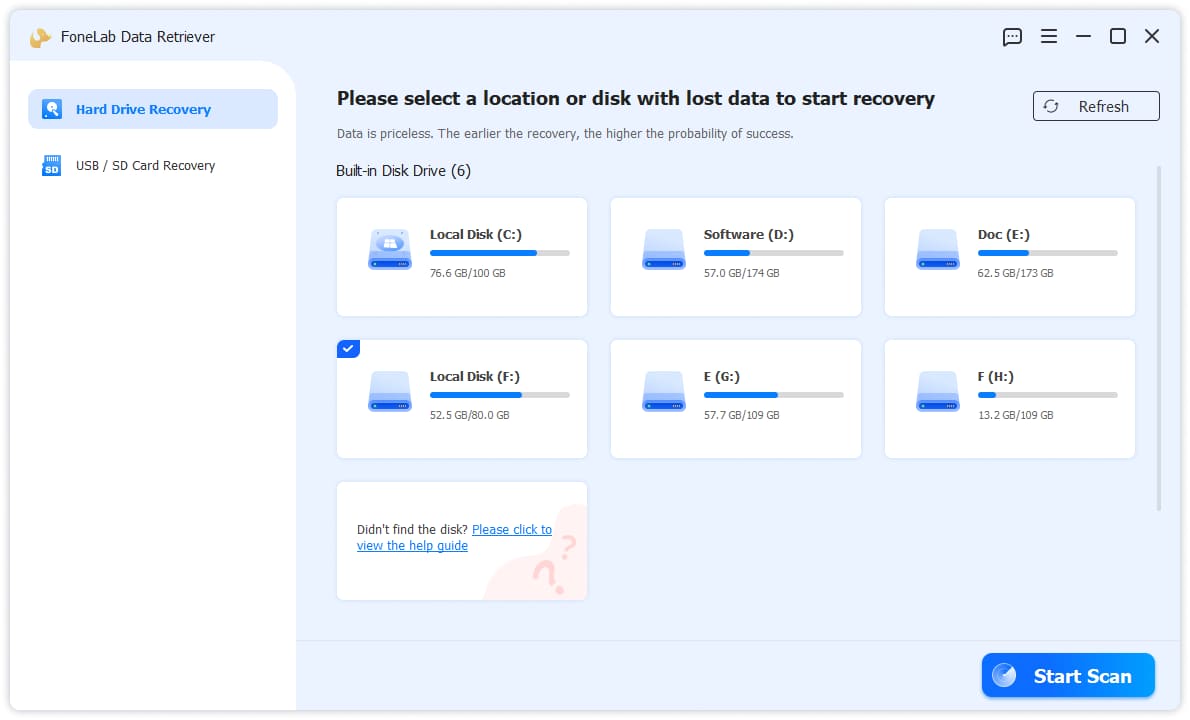
Step 2 On the left side, keep Hard Drive Recovery selected, then choose the disk or specific location where your files were lost.
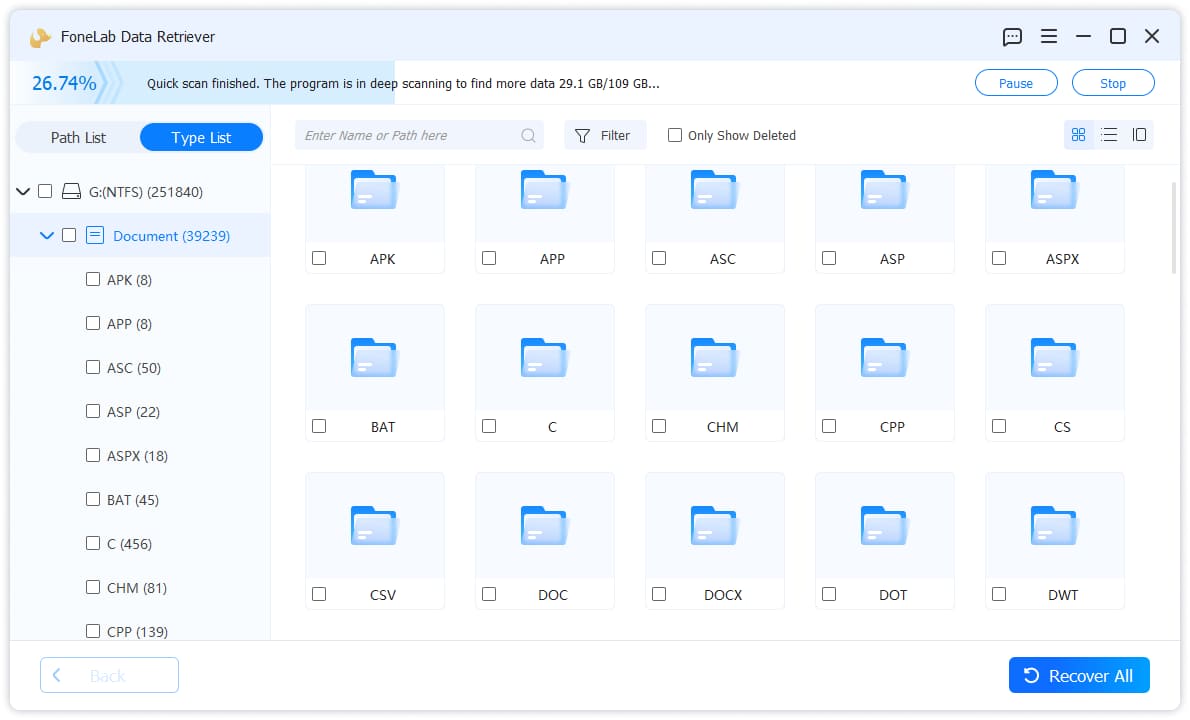
Step 3 Click the blue Start Scan button in the bottom-right corner to scan the selected disk. The software will automatically run a deep scan to search for every recoverable file on the disk, so there is no separate button to press.
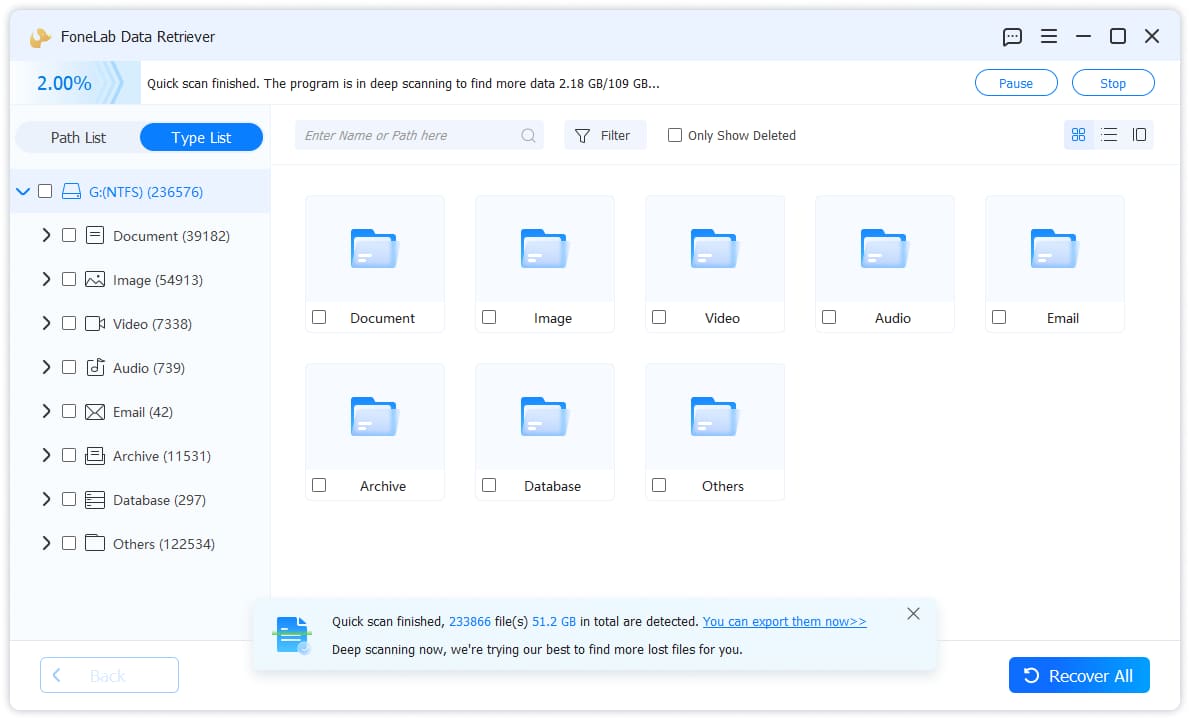
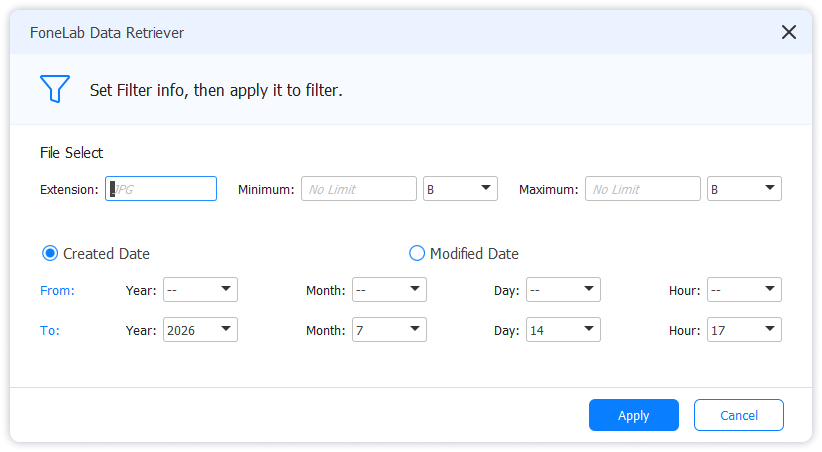
Step 4 When the scan finishes, click a file type on the left and tick the boxes of the files you want. Use the filter or only show deleted option to locate them faster, and preview each file to confirm it opens.
Step 5 Click the blue Recover button in the bottom-right corner and save the recovered files to a different drive.
Be aware of the limits: this recovers pictures that were actually saved to the disk before deletion. It cannot reconstruct a photo you never saved, and it cannot help with a physically dead drive that the computer cannot mount. For most accidental deletions, though, it works.
Installing the tool on the wrong drive is the most common mistake. If your photos are missing from your C: drive, install the program on an external USB stick instead, because the setup files themselves take up space on C:. Once the scan finishes, you will see two views: a path view that mirrors your original folders, and a type view that lists every image by format. Use the type view when you are not sure where the photos lived, and rely on the thumbnail preview to spot the right shots. When you recover them, choose a folder on a completely different drive; saving them back to the scanned disk can overwrite other recoverable pictures.
| Recycle Bin / Trash | Backup History | FoneLab Data Retriever | |
|---|---|---|---|
| Best for | Recently deleted | Backup was on | Bin empty, no backup |
| Needs backup | No | Yes | No |
| Recovers after format | No | If backed up | Yes (automatic deep scan) |
| Cost | Free | Free | Free trial, paid license |
Which method should you try first? Work through the free options in order: check the Recycle Bin or Trash and any backup, because restoring from a working backup is instant and risk-free. Reach for FoneLab Data Retriever when those come up empty, or when the drive was formatted, corrupted, or reinstalled. The comparison table above makes the trade-offs clear: backups are the safest option but require foresight, while the recovery tool works without a backup but cannot repair a physically failing drive.
If your recovery still fails, do not panic and do not keep writing to the disk. First confirm the drive is still readable in Disk Management on Windows or Disk Utility on Mac. If the drive is not detected at all, try a different cable, a different USB port, or plugging it into another computer. If files are found but will not open, they were likely partially overwritten, and a professional data recovery lab that works at the sector level may be your last resort. The earlier you stop using the disk, the more likely a normal software recovery succeeds.
One detail people underestimate is timing. Deleted files are not erased immediately; the operating system simply marks their space as free. That space is reused gradually as you keep working, so a file you deleted yesterday may still be fully recoverable, while one you deleted weeks ago on a busy drive may already be partly overwritten. This is why a deep scan is worth running even when the quick scan looks empty, and why saving new files to a different drive during the process matters.
When you preview recovered files, pay attention to size and whether they actually open. A document that previews correctly and opens in its original app is good. A file that previews as garbage or reports zero bytes means its clusters were already reused. Recover in batches and verify your most important files first, so if the scan is interrupted you have already secured what matters most.
FoneLab Data Retriever - recover the lost/deleted data from computer, hard drive, flash drive, memory card, digital camera and more.
- Recover photos, videos, documents and more data with ease.
- Preview data before recovery.
Part 5. Keep Your Photos Safe
- Turn on File History or Time Machine so deleted pictures are never really lost.
- Do not empty the Recycle Bin blindly. Glance inside before you clear it.
- Back up to an external drive and the cloud for the most important albums.
- Install recovery software on a different drive than the one you recover from.
- Save recovered photos immediately to a new backup once they are back.
Once your photos are recovered, the real fix is a 3-2-1 backup habit: three copies of your library, on two different kinds of storage, with one copy offsite. For a personal photo folder, that usually means the originals on the computer, a mirrored external drive, and a cloud archive. Turn on File History or Time Machine and leave it on rather than treating it as a one-off task. When you do recover pictures, open a handful of them to confirm they are not corrupted before you trust the whole batch, then copy them straight onto that external drive so a second accident never costs you the same memories twice.
Part 6. Frequently Asked Questions
Can I recover photos after emptying the Recycle Bin?
Yes, as long as the disk space has not been overwritten. Emptying the bin only removes the file pointers. FoneLab Data Retriever deep-scans the drive and rebuilds the picture files. The faster you act, the better the result.
Will recovered photos keep their quality?
Yes, if the data was not overwritten. Recovery restores the original file bytes, so resolution and quality are unchanged. Use the preview to check for corruption before saving.
Can I recover deleted photos on a Mac without Time Machine?
Yes. If you never set up Time Machine, the Trash may still hold the photos. If it is empty, FoneLab Data Retriever scans the Mac drive directly and restores them, though you should avoid installing it on the same disk.
How long does a photo recovery take?
A quick scan takes a few minutes. A deep scan on a large or nearly full drive can take 15 minutes to over an hour. The saving step after the scan is usually quick.
Deleted pictures are rarely gone for good. Check the Recycle Bin or Trash, look in your backup history and cloud trash, and then use FoneLab Data Retriever for a deep scan. For more, see recovering images from a hard drive.
FoneLab Data Retriever - recover the lost/deleted data from computer, hard drive, flash drive, memory card, digital camera and more.
- Recover photos, videos, documents and more data with ease.
- Preview data before recovery.