Recover the lost/deleted data from computer, hard drive, flash drive, memory card, digital camera and more.
Exceptional and Quick Ways to Recover Data after Partition USB Files
 Updated by Valyn Hua / Dec 12, 2022 09:00
There are countless reasons why people make partitions on their drives. Most of the time, partitioning your drives will help you organize your files. You can separate them on multiple devices. You do not need to create many folders on your current USB drive.
Regardless, partitioning USB drives is quite risky. You may lose some essential files once you perform the wrong troubleshooting steps. Fortunately, there is a data recovery tool to retrieve your files once you lose them in the process. It is the FoneLab Data Retriever. It has excellent features to help you return your partition USB files. If you do not know how to partition your USB or recover deleted data after that, scroll down for the steps.

Guide List
Part 1. How to Partition A USB Properly
To partition the USB drive, you do not need professional skills. You only need to be familiar with the built-in tools of your devices. These tools are the main focus once you start the process. It is better to be knowledgeable about their functions and steps. It is to avoid errors when partitioning your USB. Before you begin the procedure, you need to take note of one thing. Back up your files to prevent losing them permanently. If you are looking for troubleshooting guides, you are on the right page! Below are the steps to partition USB drives on Windows and Mac.
Section 1. How to Partition A USB on Windows
Do you know how to partition a USB on Windows? If not, this is the best method for you. Please follow the steps accordingly to avoid mistakes and errors.
Step 1Using your Windows computer, connect the USB flash drive.
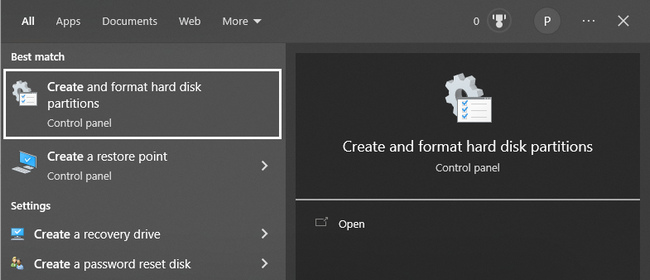
Step 2On the Windows Search Bar, look for its search bar. Once you find it, type in Create and Format Hard Disk Partitions, then launch it. The USB drives that are on your device will appear on the tool. Before proceeding, you can format your drive, depending on your preferred file system. This process will delete the files. It would be best if you ensured that all of your files had backups.
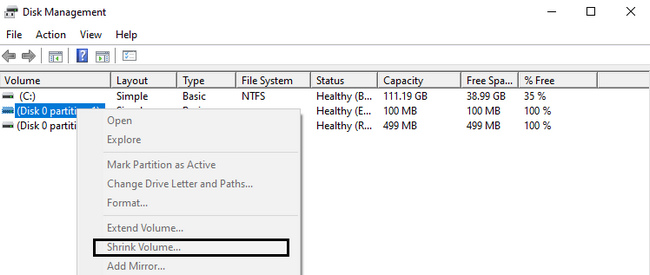
Step 3Right-click the USB drive you will use, then click the Shrink Volume button. Determine the available space for the partition. After that, enter the storage space you want to use and tick the Shrink button. Immediately locate the space that pops up on Disk Management. When you find it, right-click it and tick New Simple Volume.
FoneLab Data Retriever - recover the lost/deleted data from computer, hard drive, flash drive, memory card, digital camera and more.
- Recover photos, videos, documents and more data with ease.
- Preview data before recovery.
Section 2. How to Partition A USB on Mac
To partition USB on Mac, familiarize yourself with the tool you will use. For this reason, you will have a smooth and faster process.
Step 1Insert the USB flash drive you wish to partition to your Mac device.
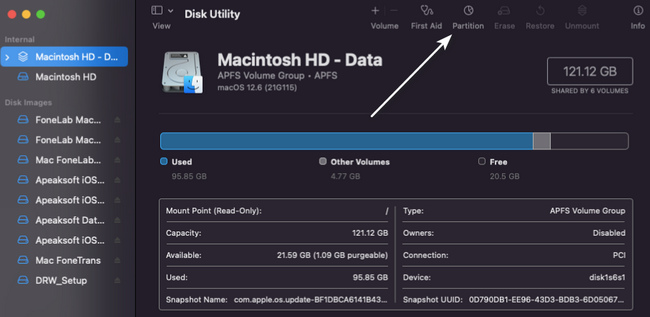
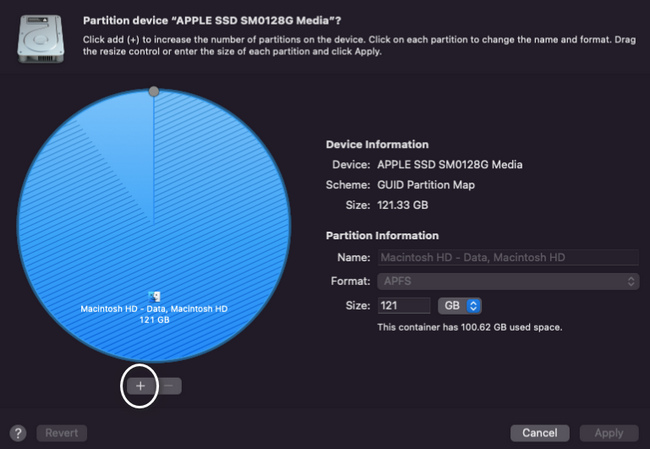
Step 2Locate the Finder on the device, then launch it immediately. On the main interface, look for the tool's search bar on the main interface and type in Disk Utility. Locate the name of the USB drive you want to use. They are located on the left side of the device. Choose the hard drive you prefer, then choose the Partition.
Step 3Click the Partition button once more, then click the Plus Sign > Apply. In this case, it will add the partition to the device. Adjust the size of the partition you made using the device's available storage space. Afterward, rename the USB partition and choose the file system you prefer.
Once you partition the USB drive on your Mac or Windows, check the files. It will help you to know if there are missing files after the process. You can rely on the best data recovery tool below for lost files.
Part 2. Best USB Partition Recovery - FoneLab Data Retriever
FoneLab Data Retriever can retrieve data from a partitioned USB drive. It is not the only recoverable scenario it supports. You can also recover files from crashed PC, Recycle Bin, and more. This data recovery tool will also help you to recover data from external hard drives, memory cards, and more. If this is your first time recovering a partition USB drive, this is the most efficient tool. It has manageable and straightforward steps. It doesn't require any professional skills. You can perform these without the help of anyone to recover data from the multiple partitions on USB.
FoneLab Data Retriever - recover the lost/deleted data from computer, hard drive, flash drive, memory card, digital camera and more.
- Recover photos, videos, documents and more data with ease.
- Preview data before recovery.
Step 1Download the best USB partition recovery by clicking the Free Download button. It is available on both Mac and Windows. You only need to look for the version of the device you are currently using. The device will download the tool for a few seconds. Afterward, it will require you to set it up. Once finished, install the tool, launch it on your device, then run it.

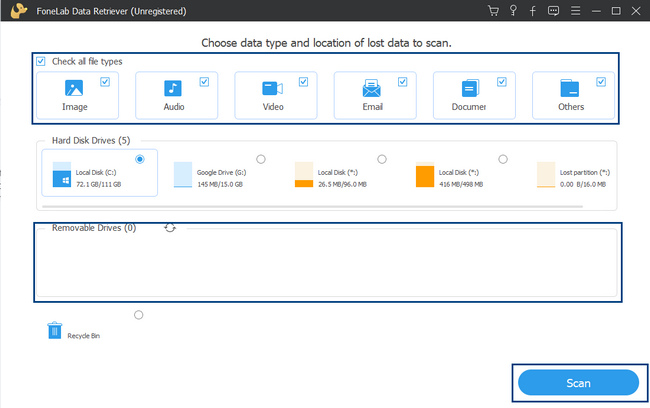
Step 2Since you are looking for files on your partition USB drive, look for the Removable Drives. Look for the name of your drive, then select it. On the top of the data recovery tool, check the boxes of the file types you want to retrieve. After that, click the Scan button and begin the process of locating your lost missing files.
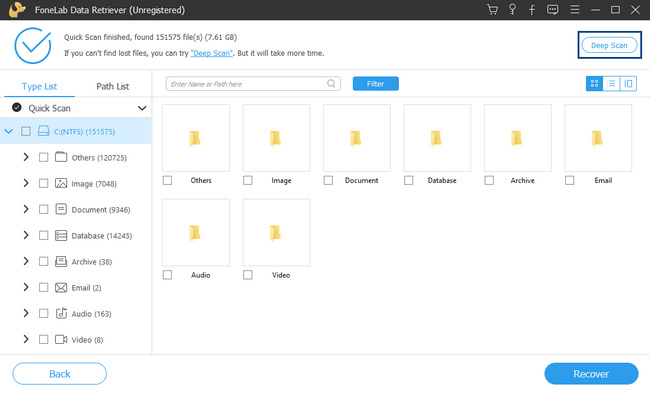
Step 3The scanning process will only last for a few seconds. If the files you want to recover do not pop up, click the Deep Scan button at the bottom right. It will give you results more than what quick scanning showed you. However, it will consume more time.
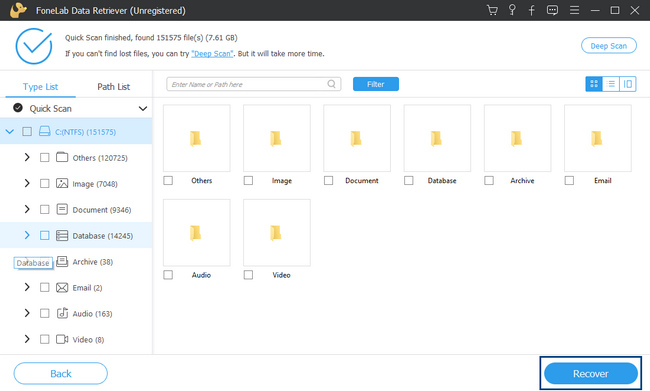
Step 4You will see the procedure's results on the left side of the tool and the folders with the number of data it contains. It will also show you the file system you use. Check the boxes on the right to add them to the files you will recover.
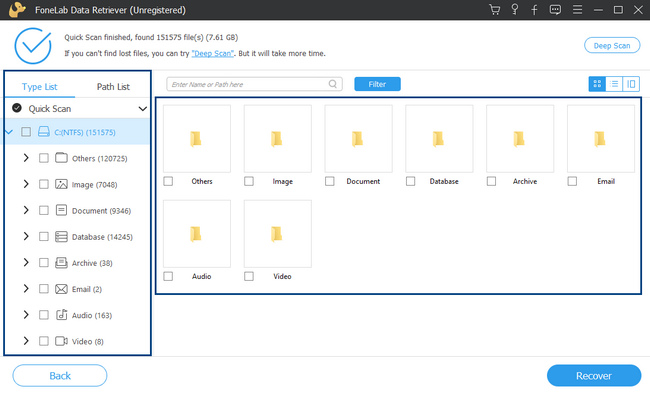
Step 5When you choose the USB partition files, you want to retrieve, click the Recover button. It is located on the bottom part of the tool. Wait for the process to finish. Afterward, look for the USB partition files you recovered on your device.
FoneLab Data Retriever - recover the lost/deleted data from computer, hard drive, flash drive, memory card, digital camera and more.
- Recover photos, videos, documents and more data with ease.
- Preview data before recovery.
Part 3. FAQs about Recovering and Partitioning USB Files
1. Can you remove the partition from the USB on Windows?
Yes, it is possible to remove them. Search for Disk Management on the Start button. Right-click the drive you want to remove partitions, then choose Delete Volume > Yes.
2. How to remove the partition on the USB drive on Mac?
Launch the Disk Utility tool on your Mac. Look for the disk you want to process on the left side, click it, then select the Partition section. Select the partition you want to remove. After that, click the Minus sign and click the Apply button.
It is risky to partition a USB drive because it can lead to missing files. However, you can use FoneLab Data Retriever to recover your lost files if that happens. Another good thing about it, it is available on both Mac and Windows. Want to know more and experience this excellent tool? Download it now on your devices.
FoneLab Data Retriever - recover the lost/deleted data from computer, hard drive, flash drive, memory card, digital camera and more.
- Recover photos, videos, documents and more data with ease.
- Preview data before recovery.