Recover the lost/deleted data from computer, hard drive, flash drive, memory card, digital camera and more.
Trustworthy Ways to Recover Data Using Recuva and Alternatives on Mac
 Updated by Lisa Ou / Dec 06, 2022 10:00
There are lots of data recovery software for Windows. Recuva is one of the leading ones. It has features that can recover different file types, like images, videos, and more. You can also use this data recovery tool for secure deletion. It means that you can delete files permanently that can't be recovered. These features are only available on Windows. It means it will not work on other devices, such as Mac. Fortunately, there is a reliable tool that you can use as an alternative. It is the FoneLab Data Retriever. It is available on both Mac and Windows. Below, you will learn more about Recuva, how it works, and its alternative.

Guide List
FoneLab Data Retriever - recover the lost/deleted data from computer, hard drive, flash drive, memory card, digital camera and more.
- Recover photos, videos, documents and more data with ease.
- Preview data before recovery.
Part 1. What is Recuva
Recuva is one of the tools that you can safely use for your lost files. It has many features for you that you will enjoy. You will not have difficulty using it because of its simple and user-friendly interface. It is the best tool to recover files from hard disk drives or USB flash drives. It is because it supports these devices. Another good thing about this, it works on both NTFS and FAT file systems. In this matter, you do not need to format your hard drives to make them compatible. This tool also has disadvantages, and they are listed below.
- This data recovery software only supports Windows devices. It means it is not possible to use Recuva for Mac. However, you can use an alternative data recovery tool for your Mac's lost data.
- It runs slow when deep scanning the lost files. Although it can give you better results, it will take a lot of time.
- This tool can overwrite the data and files on your device and system.
- There are times when the scanning process might freeze.
The strengths and weaknesses of Recuva are mentioned above. You now have an idea of how it works. It is time to learn how to use it to recover your files on Windows. Scroll down.
FoneLab Data Retriever - recover the lost/deleted data from computer, hard drive, flash drive, memory card, digital camera and more.
- Recover photos, videos, documents and more data with ease.
- Preview data before recovery.
Part 2. How to Use Recuva to Recover Data on Windows
Since Recuva on Mac is unavailable, this article prepares the procedure for Windows. This tool is not hard to use on these devices. It is because the features of Recuva are exclusive only to Windows. This tool must be tricky if you are not knowledgeable about it. It is because there is a lot of information written on the interface. It is not hard to familiarize yourself with it. In this case, you must only read carefully to avoid mistakes in your files. It is better to prevent these mistakes than to lose your files permanently. If you are using Windows, the steps below are for you.
Step 1To use Recuva Data Recovery, click the Download button on their official page. The downloading process will take a few minutes. Set up the tool on your device, and install it for another minute. Afterward, launch the tool on your computer and run it so that you can start recovering your files.
Step 2On the Startup, the tool will ask you a few questions. It depends on you if you want to skip or continue this process. Click the Next button if you prefer to proceed. It will ask for the file type and location.
Step 3On the main interface, you can activate the Deep Scan button. Click the Box beside it and the Start button to begin the search.
Note: Do not interrupt the scanning process of this tool. It would be best if you wait for it until it finishes the operation. It will let you know the progress and estimated time when it will end it.
Step 4The files will appear on the software after the process. You will see boxes beside the file's name on the left side. Check the boxes if you want to recover these files. At the bottom part of the tool, you will see the number of items it found. It will also show you the time it used to scan your lost files.
Step 5You can click Advanced Options on the top right corner of the tool. In this case, you will see the disks on the left side of the device tool. After selecting the data you want to recover, you can tick the Recover button. It will take more time. It is because the tool runs slower sometimes. Once the process is done, you will see the lost files on your Windows device.
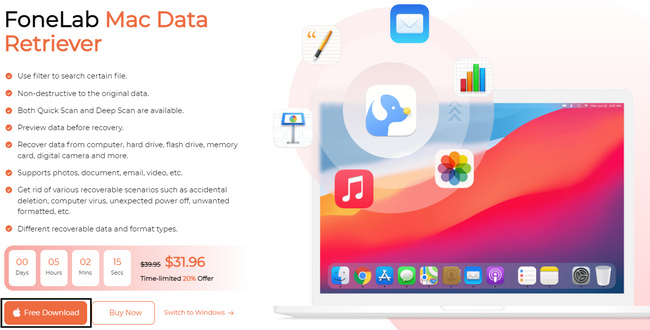
What if you are using Mac? It mentions above that, Recuva Data Recovery is not available on Mac. FoneLab Mac Data Retriever will take place. If you want to use the best alternative for Recuva, move on.
Part 3. Recuva Alternatives on Mac - FoneLab Data Retriever
The best alternative to Recuva is FoneLab Mac Data Retriever. They have similarities in the recovery features and tools, like deep scanning. However, this tool performs deep scans faster than Recuva. Only for a few seconds can you have the result of the process. This tool is available on both Mac and Windows. You do not need any software to make it compatible with other devices.
FoneLab Data Retriever - recover the lost/deleted data from computer, hard drive, flash drive, memory card, digital camera and more.
- Recover photos, videos, documents and more data with ease.
- Preview data before recovery.
For this reason, you will not need to have more storage space. If you are unfamiliar with data recovery tools, this tool is the best for you. It has features that are manageable and easy to use. Follow the steps accordingly to have a better outcome.
Step 1To download FoneLab Data Retriever, click the Free Download button. You will notice it on the left side with the Apple icon. The device will download the tool for seconds, wait for it, and then set it up on your Mac. The installation process will take place after that. Once ready, launch the tool and run it on your device.
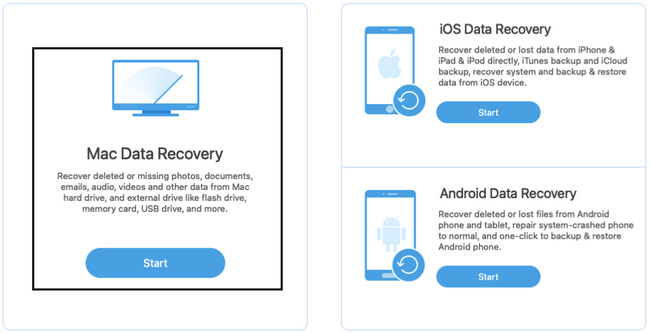
Step 2The tool will ask you to choose the feature you want to use. Since you are using a Mac device, choose Mac Data Recovery. To use this feature, click the Start button under the description.
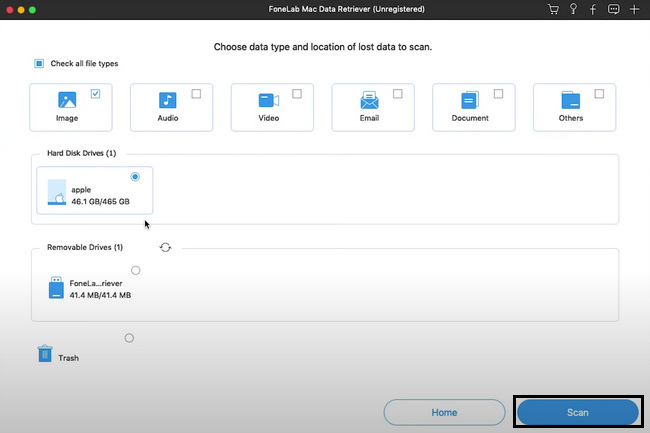
Step 3Inside the Mac Data Recover, you must choose the file type you want to recover. They must be images, audio, videos, and more. You can check the Trash Bin section. It is when you think that there are lost files in your bin. You can also select your drives, such as Hard Drives or Removable Drives.
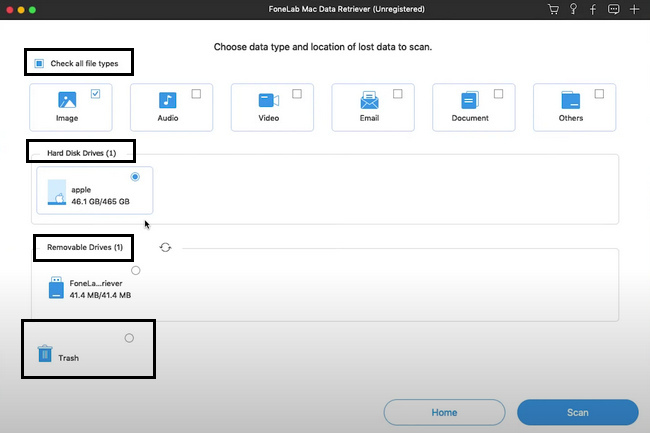
Step 4Now, click the Scan button on the lower corner of the tool. The process will only last for a few seconds. Scanning your files will be the way to see your lost data on your device.
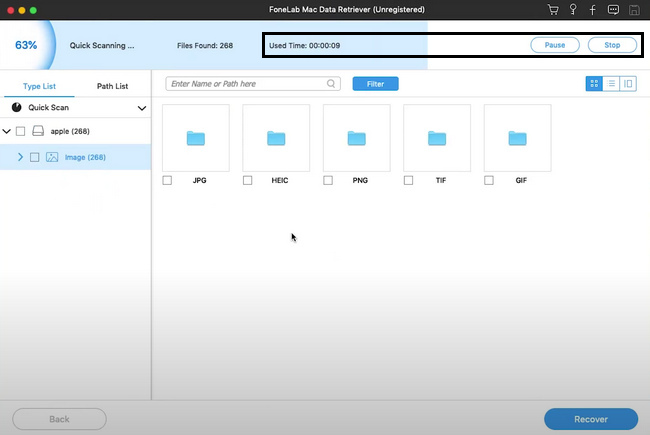
Step 5The lost or deleted files will appear on the tool. If the data you want to retrieve is not on the list, click the Deep Scan button. It will cost more time than the scanning process, but not too much. You will see the duration of the process on the middle-top part of the main interface. However, you also have the choice to Pause or Stop the deep scan process. Click the buttons to perform them.
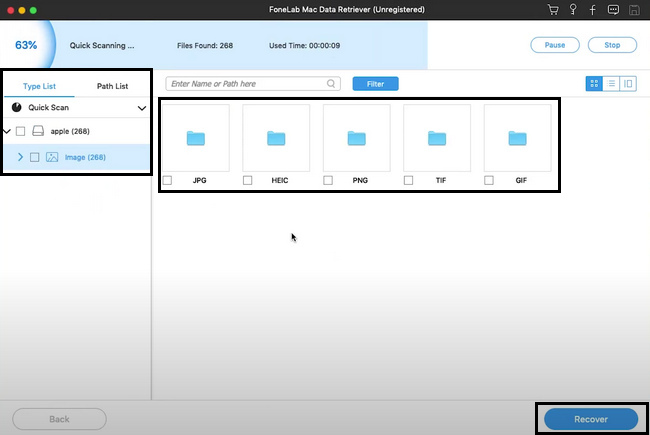
Step 6If the result satisfies you, click the folders you prefer on the left side. Each folder has the data according to its type. Choose them accordingly before you start the process of recovering. To choose them, check the boxes at the bottom of the data. If they are ready to process, click the Recover button to begin the procedure. After waiting to finish, you can now see and locate the files you want to recover.
FoneLab Data Retriever - recover the lost/deleted data from computer, hard drive, flash drive, memory card, digital camera and more.
- Recover photos, videos, documents and more data with ease.
- Preview data before recovery.
Part 4. FAQs How to Recover Data Using Recuva
1. Is Recuva secure for my information?
Absolutely, yes! Recuva is well-known for its safety on your files. It has features that will surely secure your files. For this reason, you will not need to worry about your data. All you need to do is to perform the steps correctly to achieve the best outcomes.
2. Is Recuva safe and legit?
Some users doubt this data recovery tool. It is because it offers limitless recovery for its free trial. However, yes, it is safe and legit. There is nothing to worry about because it is still one of the reliable tools.
3. Can Recuva recover on a USB flash drive?
Yes, you can recover using Recuva on a USB flash drive. Aside from that, it can also recover files from an mp3 player, recycle bin, and more. To experience this tool, download it now and utilize it!
Recuva is a tool that you can use for recovering data on Windows. If you are using Mac, it is impossible to use this tool. FoneLab Mac Data Retriever is the best alternative. It has the features that Recuva contains. To explore these two reliable data recovery tools, read this article and download them now on your devices.
FoneLab Data Retriever - recover the lost/deleted data from computer, hard drive, flash drive, memory card, digital camera and more.
- Recover photos, videos, documents and more data with ease.
- Preview data before recovery.