Recover the lost/deleted data from computer, hard drive, flash drive, memory card, digital camera and more.
Downgrade to Catalina and Others: 2 Efficient & Effective Techniques
 Updated by Lisa Ou / July 13, 2022 09:00
Apple continually wants to improve the performance of its devices, including the Mac, by upgrading its operating system. Updating OS can indeed help you fix some bugs and add new features to your computer. However, some users regretted updating their macOS because they experienced unresponsive systems or apps. Others simply prefer the previous or earlier version of their OS. Whatever the reasons, it is a good thing you are here. This post teaches how to downgrade from Catalina to Mojave or any other versions. Finally, you will know you can recover your data after downgrading your OS on your Mac computer.

Guide List
Part 1. Check The macOS Version Of Your Mac Can Run
Knowing what macOS versions can run on your Mac computer is essential. Although Apple releases a new version of macOS every year, not all of these versions support and are compatible with every Mac. It can be a bit challenging to discover it.
FoneLab Data Retriever - recover the lost/deleted data from computer, hard drive, flash drive, memory card, digital camera and more.
- Recover photos, videos, documents and more data with ease.
- Preview data before recovery.
To check the macOS version you can use for your Mac, first know which Mac device you have. Do not worry. You will not check any technical specifications, like model numbers or anything like that. Instead, it depends upon the actual model name and year of your Mac computer to determine the macOS version you can run. To know what is your computer model name and year, follow these steps:
Step 1Go to Apple Menu.
Step 2Then, select About This Mac from the list. And, you’ll see the model name and year of your Mac.
Step 3Finally, find and search on the internet what macOS versions of your Mac it is compatible with. And that’s it!
When you’re done checking what version can support your Mac, learn how to downgrade macOS after being tempted to update its operating system, especially if you prefer the previous or the earlier macOS version, move on to the following parts of this post.
Part 2. How to Downgrade macOS from Time Machine Backup
The first approach you can try is to downgrade macOS through the Time Machine backup. Instead of formatting your device, you can simply restore your Mac using this tool. But, note that it will completely erase the startup disk although you are restoring your Mac from a Time Machine backup. Thus, any photos, music, or work you’ve done and downloaded after making the initial backup will be wiped. To prevent this, make sure you’ve backed up everything you want to keep.
And here’s how to downgrade from Catalina to High Sierra, or Big Sur to Catalina, and more using a Time Machine:
Step 1Firstly, plug the Time Machine disk into your Mac.
Step 2Next, restart your Mac computer. To do it, press and hold Command + R until the Apple logo appears on your screen.
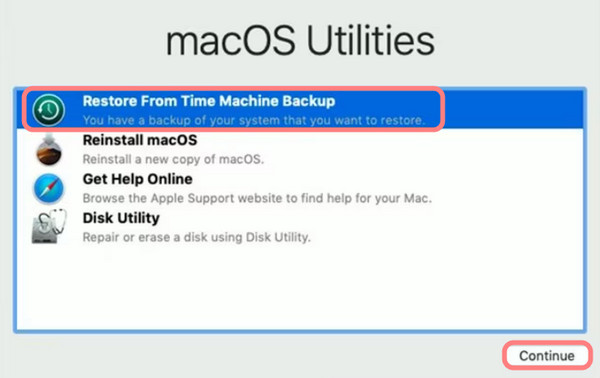
Step 3After which, when the Recovery Mode loads, select Restore from Time Machine Backup and hit Continue.
Step 4Then, choose a disc that holds your Time Machine backup.
Step 5Now, the following screen will show you all the backups. Finally, select the last one you made before updating to the newer macOS version. There you have it!
After completing the steps above, your Mac computer should be prepared to go with the downgraded macOS version.
FoneLab Data Retriever - recover the lost/deleted data from computer, hard drive, flash drive, memory card, digital camera and more.
- Recover photos, videos, documents and more data with ease.
- Preview data before recovery.
Part 3. Downgrade from Big Sur to Mojave via Downloaded macOS Version
Before the release of the macOS Mojave version, Mac users are allowed to download the older version directly through the App Store. But this is no longer possible with the updated App Store of the Mac. Yet, they can still be downloaded through Apple’s Support Website. When you have the macOS installer downloaded on your Mac, use it to create a bootable disk, and then you can reinstall macOS.
For this method, you need a 16GB or larger external hard drive or USB drive and a formatted one. Then, create an installer for the older macOS version. To do it, here’s how:
Step 1Plug in the formatted external hard drive or USB drive.
Step 2Next, run the Terminal on your Mac. Then, you’ll need to enter a command according to the version of Mac you are using. If you are to replace Big Sur with the macOS version like Mojave, use the command below.

Step 3Finally, it will create an installer with the name Untitled that you can use as a bootable disk. And that’s it!
When downgrading a macOS version, there’s a high possibility you may experience a loss of data. In the next part, we have introduced the tool that can help you recover your data after downgrading.
Part 4. How to Recover Data After Downgrading macOS with FoneLab Mac Data Retriever
If you lost your data after downgrading your macOS, don’t sweat it! You can still retrieve your file selectively and safely with FoneLab Mac Data Retriever. It is the most excellent and professional Mac data recovery tool. Even after downgrading your macOS, you can restore almost all types and formats supported by the tool. It also offers you two ways to scan your data: Quick Scan and Deep Scan. Not just that, you can scan and recover files from a hard drive, flash drive, or memory card, including the Disk Utility.
FoneLab Data Retriever - recover the lost/deleted data from computer, hard drive, flash drive, memory card, digital camera and more.
- Recover photos, videos, documents and more data with ease.
- Preview data before recovery.
Here is the complete tutorial to recover data lost and deleted files from the erased Mac hard disk:
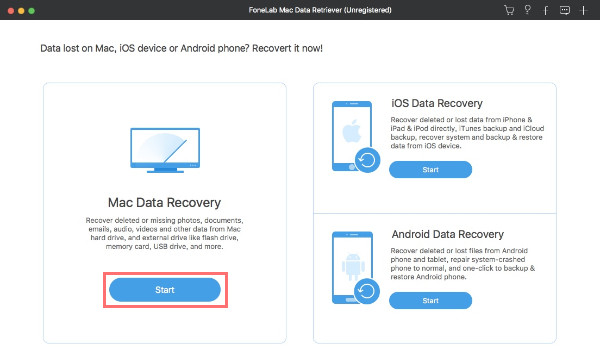
Step 1First off, download and install FoneLab Mac Data Retriever on your Mac computer. Then, launch the tool. Ensure you have downloaded the right version for your device.
Step 2After which, on the main interface, select and click Mac Data Recovery.
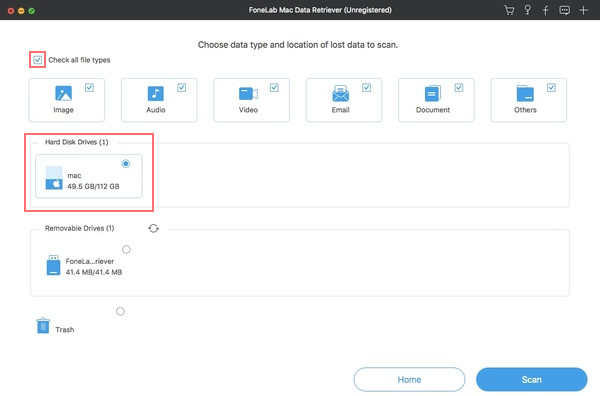
Step 3Next, choose the data type you want to recover. When you’re done selecting, pick your Mac system hard drive under the Hard Disks Drives. Then, hit the Scan button.
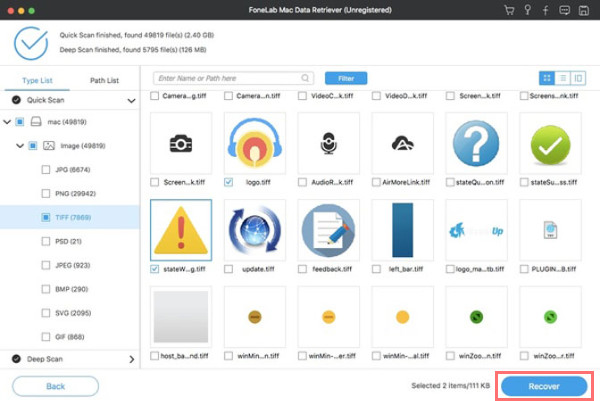
Step 4Once the tool is finished, all your files and folders will show in the categories. Then, you can open these folders to find your existing, lost, and deleted data. If you can’t find them, try to type the file name and path in the Search engine.
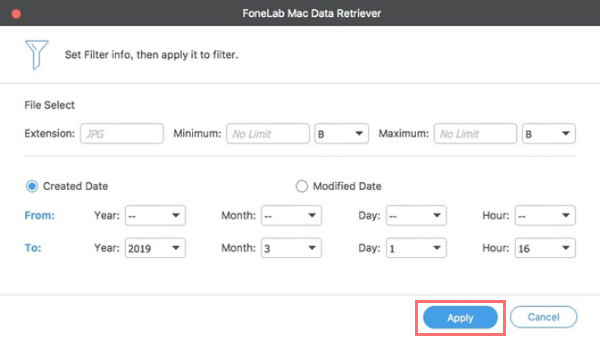
Also, you can use the tool’s filter function to set the extension's filter information data and modified data. And tick the Apply button to find all the related data easily.
Step 5Last but not least, hit the Recover button to begin restoring your files from a downgraded macOS version. And there you have it!
FoneLab Data Retriever is indeed the best program you can use to retrieve your important data from your computer and other external drives or devices. Data loss will never be a problem when upgrading or downgrading macOS.
Part 5. FAQs About Downgrading macOS
1. Does downgrading macOS will delete everything?
Yes. When downgrading macOS, you will surely lose everything on your computer. That is why it is essential to backup everything from your computer before downgrading your macOS.
2. Is it bad to downgrade my computer's current version of macOS?
Actually, when you downgrade the latest version of your operating system on Mac, you will not find or will not cause any visible issues right away. But as time passes, you might find your computer performs poorly while using your Mac with a downgraded macOS version. It isn't bad. However, it may cause errors over time.
In conclusion, upgrading macOS software is beneficial to ensure that your Mac stays secure and can give you new and cool features. But still, some problems may occur, and they might frustrate you. Whenever you want to downgrade macOS on your computer, the techniques mentioned here can help you achieve your needs. Also, with the assistance of the professional tool – FoneLab Mac Data Retriever, recover your data after downgrading effectively and efficiently.
FoneLab Data Retriever - recover the lost/deleted data from computer, hard drive, flash drive, memory card, digital camera and more.
- Recover photos, videos, documents and more data with ease.
- Preview data before recovery.