[4 Simple Ways] How to backup iPad - iPad Guides
 Posted by
 Hi! How do I backup my iPad? I have important data on my device and want to ensure the date safely. Please help with it! Thanks!
Regular backups ensure that you can restore all of your critical information if you have to. And if you ever decide to replace your current iPad with a new model, backups make it easy to transfer information to your new device without time-consuming setup.
You can use iTunes to backup iPad to your local computer or iOS Data Backup & Restore software to backup iPad. Or you can backup directly to the cloud via your iPad. One method is not inherently superior to the others, it all depend on your preferences. We’ll show you how to backup iPad by using these three iPad backup ways.


Guide List
Part 1. How to Backup iPad to iCloud
iCloud securely stores your photos, videos, documents, music, apps, and more. And keep them updating cross all your devices. It lets you easily share photos, calendars, locations and more with friends and family. You can even use iCloud to help you find your device if you lose it.
After you set up iCloud on your iOS device or Mac, sign in your iCloud on your other devices and computers using the same Apple ID, you only need to do this once. After that, the changes you make on one device appear on all your other devices. For example, if you create a new album in Photos on your Mac, the album automatically appears in Photos on iCloud.com on Mac and Windows browsers, your iOS devices, your Apple Watch and your Apple TV.

You can backup your iPad with iCloud via a Wi-Fi connection. The process is simple, but you’ll want to make sure you have enough space in your iCloud account to accommodate your backup, and that you are signed into your iCloud account before getting started.
To backup iPad to iCloud, we should turn on our Wi-Fi connection on iPad first. Follow the steps below to turn on the Wi-Fi connection.
Step 1 Unlock your iPad, launch Settings app from your home screen. The Settings app icon is gray and looks like gears.
Step 2 Tap Wi-Fi and then tap the Wi-Fi On/Off switch. You'll want the switch to be green.
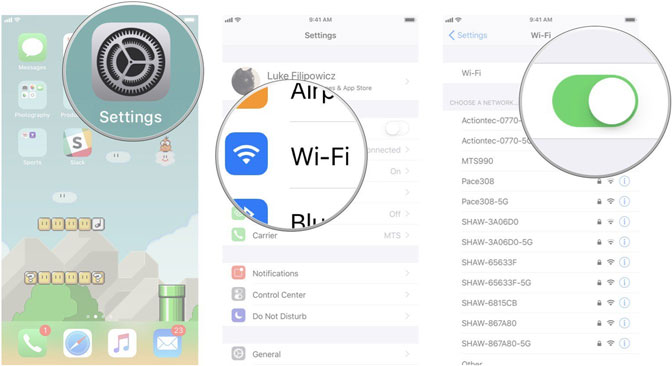
Step 3 Tap on the network you want to join. Then type in the network password. If the network has no password you won't need this step.
Step 4 Tap Join. Provided you enter all the right information, you will now be connected to the particular network you wanted to use.
After turning on the Wi-Fi, we can start to backup iPad to iCloud.
Option 1. iCloud Backup
Step 1 Tap Settings on the iPad Home screen. In the left panel, tap your name.
Step 2 Scroll down and tap iCloud.
Step 3 Turn on the iCloud Backup toggle switch.
Step 4 Tap Back Up Now for an immediate backup. Stay connected to your Wi-Fi network until the process completes.
With this setting, your iPad will automatically backup wirelessly daily whenever the iPad is connected to Wi-Fi, plugged into a power source, and is locked. All the data is stored in your iCloud account.
Option 2. iCloud Sync
Besides making a full backup file, you can also use iCloud sync to save a copy of your desited date type and then you can access them on any device with the same Apple ID. Go to Settings > your name > iCloud. Tap the data you want to backup and toggle on the button.
Option 3. iCloud Drive
As you know, cloud service is a helpful option to backup data. You can upload your data to cloud service and download them any time when you need them. iCloud has a cloud service called iCloud Drive to do the same thing. You can open the Files app on your iPad and upload your data for backup.
But you should make sure that you have enough available space in iCloud for the backup. iCloud comes with 5GB of storage for free, but most users will quickly eat that up. Fortunately, plans start at just $0.99 for 50GB of storage.
Tips: If you want to know how to restore iPad data from iCloud backup, you can refer to restore iPad from iCloud backup.
Part 2. How to backup iPad to iTunes/Finder/Apple Devices
iTunes is a piece of software that lets you add to, organize and play your digital media collection on your computer, as well as sync it to a portable iOS device. It's a jukebox player along the lines of Songbird and Windows Media Player, and you can use it on a Mac or Windows machine.
The most significant difference between iTunes and some other media players is the built-in iTunes Store where you can get podcasts, iPad apps, music videos, movies, audiobooks and TV shows.

Of course, through iTunes we can also sync the media resources we purchased on the iPad to the computer for backup.
And now, earlier iTunes has been replace by Finder or Apple Devices to manage your data in the same way. Please check detailed steps below.
Step 1 Connect the iPad to a computer using a USB cable. If iTunes/Finder/Apple Devices doesn't open automatically, open it.
Step 2 Tap the iPad icon in the upper-left corner of the iTunes/Finder/Apple Devices window to open the iPad Summary/General screen.
Step 3 In the Backups section, we can select buckup to This Computer or iCloud.
Step 4 Optionally, if we choose This Computer, we can select Encrypt local backup to generate a backup that includes account passwords, and data from the Health and HomeKit apps. This backup is password protected.

Step 5 Select Back Up Now to make a backup.
Step 6 Verify the backup is complete by checking the date under Latest Backup.
Step 7 In the Options section, select Automatically sync when this iPad is connected.
Part 3. How to backup iPad with iOS Data Backup & Restore
In addition to backing up the iPad to iCloud and iTunes/Finder/Apple Devices, we can also use FoneLab OS Data Backup & Restore for iPad backup.
With iOS Data Backup & Restore, we can backup our data on iPhone, iPad or iPod touch with one click. and choose the file path on your computer and the software won't modify or overwrite your old backups.
- Backup and restore iOS data to your PC/Mac easily.
- Preview your data before backup or restore your data: Preview data in detail before you restore data from backups.
- Backup & Restore your data selectively: Backup and restore iPhone, iPad, and iPod touch data selectively.
FoneLab enables you to backup and restore iPhone/iPad/iPod without data loss.
- Backup and restore iOS data to your PC/Mac easily.
- Preview data in detail before you restore data from backups.
- Backup and restore iPhone, iPad and iPod touch data Selectively.
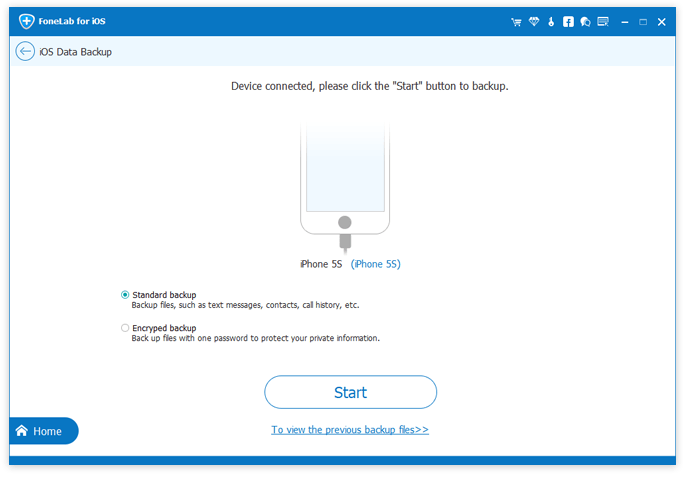
Step 1 Download and install iOS Data Backup & Restore. This software will launch automatically once the process completes. Choose iOS Data Backup & Restore from the interface, which can backup any iPhone/iPad/iPod data and restore data to iOS device/PC.
Step 2 Connect your iPad to the computer. If your iPad is connected to your computer for the first time, there will be a trust window pop up, tap Trust on your device home screen if it pops up.
Step 3 Choose iOS Data Backup option. After that, choose Encrypted backup if you want to protect your backup files with password. Or just select Standard backup to move on.
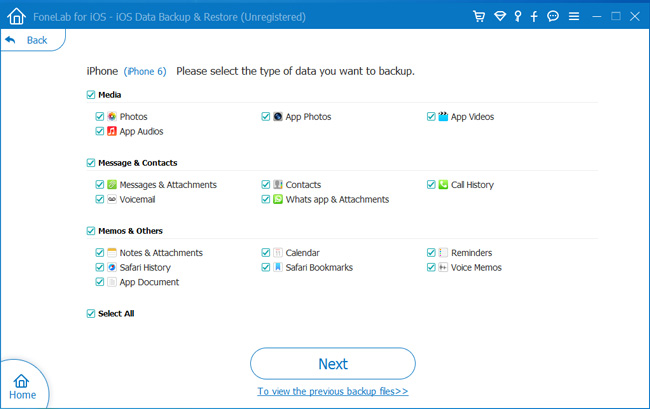
Step 4 Select the type of data you want to backup. If you want to backup all data, tick the box next to the Select All option on the bottom-left. And then click Next to begin.
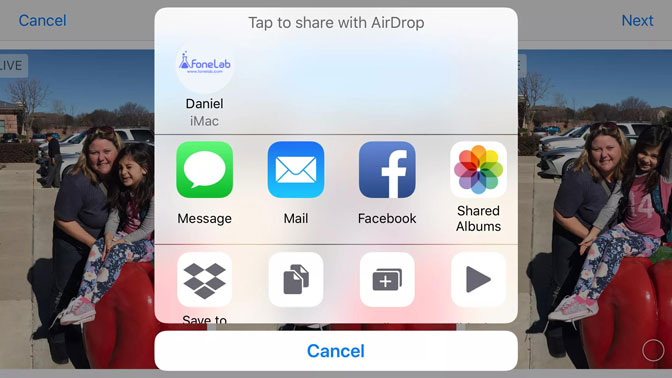
Part 4. Backup iPad with AirDrop
AirDrop is an ad-hoc service, which enables the transfer of files among supported Macintosh computers and iOS devices over Wi-Fi and Bluetooth, without using mail or a mass storage device. That means we can use AirDrop to share content from iPad to Mac for backing up iPad.
Step 1 On computer, choose Go > AirDrop from the Menu bar in the Finder. Or select AirDrop in the sidebar of a Finder window.
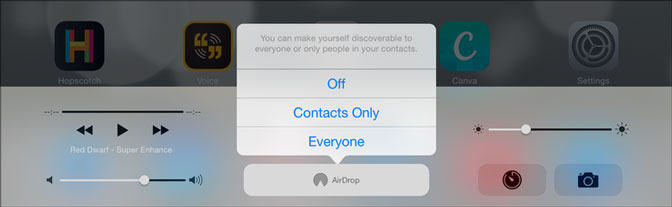
On iPad, swipe up from the bottom of the screen or swipe down from the top-right corner of the screen to launch Control Center and turn on Bluetooth and Wi-Fi option. Tap on AirDrop. Choose who can send things to you through AirDrop by tapping Off, Contacts Only, or Everyone.
Step 2 Open the file that you want to send, tap Share button. Or control-click the file in the Finder, then choose Share from the Shortcut Menu.
Step 3 There are several sharing options in the Share menu. Choose AirDrop. Select a recipient from the AirDrop sheet. The content is automatically sent to that device.
Part 5. Comparison of Backup iPad
| Comparison Dimension | Part 1. iCloud Backup | Part 2. iTunes/Finder/Apple Devices | Part 3. FoneLab iOS Data Backup & Restore | Part 4. AirDrop |
|---|---|---|---|---|
| Backup Data Types | App data, device settings, home screen layout, messages, photos (if iCloud Photos off), ringtones, purchase history | Everything (full snapshot of device), including encrypted passwords/health data if backup password set | Selectable (contacts, messages, photos, videos, WhatsApp, call logs, notes, calendars, Safari bookmarks, etc.) | Individual files only (photos, videos, documents, links, locations) |
| Entire or Selective? | Entire device backup only (cannot select individual items) | Entire device backup only (cannot select individual items) | Selective (choose exactly what to back up) | Selective (manual file-by-file transfer) |
| Internet Required? | Yes (Wi-Fi required for backup) | No (uses USB cable) | No (uses USB cable) | Yes (Wi-Fi and Bluetooth) |
| Computer Required? | No (backup to cloud) | Yes (requires Mac/PC with iTunes/Finder) | Yes (requires Windows PC or Mac with software installed) | No (device-to-device) |
Part 6. FAQs about How to Backup iPad
How do I know if my iPad is backed up?
It depends on the methods you used to backup iPad. You can commonly follow the steps to backup your device to access your backup data to confirm if your iPad is backed up.
Does your iPad need to be backed up?
If you want to keep your data on iPad safe, you need to backup iPad. If not, you can ignore it.
Conclusion
Through the above four commonly used IPad backup methods, we can successfully backup iPad. At the same time, we also recommend you to backup frequently or regularly, which is a very good habit for saving data.
If you want to restore iPad data from backup, you can refer to this article: Way to extract iPad backup. This article has methods and detailed steps to restore iPad data from backup.
FoneLab enables you to backup and restore iPhone/iPad/iPod without data loss.
- Backup and restore iOS data to your PC/Mac easily.
- Preview data in detail before you restore data from backups.
- Backup and restore iPhone, iPad and iPod touch data Selectively.