Top 4 Techniques on How to Record Screen with Audio on Mac
 Posted by Lisa Ou / Nov 07, 2023 16:00
Would you like to know the techniques to screen record Mac with internal audio and external? If so, you must be aware of the advantages you can get if you learn this function. By recording your screen with audio, you will easily obtain copies of videos you wish to save to your Mac. For instance, you can screen-record social media videos, allowing you to revisit them anytime. On the other hand, you may be in the middle of a meeting but are too busy to take in all the details. Hence, recording it on your computer to review later will greatly help.
However, if you only install and use random screen recorders online, the result might not go according to plan. Some of them may not have the features you need, like the capability to record with audio. Hence, you must be meticulous in choosing the screen recorder you will use on Mac. Lucky for you, though, you have stepped inside this article, which contains the leading programs and features for recording your Mac screen with audio. Kindly move ahead to the following content to obtain their information and the guidelines that will assist you.


Guide List
Part 1. Screen Record on Mac with Audio with FoneLab Screen Recorder
At the top of our list is the Fonelab Screen Recorder. It is a third-party recording tool that lets you document your activities on the Mac with audio, whether internal or external. Hence, you can record your screen with your system sound, microphone, or both, unlike others that limit what you can capture. It also offers bonus functions you can utilize while recording, like taking snapshots. It even lets you adjust the recording size depending on your preference.
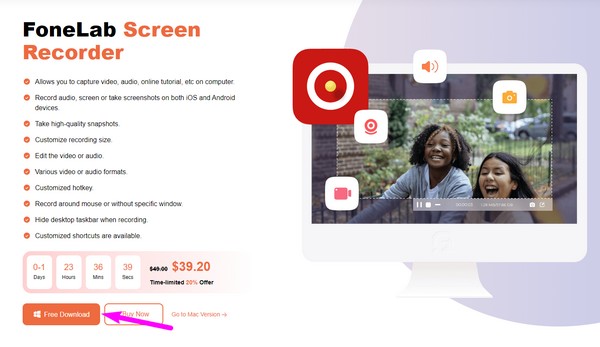
FoneLab Screen Recorder allows you to capture video, audio, online tutorial, etc on Windows/Mac, and you can easily customize size, edit the video or audio, and more.
- Record video, audio, webcam and take screenshots on Windows/Mac.
- Preview data before saving.
- It is safe and easy to use.
Meanwhile, FoneLab Screen Recorder doesn’t only offer the usual screen recorder. It also has a specialized recorder for a window, webcam, and audio. This way, you can directly capture the content you like, if it is on a window, without adjusting the recording size.
See the following procedure underneath as an example to screen record on Mac with internal audio using Fonelab Screen Recorder:
Step 1Enter a browser on your Mac and proceed immediately to the FoneLab Screen Recorder page. On the lower left portion of the screen, hit Free Download to save the installer in your Downloads folder. After that, open it and drag the tool’s appearing icon to the Applications folder. Finally, launch it to utilize on your Mac.
Step 2Hit the Video Recorder on the prime interface’s leftmost side once the tool runs. You will then see the recording options on the following screen, so modify them depending on your liking. Also, be sure to enable System Sound or Microphone for audio.
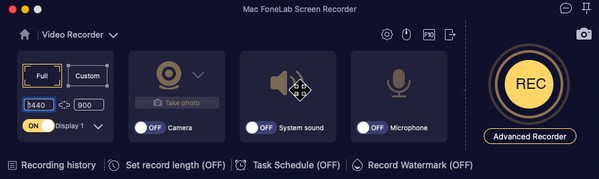
Step 3Once everything is set, click REC on the right to begin recording the screen you want to capture. A bar containing the stop, pause, etc., options will be displayed, so use them accordingly.

Part 2. Screen Record on Mac with Audio via QuickTime
QuickTime, on the other hand, is a player built into Mac computers. Its main advantage is that it comes with other useful features, like screen and audio recorders. Hence, you are free to access it on your Mac, and it doesn’t require a download process since it’s pre-installed. But the thing is, it can only record external audio, and you may encounter difficulty setting it up on your first use, as there are some extra codecs you might still need to install. Moreover, compared to the previous recorder, QuickTime lacks beneficial features, and the recordings are only limited to MOV format.
Act according to the secure process below to use the screen recorder on Mac with audio, QuickTime:
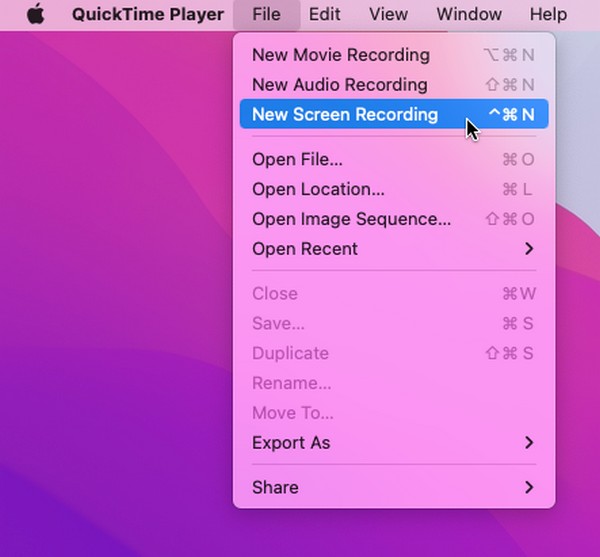
Step 1Open your Mac QuickTime by clicking its icon on Launchpad or using the Spotlight search. Once active, hit the File button next to the QuickTime Player tab at the top, then choose New Screen Recording from the pop-up menu.
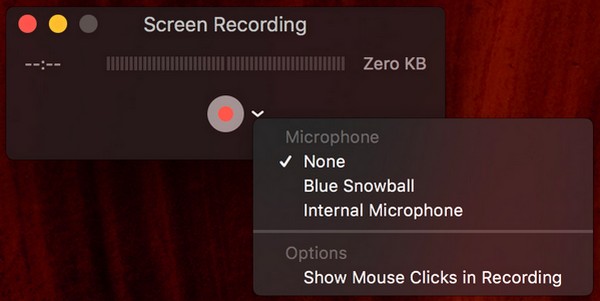
Step 2When the screen recording window materializes, click the down arrow icon to check the Internal Microphone option. Afterward, hit the record button in the middle to begin recording your Mac screen with audio.
FoneLab Screen Recorder allows you to capture video, audio, online tutorial, etc on Windows/Mac, and you can easily customize size, edit the video or audio, and more.
- Record video, audio, webcam and take screenshots on Windows/Mac.
- Preview data before saving.
- It is safe and easy to use.
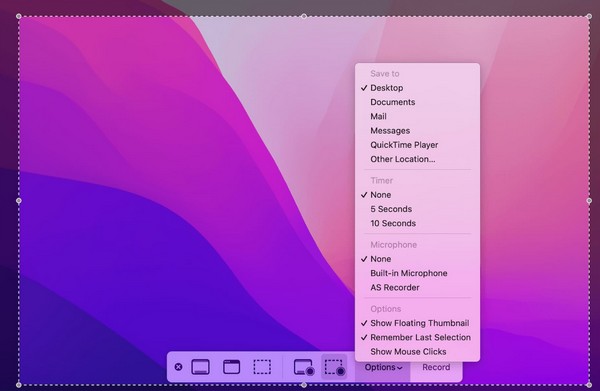
Part 3. Screen Record on Mac with Audio through Screenshot Toolbar
The Screenshot Toolbar is another built-in feature on Mac that has the ability to record your screen. It is the easiest and most accessible recording method on a Mac since it only takes one keyboard shortcut to launch it. However, you may also find it the most limited, as its functions are only for basic use. For instance, it only includes sounds from the microphone whenever you record the screen. Thus, you won’t be able to screen record with the internal audio using this feature. It will only pick up the sounds on the mic.
Go along with the safe instructions below to record screen audio and video on Mac through the Screenshot Toolbar:
Step 1On your Mac keyboard, press Cmd + Shift + 5 for the Screenshot Toolbar to be revealed on the screen. After that, select the Options tab to select your preferred microphone option.
Step 2Once finished, see the toolbar again and hit the record button to record your screen. You may choose either the button for the entire or partial screen recording.
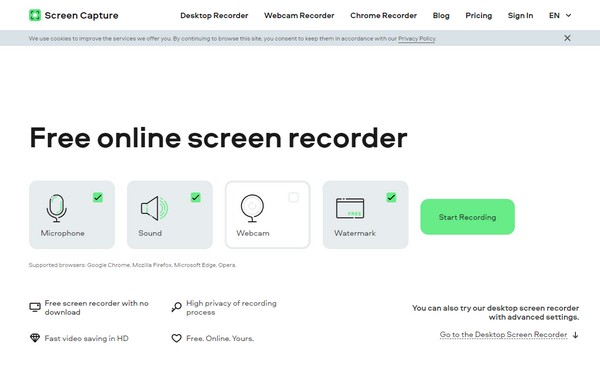
Part 4. Screen Record on Mac with Audio Online
There are also available online programs for screen recording with audio on a Mac. One of them is the free online screen recorder, Screen Capture. Unlike the previous tool, this one supports recording a screen with audio from both system sound and microphone. It is also hassle-free to navigate because of its page’s clean interface. But you must have a stable internet if you choose this method. Since it’s an online tool, it requires a strong connection that won’t cause an interruption in the recording.
Mind the comfortable steps underneath to record Mac screen with internal audio online:
Step 1Access screencapture.com and direct to its online screen recording page. You will then see the options it offers, so manage them accordingly.
Step 2Check the Microphone, Sound, or both for the audio, then finally, hit the Start Recording tab on the right side to record your Mac screen with audio.
FoneLab Screen Recorder allows you to capture video, audio, online tutorial, etc on Windows/Mac, and you can easily customize size, edit the video or audio, and more.
- Record video, audio, webcam and take screenshots on Windows/Mac.
- Preview data before saving.
- It is safe and easy to use.
Part 5. FAQs about Screen Recording on Mac with Audio
1. How to record Mac screen with internal audio?
Use one of the screen recorders we have listed in this article. The methods that support internal audio are the FoneLab Screen Recorder in Part 1 and the online tool in Part 3. See their information and guidelines above to be assisted in recording your Mac screen with internal audio.
2. Why is there no audio on my QuickTime screen recording?
You may not have set up the Microphone option on QuickTime when you began recording. For your videos to have audio, ensure to click the down arrow next to the record icon and handle the Microphone options. This way, your screen recordings will have sounds when you play them on Mac.
Screen recording indeed provides various advantages on a Mac. Thus, we chose the most effective recorders in this article for you to rely on. Try them now!
FoneLab Screen Recorder allows you to capture video, audio, online tutorial, etc on Windows/Mac, and you can easily customize size, edit the video or audio, and more.
- Record video, audio, webcam and take screenshots on Windows/Mac.
- Preview data before saving.
- It is safe and easy to use.